The Birth of an Open Source Project
My consulting firm uses Nessus and Snort extensively. We use the ACID management tool to manage our network intrusion detection systems. We needed a similar tool to manage our Nessus scans. Even though NPI offered some very nice capabilities, it still didn't quite meet the needs of our organization. We wanted to be able to initiate scans from the Web interface, rather than just view the past results. We also found the need to do the manual importing of each scan arduous and time consuming. We have dozens of scans that need to be run at any given time, and because they typically belong to different organizations, they need to be tracked separately. What we really wanted was a tool that would manage our different scan's configurations, schedule them, run them automatically, and import the results into the appropriate database.
We were not able to find an open source tool that matched all these needs, so we were faced with the alternative of finding a commercial product to meet our needs or developing one in-house. However, even the commercial vulnerability scanners didn't quite offer what we needed in terms of scheduling and keeping track of different client's scans. Obviously writing a new vulnerability scanner from scratch would have been both cost and time prohibitive. So we explored the idea of developing our own add-on module to Nessus as an open source project. We went through a decision process to determine if it made sense. If you are thinking of writing your own open source program, you should do the same, taking the following factors into consideration.
Is There Something Already Out There?
First, search the Web to see if there is anything that already does what you need to do. Look at places like Sourceforge.net and Freshmeat.net, and use Google and other search engines. There is a good chance that something already exists to solve your problem. If you find something that is not quite exactly what you need, you could use it as a starter or a helper in building your program, as we did with NPI. Even if nothing exists, you might find some FAQs or sites with helpful information for your project. Also, during your explorations, you might find some people with the same problems willing to contribute to your project. Before you know it, you could have several programmers willing to help you.
Is There a Broader Need for Your Program?
If the problem you are solving is a specific niche problem for your company, it may not be worth going through the trouble to open source it. Drop a few messages on relevant message boards to see if there is any interest. If nobody else wants it, you may just want to keep it as an in-house development project. However, even in the smallest industries there are usually similar needs for applications, and the Internet has made the world a smaller place. Think of all the times you went searching for something obscure and found it, because someone on the Web thought it was worth releasing. So if there's any interest, make it open source!
Do You Have Permission to Release Code as Open Source?
If you are doing this as part of your duties for an employer, make sure they will allow you to release the source code. If it's part of a larger proprietary program, then it's doubtful that they will want it open sourced. However, if it's a stand-alone program and they see the benefits of peer review and additional contributors as well as free advertising, there is a good chance that your employer won't mind. Just check before you start posting code, if you value your job.
We went through this process and decided that for all the reasons above, it was worth developing our own add-on to Nessus as an open source project. We called this program Nessus Command Center (NCC) and this is the debut of that program in print.
The genesis of NCC was our need to create a management tool to automate our scans and better analyze the results. The NPI tool described earlier does a pretty decent job of importing Nessus data into a database, but it doesn't address the scheduling issue and the interface left something to be desired. Rather than reinventing the wheel, we used parts of NPI for our Web interface and added on a management and scheduling module. Our goals in the project were as follows.
A management platform for Nessus scanning. We needed a tool for keeping track of scans for different companies with different configurations and even different groups of companies. As a consulting firm, we deal with many different firms. We even have resellers ordering scans for companies using our infrastructure. We wanted a way to manage all these different entities and keep them separate, yet giving us a control panel to globally manage all of them easily. A scheduling database and interface for Nessus. The first goal was to develop a way to catalog our scan information, schedule the scans, and automatically run them. We wanted the ability to keep track of different entities, because the scans would belong to many different companies. There would be an administrator level for us to create and schedule the scans, and the possible capability in the future for clients to go in and modify certain parts of their scan configuration, such as time, hosts to scan, and so on. The database would need to have a Web-based interface, since we would have customers and agents outside our firewall accessing the system to configure their scans. A database interface for Nessus results. This goal was already partially achieved in the NPI program, but we wanted to improve the interface, which was rudimentary and didn't allow, for example, multiple users and levels of access. We planned to use NPI as our template for this part of the program. And given that NPI is GPL and our program would be GPL this wouldn't be a problem. A Web interface for setting all Nessus options. This was really an optional feature rather than a must-have for us. In studying the problem, we found that most of the scans we ran used only about five different configurations. However, it would be nice to be able to configure all the possible Nessus scan options right from the Web, without having the Nessus client loaded. This would allow us to input a scan directly from a customer's office or anywhere offsite. We looked around and found another open source project called Inprotect that was offering a Web interface for Nessus. The code was released under the GPL, so we could use this code as a guideline for our efforts in this area. Due to the more complicated nature of this task, we decided that this feature would not be in the beta release.
Platforms for NCC
From the very start, we decided we would write our program for the series of platforms known as LAMP (Linux, Apache, MySQL, and Perl).
Linux:
For obvious reasons, Linux offers the most portability and the lowest cost for entry. However, there is no reason why this system wouldn't run on other flavors of UNIX with some minor modifications. Also, it could be ported to a Windows-based programming platform, such as Perl for Windows.
Apache:
Again, we chose this because Apache is open source and is one of the most popular Web servers. It was also the most logical choice since we would be using it for our other tools. In addition, this system would also run on any PHP-compliant Web server including IIS.
MySQL:
There are several good open source databases including Postgresql and others. We chose MySQL because we were the most familiar with it and the licensing issues were the easiest to deal with. Like Apache, we were already using MySQL for our ACID databases.
Perl:
Again, there are lots of scripting languages, but we picked Perl because it is one of the most portable languages, doesn't requires any compiling, and is easily modifiable by third parties.
Based on this LAMP architecture, we set out to build a tool that would suit our purposes. We first wrote a project plan that detailed the work we would have to do. We then divided the tasks based on our different skill sets. We listed the programmatic elements that would be needed for our program, including Perl scripts, PHP scripts, MySQL scripts, and shell scripts, as well as text files for the documentation. Table 8.6 shows the project list with all of the pieces needed and what each one does.
Table 8.6. NCC Project ElementsTypes | Items | Descriptions |
|---|
Perl script | ncc.pl | Runs with cron and populates the queue table with scans ready to be run. | Perl script | ncc-client.pl | Removes scheduled scans from the queue, issues the command to run them, and then does the conversion to drop .nbe files into the MySQL database when they are done. | Perl script | ncc-daily.pl | Sends out daily summary e-mails and does clean up on the queue table. | PHP script | Main.php and other supporting php files, and so on | Interface to enter items into the schedule table; consists of multiple files. | PHP script | Reports.php | Interface to view MySQL database, modified versions of NPI; consists of multiple files. | MySQL database | NCC Database | Sample database for the scans; internal to MySQL database program. | MySQL script | ncc.mysql | Creates initial database. | Misc script | install.pl | Script to create the cron item, call MySQL script, copy executables to bin, and php file to Web. | Text file | ncc.ini | Environment variables for the Perl and PHP scripts; database names, file locations, e-mail to send notifies to, and so on. | Text file | INSTALL, README, and so on | Multiple files with installation instructions, operation instructions, and other pertinent data. |
We also had to design a database schema with the tables that we would be populating with our program. The NPI program was a great help in this regard, although there were new tables relating to our scheduling that we needed to add.
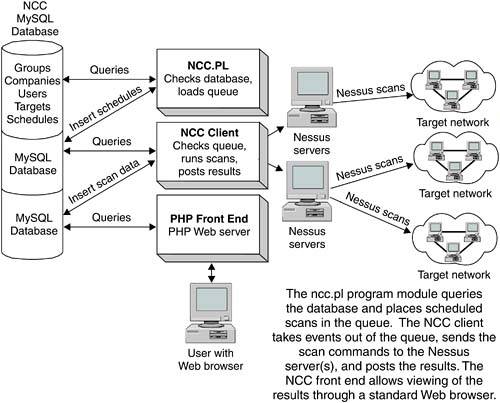
While the dataflow was similar to that of NPI, there were some significant differences. We diagramed this so we could follow all the logical interactions between the systems. Figure 8.11 shows the logical layout of NCC.
We also created a Web site and a Sourceforge page for the project. The Web page is located at www.netsecuritysvcs.com/ncc. While we figured we had enough talent in our group to finish the project, it never hurts to let other people in the open source community know what you are working on. Also, once it was finished, we would need help in porting it to other platforms and adding new features.
So once all the preliminaries were taken care of, we got to work, usually holding weekly meetings to track the progress. Because this was not a full-time effort and we all had day jobs, it took about a year to complete the program, and even that was only a beta version. Still, we had something we could use, and now by leveraging the online community of developers, NCC can be extended and improved. Writing NCC as an open source project certainly required a little more work on the front end than doing it as a private project because we had to do the research on existing programs and integrate the code bases, but we were able to leverage existing code bases, which cut our total development time down considerably. Also, we knew that if it became popular, it might get ported to other platforms or even used as the base for an even bigger program, which would only help us. All in all, the experience was a real win/win for my company and other users out there.
Installing NCC
NCC has requirements similar to those of the NPI tool described earlier in this chapter. You need a PHP-compliant Web server (such as Apache), MySQL database, and a Nessus server and client. NCC assumes you already have these installed and running. If you don't, refer to the sections earlier in this chapter on how to set up Apache and MySQL, and Chapter 5 for instructions on installing Nessus.
When these are in place you can install NCC.
 Download the program or get it from the book's CD-ROM. Unpack and unzip the program into its own directory, making sure the directory is in your path.
Change into the NCC directory and type ./install.pl. This runs the NCC installation script. (You don't have to compile NCC because it is programmed in interpreted languages such as Perl and PHP.)
The install program first checks for the presence of the Perl modules required for NCC. If it doesn't find them, you have to load the appropriate module(s) either from your distribution disks or using the CPAN utilities described in the "Installing Swatch" section earlier in this chapter.
The program automatically initializes your database and copies all the files into the appropriate places. During the installation you are prompted for some input. Table 8.7 describes these installation settings.
Table 8.7. NCC Installation SettingsSettings | Descriptions |
|---|
NCC user | This is a system account that NCC will run as. It is recommended that you create a special user account just for NCC. | Installation directory | You can choose one of the two standard locations, /usr/local/ncc or current, or you can specify your own. | NCC Administrator e-mail | The e-mail address of the NCC administrator who will get all the daily activity reports. | From address for results | The address that the reports will appear to come from (important for spam filters). | Name of MySQL server | Host name or IP address of your NCC MySQL server, which should be localhost if is running on the same machine. | Name of database for NCC | The name of the MySQL database that will be created by the install script. The default of ncc is fine for most installations. | MySQL user | A valid user on the MySQL system. You should create one specifically for NCC. | MySQL password | Password for the above user. | Nessus server | Host name or IP address of your Nessus server. This is localhost if you are running Nessus and NCC on the same machine. | Nessus port | The port to connect to on the Nessus server. The default of 1241 is correct unless you have changed this on your Nessus server. | Nessus username | A valid user on that Nessus server. | Nessus password | The password for the above user. | Nessus path | Path to the Nessus executables. The default is correct for the standard Nessus installation. | Temp directory | Where NCC will stage results from your scans before it imports them into the database. You can look here if you want to find the raw .nbe files that were used. |
You will be prompted for the NCC admin user and password combination. This user will be an administrator of the entire program, so choose this login ID and password carefully.
Create a symbolic link from the place in your public Web directories that you want to access NCC. Point this to /html in the root NCC install directory. This will connect you to the main NCC page and to your public Web directories as well as protect the other NCC files from access.
You are now ready to run NCC. With the database and Web server running, open a Web browser and enter the host name of your NCC server along with the location you created above. For example, if you created the symlink in /ncc of your Web root directory and your NCC server is ncc.example.com, the URL would look like this:
http://ncc.example.com/ncc
If you were accessing it on the local machine, this would work:
http://localhost/ncc
This displays the NCC login page. Log in with the user name and password you created during the installation process.
You can now begin using NCC to automate and schedule your scans.
Using NCC
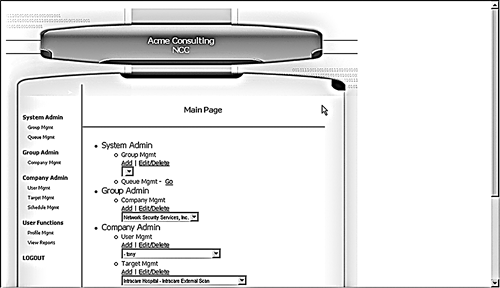
After you have logged in, the NCC main screen displays (see Figure 8.12). This is where you manage all of your groups, companies, scan targets, and schedules.
NCC was designed to be modular and expandable. For example, you can use NCC to manage multiple scans within one company. However, if you are a consultant, you can create scans for multiple companies that have different profiles. Let's take it one step further and say that you want to run a security ASP. NCC lets you set up multiple groups, each with its own member companies for all of your individual agents and consultants selling security scans. (This group management feature will eventually allow for customizable interfaces and front ends, but this feature is not in the beta version.)
You can choose from four main options.
System admin:
These options are available only to the system administrator. This is where you create your groups and perform other system-level functions.
Group admin:
This option is available only to group administrators. These users may add, edit, or delete a group's company profiles. You would use this function if, for example, you were setting up different companies with a set of targets each could manage. Each group administrator will see only see the companies he or she has access to.
Company admin:
This is where you manage the users, target files, and schedules for each company. For example, you may want to have a lower-level system administrator start scans for one division but not for another. You can set those parameters here.
User functions:
This section is available to all users. Here individual users can edit their profile information and perform functions on their accounts such as changing their passwords. They can also access the data from scans that have run.
Let's take a simple example and walk through the steps of adding users, adding targets, and scheduling a scan. For simplicity, the example assumes you don't need multi-company and multi-group capabilities.
Adding Users
First, you should add a user (other than the system administration user you added earlier). Under Company Admin, click on Add user to add a user who can run scans.
Select the company they will belong to from the pull-down box and click on Add.
On the User Management screen, fill in the information on your new user (see Figure 8.13)
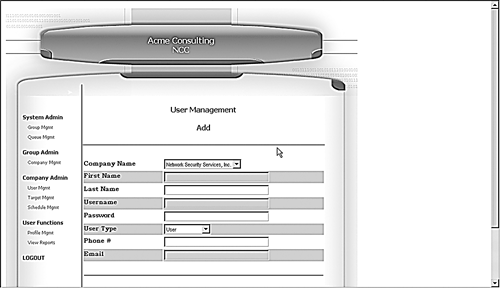
You can select a user name and password here. The password will be starred out and stored as a MD5 hash rather than plain text. Also, select a user type here: System admin, Group admin, Company admin, and User. Note that you will only be able to create users that are at or below the user level you are logged on as. For example, company admins cannot create system admin level users.
If you want to edit or delete an existing user, click on Edit/delete from the Main Screen under Company Management. Click on Add, and NCC adds your user to the database. This person can now log on and add scans as part of the company they were added to.
Adding Targets
NCC defines a target as any set of IP addresses and associated scan settings for those addresses. We made a conscious decision when designing the program to separate the target objects from the schedule objects. This allows the program to be much more modular and have greater flexibility. For example, you may want to schedule a certain scan to run at the beginning of each month. However, if a new vulnerability comes out, you might want to scan that target in the middle of the month, just once, to check your vulnerability. NCC allows you to add a one-time scan event to that target rather than changing your monthly scan and then having to change it back so that your monthly scan still runs.
To add a target, from the main screen under Company Admin click on Target Mgmt.
Pull down the context-sensitive menu to see all the targets that you have access to. If you are a group administrator, it will show you all the targets for every company that you are a member of.
Click on Add and the Target Management screen displays (see Figure 8.14). Here you can select the company you are adding this target for.
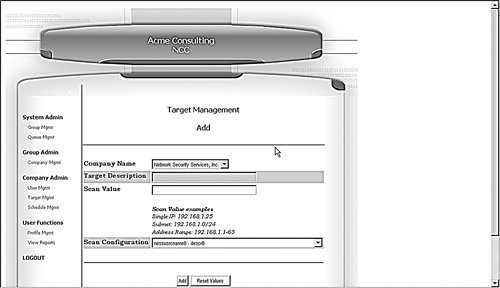
Give the target a text description, such as DMZ Servers. This name will appear in the drop-down box, so make it specific enough that you can tell what it is. Select a Scan typewhether your scan is of a single address, a subnet, or an address range.
Under Scan Value enter the IP address string that corresponds to your targets in Nessus-compliant syntax. Recall from Chapter 5 that the allowed formats for Nessus scan strings.
Single IP address | 192.168.0.1 | IPs separated by commas | 192.168.0.1,192.168.0.2 | IP ranges separated by dashes | 192.168.0.1-192.168.0.254 | Using standard slash notation | 192.168.0.1/24 (a class C network of 256 addresses) | A host name | myhost.example.com | Any combination of the above separated by commas | 192.168.0.1-192.168.0.254, 195.168.0.1/24,192.168.0.1-192.168.0.254 |
Select a scan configuration. The default is the Nessus default scan. There are up to four other scan types you can run. (Future versions will allow for uploading a custom configuration file and also pasting in a text file.)
Click on Add, and the target is added. You are now ready to schedule your scan.
Scheduling Your Scan
Once you have created one or more target objects, you can apply scan schedules to them.
On the main menu under Company Admin, click on Schedule Management. The Schedule Management screen displays (see Figure 8.15).
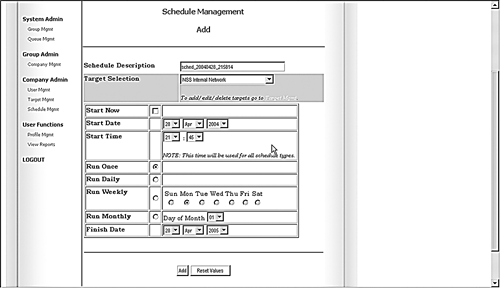 Select a company and a target within that company. Again, the pull-down menu selections available to you reflect the user level at which you logged in.
Select a scan date, time, how often it should run, and how many times to recur.
You can have the scan run one time, daily, weekly, monthly, bi-monthly, or quarterly. (Future versions will support custom recurrence strings in either cron or I-cal format.) You can also set the recurrence to happen only for a certain number of times, for example, for a customer who has signed a one-year contract for monthly scans. You can also choose to have it recur continuously, for example, for your own network's regular monthly scans.
Click on Add and your scan will be scheduled.
Now you can sit back and wait for the report. The user who created the scan will be notified by e-mail a day before the scan happens (except for daily scans, for which you are notified an hour beforehand), and another e-mail when the report is available to view.
Once your scan has run, you can view it by selecting View reports under User Functions on the main menu. This displays the NCC Scan database screen (see Figure 8.16)
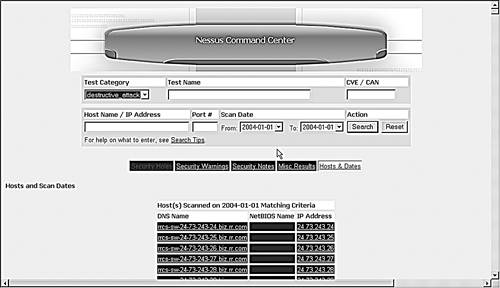
This lets you browse the scan data and create custom reports.
You may notice this interface looks similar to the NPI interface reviewed earlier in this chapter. This is because we used the NPI code as a reference in creating this section. NPI is open source and GPL, so as long we were releasing our code GPL and included the copyright information, we were free to use this code. One of the great things about open source development is that it is perfectly acceptable to build on the successes of other people. And someone may build on your work to create something even better still. As long as it is open source, you have full access to any advances and improvements.
This may seem like a lot of work just to do a scan, and it is if you are only doing it once. But when you are managing dozens of scans with multiple users, then NCC is invaluable for keeping track of all this activity.
You now have the tools and the knowledge to create a complete intrusion detection and vulnerability scanning system with complex analytical functionality. By using these combinations of tools, you will be able to greatly increase the security of your internal network and external network servers. Together these tools can help you make the most of the time you spend on securing your network. Next, we are going to look at tools to help you keep your data secure inside and outside your network by using encryption tools.
|