7.3. View ActionsA view action can appear as a menu item in a view's context menu, as a toolbar button on the right side of a view's title bar, and as a menu item in a view's pull-down menu (see Figure 6-9 on page 237). This section covers adding an action to a view programmatically and registering that view so that others can contribute their own actions via the plug-in manifest, whereas Section 6.4, View Actions, on page 237 discussed adding an action using declarations in the plug-in manifest. 7.3.1. Model actionsNow that the model objects are in place, the AddToFavoritesActionDelegate class introduced in Section 6.3.3, IObjectActionDelegate, on page 233, can be completed. With the modifications outlined below, the action delegate adds the selected items to the FavoritesManager, which then notifies the FavoritesViewContentProvider, which then refreshes the table to display the new information. In addition, the targetPart field is not being used any longer, so it and all references to it can be removed. private ISelection selection; public void selectionChanged(IAction action, ISelection selection) { this.selection = selection; action.setEnabled(!selection.isEmpty()); } public void run(IAction action) { if (selection instanceof IStructuredSelection) { FavoritesManager mgr = FavoritesManager.getManager(); Iterator iter = ((IStructuredSelection) selection).iterator(); mgr.addFavorites(mgr.newFavoritesFor(iter)); } } 7.3.2. Context menuTypically, views have context menus populated by actions targeted at the view or selected objects within it. There are several steps to create a view's context menu programmatically. If you want other plug-ins to contribute actions to your view's context menu via declarations in the plug-in manifest, then you must take several more steps to register your view (see Section 6.3, Object Actions, on page 224, Section 6.4.1, Defining a view context submenu, on page 237, and Section 6.4.2, Defining a view context menu action, on page 238 for information concerning how actions are contributed to a view's context menus via the plug-in manifest). 7.3.2.1. Creating actionsThe first step is to create the actions that will appear in the context menu. For the Favorites view, an action that will remove the selected elements from the view is needed. package com.qualityeclipse.favorites.actions; import ... public class RemoveFavoritesAction extends Action { private FavoritesView view; public RemoveFavoritesAction(FavoritesView view, String text) { super(text); this.view = view; } public void run() { FavoritesManager.getManager().removeFavorites( view.getSelectedFavorites()); } } In the FavoritesView class, create a new action field as follows: private RemoveFavoritesAction removeAction; and call the following new method from createPartControl(Composite) to initialize the field. private void createActions() {
IWorkbench workbench = PlatformUI.getWorkbench();
ISharedImages platformImages = workbench.getSharedImages();
removeAction = new RemoveFavoritesAction(this, "Remove");
removeAction.setImageDescriptor(platformImages
.getImageDescriptor(ISharedImages.IMG_TOOL_DELETE));
removeAction.setDisabledImageDescriptor(platformImages
.getImageDescriptor(ISharedImages.IMG_TOOL_DELETE_DISABLED));
removeAction
.setToolTipText("Remove the selected favorite items");
}
This same action is used later for keyboard-based actions (see Section 7.3.5, Keyboard actions, on page 288) and global actions (see Section 7.3.6, Global actions, on page 289). 7.3.2.2. Creating the context menuThe context menu must be created at the same time that the view is created, but because contributors add and remove menu items based on the current selection, its contents cannot be determined until just after the user clicks the right mouse button and just before the menu is displayed. To accomplish this, set the menu's RemoveAllWhenShown property to true so that the menu will be built from scratch every time, and add a menu listener to dynamically build the menu. In addition, the menu must be registered with the control so that it will be displayed and with the view site so that other plug-ins can contribute actions to it (see Section 6.3, Object Actions, on page 224). For the Favorites view, modify createPartControl() to call the following new createContextMenu() method. private void createContextMenu() {
MenuManager menuMgr = new MenuManager("#PopupMenu");
menuMgr.setRemoveAllWhenShown(true);
menuMgr.addMenuListener(new IMenuListener() {
public void menuAboutToShow(IMenuManager m) {
FavoritesView.this.fillContextMenu(m);
}
});
Menu menu =
menuMgr.createContextMenu(viewer.getControl());
viewer.getControl().setMenu(menu);
getSite().registerContextMenu(menuMgr, viewer);
}
7.3.2.3. Dynamically building the context menuEvery time the user clicks the right mouse button, the context menu's content must be rebuilt from scratch because contributors can add or remove actions based on the selected items. In addition, the context menu must contain a separator with the IWorkbenchActionConstants.MB_ADDITIONS constant, indicating where contributed actions can appear in the menu. The create ContextMenu() method (see Section 7.3.2.2, Creating the context menu, on page 285) calls the new fillContextMenu(IMenuManager) method shown here: private void fillContextMenu(IMenuManager menuMgr) {
boolean isEmpty = viewer.getSelection().isEmpty();
removeAction.setEnabled(!isEmpty);
menuMgr.add(removeAction);
menuMgr.add(new Separator(
IWorkbenchActionConstants.MB_ADDITIONS));
}
7.3.2.4. Selection providerWhen object-based actions are defined (see Section 6.3, Object Actions, on page 224), they are targeted at the selected object rather than at the view. For object-based actions to appear in a view's context menu, the view must not only register the context menu (see Section 7.3.2.1, Creating actions, on page 284), but it must also publish its selection for any other registered listeners (see Section 7.4.1, Selection provider, on page 305). In addition, object-based actions are typically targeted at specific types of objects rather than all objects. This means that the selected object must implement the IAdaptable interface so that contributors can adapt the selected objects to any object they can interrogate and manipulate (see Section 7.4.2, Adaptable objects, on page 306). 7.3.2.5. Filtering unwanted actionsAt this point, the Favorites view context menu appears as it should, but if your view publishes its selection as referenced in Section 7.3.2.4, on this page, and described in Section 7.4.1, Selection provider, on page 305, then the context menu will incorrectly contain the Favorites submenu with the Add menu item that was defined in Section 6.3.1, Defining an object-based action, on page 224. That Favorites submenu should appear everywhere else except in the Favorites view. To accomplish this, revisit the object contribution outlined in Section 6.3.1 and insert the following visibility element and change the adaptable attribute so that the object contribution looks like this: <objectContribution objectClass="org.eclipse.core.resources.IResource" adaptable="false" id="com.qualityeclipse.favorites.popupMenu"> ... etc ... <visibility> <not> <objectClass name="com.qualityeclipse.favorites.model.IFavoriteItem"/> </not> </visibility> </objectContribution> The modifications cause the Favorites > Add menu item to appear for resource selections but not for Java element selections. Duplicate the preceding objectContribution declaration, changing only the objectClass attribute as follows: objectClass="org.eclipse.jdt.core.IJavaElement"
For more, see Section 6.3.2.2, The visibility element, on page 228. 7.3.3. Toolbar buttonsNext, programmatically add the remove action to the toolbar (see Section 6.4.4, Defining a view toolbar action, on page 240 for declaring a toolbar button using the plug-in manifest rather than programmatically). In addition, the state of this toolbar button needs to change based on the selection in the Favorites view. In the FavoritesView class, call the following new method from the createPartControl(Composite) method. private void createToolbarButtons() {
getViewSite().getActionBars().getToolBarManager()
.add(removeAction);
removeAction.setEnabled(false);
viewer.addSelectionChangedListener(
new ISelectionChangedListener() {
public void selectionChanged(SelectionChangedEvent event) {
removeAction.setEnabled(!event.getSelection().isEmpty());
}
});
}
7.3.4. Pull-down menuThis section will programmatically add an action to the Favorites view pull-down menu so that the name filter can be enabled and disabled (see Section 6.4.5, Defining a view pull-down submenu and action, on page 241 for defining a pull-down menu item in the plug-in manifest rather than programmatically). For now, the action will use a simple InputDialog to prompt for the name filter pattern, but this will be replaced with a specialized Favorites view filter dialog later in the book (see Section 11.1.2, Common SWT dialogs, on page 406). package com.qualityeclipse.favorites.views; import ... public class FavoritesViewFilterAction extends Action { private final Shell shell; private final FavoritesViewNameFilter nameFilter; public FavoritesViewFilterAction( StructuredViewer viewer, String text ) { super(text); shell = viewer.getControl().getShell(); nameFilter = new FavoritesViewNameFilter(viewer); } public void run() { InputDialog dialog = new InputDialog( shell, "Favorites View Filter", "Enter a name filter pattern" + " (* = any string, ? = any character)" + System.getProperty("line.separator") + "or an empty string for no filtering:", nameFilter.getPattern(), null); if (dialog.open() == InputDialog.OK) nameFilter.setPattern(dialog.getValue().trim()); } } The createPartControl() method is getting quite long and is in need of refactoring. After extracting the table columns as fields and extracting table creation and sorting into separate methods, the createPartControl() method is modified to call a new createViewPulldownMenu() method. This new method programmatically creates and initializes the filter field, and adds the new filter action to the Favorites view's pull-down menu (see Figure 7-6). private FavoritesViewFilterAction filterAction;
private void createViewPulldownMenu() {
IMenuManager menu =
getViewSite().getActionBars().getMenuManager();
filterAction =
new FavoritesViewFilterAction(viewer, "Filter...");
menu.add(filterAction);
}
Figure 7-6. Favorites view showing the view's pull-down menu.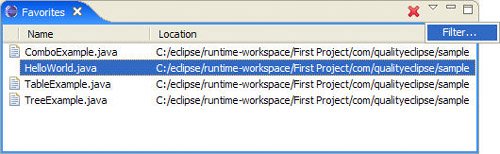
7.3.5. Keyboard actionsRather than using the mouse to activate the context menu and then selecting the Remove command to remove an item from the Favorites view (see Section 7.3.2, Context menu, on page 283), it would be quicker just to press the Delete key. This approach programmatically associates the Delete key with the RemoveFavoritesAction rather than defining the command via the plug-in manifest as in Section 6.6, Key Bindings, on page 251. For this to work, call the following hookKeyboardActions() method from the createPartControl() method. private void hookKeyboardActions() {
viewer.getControl().addKeyListener(new KeyAdapter() {
public void keyReleased(KeyEvent event) {
handleKeyReleased(event);
}
});
}
protected void handleKeyReleased(KeyEvent event) {
if (event.character == SWT.DEL && event.stateMask == 0) {
removeAction.run();
}
}
7.3.6. Global actionsNow that the RemoveFavoritesAction is available both in the context menu (see Section 7.3.2.1, Creating actions, on page 284) and by pressing the Delete key (see Section 7.3.5, Keyboard actions, on page 288), that same action needs to be triggered when the user selects Delete from the Edit menu. The interface org.eclipse.ui.IWorkbenchActionConstants defines a number of constants, such as the following, for just this purpose.
Calling the following new method from the createPartControl() method associates Edit > Delete with RemoveFavoritesAction when the Favorites view is active. private void hookGlobalActions() {
getViewSite().getActionBars().setGlobalActionHandler(
ActionFactory.DELETE.getId(), removeAction);
}
7.3.7. Clipboard actionsThe three clipboard-related actions are cut, copy, and paste. For the Favorites view, you need to provide the ability to cut selected items out of the view, copy selected items, and paste new items into the view using three separate actions. To support these three actions, lazily create a clipboard object. private Clipboard clipboard;
public Clipboard getClipboard() {
if (clipboard == null)
clipboard = new Clipboard(getSite().getShell().getDisplay());
return clipboard;
}
In addition, the clipboard, if it is defined, must be cleaned up when the view is closed by extending the view's dispose() method. public void dispose() {
if (clipboard != null)
clipboard.dispose();
super.dispose();
}
7.3.7.1. CopyThe copy action translates selected Favorites items into various formats such as resources, and places that information into the clipboard. Transfer objects convert various formats, such as resources, into platform-specific byte streams and back so that information can be exchanged between different applications (see Section 7.3.8.3, Custom transfer types, on page 298 for more on transfer types). The following CopyFavoritesAction class will be added to handle copying items from the Favorites view. package com.qualityeclipse.favorites.actions; import ... public class CopyFavoritesAction extends Action { private FavoritesView view; public CopyFavoritesAction(FavoritesView view, String text) { super(text); this.view = view; } public void run() { IFavoriteItem[] items = view.getSelectedFavorites(); if (items.length == 0) return; try { view.getClipboard().setContents( new Object[] { asResources(items), asText(items), }, new Transfer[] { ResourceTransfer.getInstance(), TextTransfer.getInstance(), }); } catch (SWTError error) { // Copy to clipboard failed. // This happens when another application // is accessing the clipboard while we copy. // Ignore the error. } } public static IResource[] asResources(IFavoriteItem[] items) { List resources = new ArrayList(); for (int i = 0; i < items.length; i++) { IResource res = (IResource) items[i].getAdapter(IResource.class); if (res != null) resources.add(res); } return (IResource[]) resources.toArray( new IResource[resources.size()]); } public static String asText(IFavoriteItem[] items) { StringBuffer buf = new StringBuffer(); for (int i = 0; i < items.length; i++) { if (i > 0) buf.append(System.getProperty("line.separator")); buf.append(items[i].getName()); } return buf.toString(); } } You need to create a field in FavoritesView to hold the copy action: private CopyFavoritesAction copyAction; then initialize that field in the createActions() method: copyAction = new CopyFavoritesAction(this, "Copy");
copyAction.setImageDescriptor(platformImages
.getImageDescriptor(ISharedImages.IMG_TOOL_COPY));
copyAction.setDisabledImageDescriptor(platformImages
.getImageDescriptor(ISharedImages.IMG_TOOL_COPY_DISABLED));
copyAction.setToolTipText("Copy the selected favorite items");
and hook the action to the global copy (see Section 7.3.6, Global actions, on page 289) in the hookGlobalActions() method: getViewSite().getActionBars().setGlobalActionHandler( ActionFactory.COPY.getId(), copyAction); The copy action can also be added to the context menu by modifying the fillContextMenu() method (see Section 7.3.2.3, Dynamically building the context menu, on page 285) and to the view's toolbar (see Section 7.3.3, Toolbar buttons, on page 287). 7.3.7.2. CutThe cut action is based on the copy and remove actions, first using the copy action to copy the selected Favorites items to the clipboard and then the remove action to remove the selected items from the Favorites view. It is initialized and used much like the copy operation described in the previous section. package com.qualityeclipse.favorites.actions; import ... public class CutFavoritesAction extends Action { private CopyFavoritesAction copyAction; private RemoveFavoritesAction removeAction; public CutFavoritesAction( CopyFavoritesAction copyAction, RemoveFavoritesAction removeAction, String text ) { super(text); this.copyAction = copyAction; this.removeAction = removeAction; } public void run() { copyAction.run(); removeAction.run(); } } 7.3.7.3. PasteThe paste operation takes information that was previously added to the clipboard by another operation and adds it to the Favorites view. As with the copy operation (see Section 7.3.7.1, Copy, on page 290), transfer objects facilitate translation from platform-specific byte streams to objects, and the paste operation converts those objects into items that are added to the Favorites view. The initialization and use of the paste operation is much like the copy operation discussed in Section 7.3.7.1, Copy, on page 290. package com.qualityeclipse.favorites.actions; import ... public class PasteFavoritesAction extends Action { private FavoritesView view; public PasteFavoritesAction(FavoritesView view, String text) { super(text); this.view = view; } public void run() { if (pasteResources()) return; if (pasteJavaElements()) return; // Other transfer types here. } private boolean pasteResources() { ResourceTransfer transfer = ResourceTransfer.getInstance(); IResource[] resources = (IResource[]) view.getClipboard().getContents(transfer); if (resources == null || resources.length == 0) return false; FavoritesManager mgr = FavoritesManager.getManager(); mgr.addFavorites(mgr.newFavoritesFor(resources)); return true; } private boolean pasteJavaElements() { Transfer transfer = JavaUI.getJavaElementClipboardTransfer(); IJavaElement[] elements = (IJavaElement[]) view.getClipboard().getContents(transfer); if (elements == null || elements.length == 0) return false; FavoritesManager mgr = FavoritesManager.getManager(); mgr.addFavorites(mgr.newFavoritesFor(elements)); return true; } } 7.3.8. Drag-and-drop supportThe ability to add objects to the Favorites view from another view using the copy/paste actions is available, but it would be nice to allow objects to be dragged into and out of the Favorites view. To accomplish this, add drag source and drop target objects to the Favorites view by calling the following new method from the createPartControl() method. The FavoritesDragSource and FavoritesDropTarget types are defined in the next two sections. private void hookDragAndDrop() {
new FavoritesDragSource(this, viewer);
new FavoritesDropTarget(this, viewer);
}
7.3.8.1. Dragging objects out of the Favorites viewThe FavoritesDragSource type initializes the drag source operation and handles conversions of Favorites items into resource objects and text. This allows the user to drag and drop selected Favorites items elsewhere within Eclipse or into another drag-and-drop-enabled application such as Microsoft Word (see Figure 7-7). Figure 7-7. Drag-and-drop operationfrom Microsoft Word to Eclipse.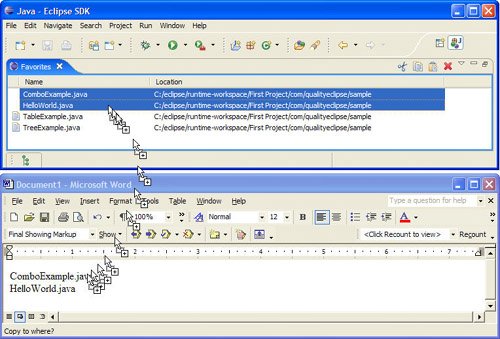
The constructor, called from the hookDragAndDrop() method (see Section 7.3.8, Drag-and-drop support, on page 294), initializes the drag source by:
When a user initiates a drag operation from the Favorites view, the dragStart() method is called to determine whether the drag operation can be performed. In this case, set the event.doit field to be true if there are Favorites items selected, otherwise set event.doit to false since the operation can only be performed when at least one Favorites item is selected. When the user drops the objects, the dragSetData() method is called to convert the selected items before the transfer occurs, and then the dragFinish() method is called after the transfer is complete. package com.qualityeclipse.favorites.views; import ... public class FavoritesDragSource implements DragSourceListener { private FavoritesView view; public FavoritesDragSource( FavoritesView view, TableViewer viewer ) { this.view = view; DragSource source = new DragSource(viewer.getControl(), DND.DROP_COPY); source.setTransfer( new Transfer[] { TextTransfer.getInstance(), ResourceTransfer.getInstance()}); source.addDragListener(this); } public void dragStart(DragSourceEvent event) { event.doit = view.getSelectedFavorites().length > 0; } public void dragSetData(DragSourceEvent event) { if (TextTransfer.getInstance() .isSupportedType(event.dataType)) { event.data = CopyFavoritesAction.asText( view.getSelectedFavorites()); } else if (ResourceTransfer.getInstance() .isSupportedType(event.dataType)) { event.data = CopyFavoritesAction.asResources( view.getSelectedFavorites()); } } public void dragFinished(DragSourceEvent event) { // If this was a MOVE operation, // then remove the items that were moved. } } 7.3.8.2. Dragging objects into the Favorites viewThe FavoritesDropTarget type allows items to be added to the Favorites view by dragging them from another view. This allows the user to drag resources or Java elements from the Resource Navigator view or the Java Package view into the Favorites view. The constructor, called from the hookDragAndDrop() method (see Section 7.3.8, Drag-and-drop support, on page 294), initializes the drop target by:
During the drag operation, there are several events that occur so that various drop targets can provide feedback to the user when the cursor enters, moves over, and exits a drag target. Since you need to add items to the Favorites view without removing them from their original location, and to make it convenient for the user so that he or she does not have to hold down the Ctrl key to perform the drag operation, implement the dragEnter() method to convert a move operation into a copy operation. The conversion from a move operation to a copy operation is done in the dragEnter() method in addition to the drop() method so that the user gets visual feedback indicating that a copy will occur before the operation is performed. When the user drops the objects on the Favorites view, the drop() method is called to perform the operation. It converts the objects into Favorites items and ensures that the operation is indeed a copy operation so that the objects are not removed from their original locations. package com.qualityeclipse.favorites.views;
import ...
public class FavoritesDropTarget extends DropTargetAdapter
{
public FavoritesDropTarget(
FavoritesView view,
TableViewer viewer) {
DropTarget target =
new DropTarget(
viewer.getControl(),
DND.DROP_MOVE | DND.DROP_COPY);
target.setTransfer(
new Transfer[] {
ResourceTransfer.getInstance(),
JavaUI.getJavaElementClipboardTransfer()});
target.addDropListener(this);
}
public void dragEnter(DropTargetEvent event) {
if (event.detail == DND.DROP_MOVE
|| event.detail == DND.DROP_DEFAULT) {
if ((event.operations & DND.DROP_COPY) != 0)
event.detail = DND.DROP_COPY;
else
event.detail = DND.DROP_NONE;
}
}
public void drop(DropTargetEvent event) {
FavoritesManager mgr = FavoritesManager.getManager();
if (ResourceTransfer.getInstance()
.isSupportedType(event.currentDataType)
&& (event.data instanceof IResource[])) {
mgr.addFavorites(
mgr.newFavoritesFor((IResource[]) event.data));
event.detail = DND.DROP_COPY;
} else if (JavaUI.getJavaElementClipboardTransfer()
.isSupportedType(event.currentDataType)
&& (event.data instanceof IJavaElement[])) {
mgr.addFavorites(
mgr.newFavoritesFor((IJavaElement[]) event.data));
event.detail = DND.DROP_COPY;
} else
event.detail = DND.DROP_NONE;
}
}
7.3.8.3. Custom transfer typesTransfer objects convert various formats, such as resources, into platform-specific byte streams and back so that information can be exchanged between different applications. Eclipse provides several transfer types, including:
These transfer objects are useful for generic types of objects such as resources. If you are dragging objects specific to your application from one view to another, however, the transfered objects may not completely capture the information of the object being dragged. For example, if you were to drag a Favorites item from one Favorites view to another, and there was additional state information associated with the item, and a ResourceTransfer object was being used, then that additional state information would be lost. Solving this problem requires building a custom transfer type such as the one that follows. A transfer type must be a subclass of the org.eclipse.swt.dnd.Transfer class, but subclassing org.eclipse.swt.dnd.ByteArrayTransfer is easier because of the additional behavior it provides. If a custom transfer type for Favorites items is built, then it would rely on functionality introduced in Section 7.5.2, Saving global view information, on page 311 and might be similar to the existing ResourceTransfer type. package com.qualityeclipse.favorites.views; import ...; public class FavoritesTransfer extends ByteArrayTransfer { private static final FavoritesTransfer INSTANCE = new FavoritesTransfer(); public static FavoritesTransfer getInstance() { return INSTANCE; } private FavoritesTransfer() { super(); } Each FavoritesTransfer class must have a unique identifier to ensure that different Eclipse applications use FavoritesTransfer classes of different "types." The getTypeIds() and getTypeNames() methods return the platform-specfic IDs and names of the data types that can be converted using this transfer agent. private static final String TYPE_NAME =
"favorites-transfer-format:"
+ System.currentTimeMillis()
+ ":"
+ INSTANCE.hashCode();
private static final int TYPEID =
registerType(TYPE_NAME);
protected int[] getTypeIds() {
return new int[] { TYPEID };
}
protected String[] getTypeNames() {
return new String[] { TYPE_NAME };
}
The javaToNative() method converts a Java representation of data to a platform-specific representation of the data, then returns that information by placing it in the transferData argument. protected void javaToNative(
Object data,
TransferData transferData) {
if (!(data instanceof IFavoriteItem[])) return;
IFavoriteItem[] items = (IFavoriteItem[]) data;
/**
* The serialization format is:
* (int) number of items
* Then, the following for each item:
* (String) the type of item
* (String) the item-specific info glob
*/
try {
ByteArrayOutputStream out =
new ByteArrayOutputStream();
DataOutputStream dataOut =
new DataOutputStream(out);
dataOut.writeInt(items.length);
for (int i = 0; i < items.length; i++) {
IFavoriteItem item = items[i];
dataOut.writeUTF(item.getType().getId());
dataOut.writeUTF(item.getInfo());
}
dataOut.close();
out.close();
super.javaToNative(out.toByteArray(), transferData);
}
catch (IOException e) {
// Send nothing if there were problems.
}
}
The nativeToJava() method converts a platform-specific representation of data to a Java representation. protected Object nativeToJava(TransferData transferData) {
/**
* The serialization format is:
* (int) number of items
* Then, the following for each item:
* (String) the type of item
* (String) the item-specific info glob
*/
byte[] bytes =
(byte[]) super.nativeToJava(transferData);
if (bytes == null)
return null;
DataInputStream in =
new DataInputStream(
new ByteArrayInputStream(bytes));
try {
FavoritesManager mgr =
FavoritesManager.getManager();
int count = in.readInt();
List items = new ArrayList(count);
for (int i = 0; i < count; i++) {
String typeId = in.readUTF();
String info = in.readUTF();
items.add(mgr.newFavoriteFor(typeId, info));
}
return (IFavoriteItem[]) items.toArray(
new IFavoriteItem[items.size()]);
}
catch (IOException e) {
return null;
}
}
Tip In input/output (I/O) code like the preceding, consider using a BufferedOutputStream between the ByteArrayOutputStream and the DataOutputStream. While not always necessary, this can be a useful performance improvement. 7.3.9. Inline editingAnother feature you need to have is the ability to edit the name of the Favorites items directly in the Favorites view quickly and easily. It is arguable that it should trigger the rename action or refactoring so that the underlying resource or Java element will be renamed rather than just editing the name of the item itself, but things are kept simple for the purposes of demonstrating the inline editing function. To perform inline editing of a Favorites item's name, a new action named RenameFavoriteAction is needed. When the user selects the Rename command in the context menu, a text field opens over the selected item's name in the Favorites view (see Figure 7-8). The user enters the new name into the text field and presses the Return key, which closes the editor and updates the item's name. Figure 7-8. Favorites view showing the inline text field.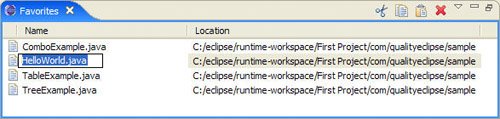
This new action is derived from org.eclipse.ui.actions.Rename-ResourceAction and uses two helper classes. The TableEditor is responsible for positioning and sizing the text field over the item being renamed. The TextActionHandler temporarily redirects all global editing commands like cut, copy, paste, clear, and select all to the text field rather than to the current Eclipse editor. This class has very little code specific to the Favorites view, and with a little refactoring, it could become a general-purpose inline edit action. package com.qualityeclipse.favorites.actions; import ... public class RenameFavoriteAction extends Action { private static final int COLUMN_TO_EDIT = 1; private final FavoritesView view; private final Table table; private final TableEditor tableEditor; private final TextActionHandler textActionHandler; private Composite editorParent; private Text editor; private String originalText; public RenameFavoriteAction( FavoritesView view, Table table, String text ) { super(text); this.view = view; this.table = table; tableEditor = new TableEditor(table); textActionHandler = new TextActionHandler( view.getViewSite().getActionBars()); } When the action is executed, the run() method is called to create and show the cell editor. public void run() {
originalText = getTextToEdit();
if (originalText == null)
return;
if (editor == null)
createEditor();
showEditor(originalText);
}
private void createEditor() {
// Create the parent so that a simple border
// can be painted around the text editor.
editorParent = new Composite(table, SWT.NONE);
TableItem[] tableItems = table.getSelection();
tableEditor.horizontalAlignment = SWT.LEFT;
tableEditor.grabHorizontal = true;
tableEditor.setEditor(
editorParent, tableItems[0], COLUMN_TO_EDIT);
editorParent.setVisible(false);
editorParent.addListener(SWT.Paint, new Listener() {
public void handleEvent(Event e) {
// Paint a simple border around the text editor.
Point textSize = editor.getSize();
Point parentSize = editorParent.getSize();
int w = Math.min(
textSize.x + 4, parentSize.x - 1);
int h = parentSize.y - 1;
e.gc.drawRectangle(0, 0, w, h);
}
});
// Create the editor itself.
editor = new Text(editorParent, SWT.NONE);
editorParent.setBackground(editor.getBackground());
editor.addListener(SWT.Modify, new Listener() {
public void handleEvent(Event e) {
Point textSize =
editor.computeSize(SWT.DEFAULT, SWT.DEFAULT);
textSize.x += textSize.y;
// Add extra space for new characters.
Point parentSize = editorParent.getSize();
int w = Math.min(textSize.x, parentSize.x - 4);
int h = parentSize.y - 2;
editor.setBounds(2, 1, w, h);
editorParent.redraw();
}
});
editor.addListener(SWT.Traverse, new Listener() {
public void handleEvent(Event event) {
//Workaround for Bug 20214 due to extra
//traverse events.
switch (event.detail) {
case SWT.TRAVERSE_ESCAPE :
//Do nothing in this case.
disposeEditor();
event.doit = true;
event.detail = SWT.TRAVERSE_NONE;
break;
case SWT.TRAVERSE_RETURN :
saveChangesAndDisposeEditor();
event.doit = true;
event.detail = SWT.TRAVERSE_NONE;
break;
}
}
});
editor.addFocusListener(new FocusAdapter() {
public void focusLost(FocusEvent fe) {
saveChangesAndDisposeEditor();
}
});
// Add a handler to redirect global cut, copy, etc.
textActionHandler.addText(editor);
}
private void showEditor(String name) {
editor.setText(name);
editorParent.setVisible(true);
Point textSize =
editor.computeSize(SWT.DEFAULT, SWT.DEFAULT);
textSize.x += textSize.y;
// Add extra space for new characters.
Point parentSize = editorParent.getSize();
int w = Math.min(textSize.x, parentSize.x - 4);
int h = parentSize.y - 2;
editor.setBounds(2, 1, w, h);
editorParent.redraw();
editor.selectAll();
editor.setFocus();
}
After the user has finished editing the name, the cell editor event listeners call the saveChangesAndDisposeEditor() method to save the new name and dispose of the cell editor. protected void saveChangesAndDisposeEditor() {
String newText = editor.getText();
if (!originalText.equals(newText))
saveChanges(newText);
disposeEditor();
}
protected void disposeEditor() {
textActionHandler.removeText(editor);
if (editorParent != null) {
editorParent.dispose();
editorParent = null;
editor = null;
tableEditor.setEditor(null, null, COLUMN_TO_EDIT);
}
}
protected String getTextToEdit() {
String text = null;
IFavoriteItem[] items = view.getSelectedFavorites();
if (items.length == 1)
text = items[0].getName();
return text;
}
protected void saveChanges(String newText) {
IFavoriteItem[] items = view.getSelectedFavorites();
if (items.length == 1) {
items[0].setName(newText);
view.getFavoritesViewer().refresh(items[0]);
}
}
}
Next, add a new field, a new line in createActions() to initialize the field, and a new line to the fillContextMenu() method so that the new Rename item appears in the Favorites view's popup menu. private RenameFavoriteAction renameAction; renameAction = new RenameFavoriteAction( this, viewer.getTable(), "Rename"); menuMgr.add(renameAction); One alternate approach is to hook this up so that the user can press F2 to directly edit the item name, similar to the way that the Delete key was previously hooked to the delete action (see Section 7.3.5, Keyboard actions, on page 288). Another approach is to add a mouse listener so that Alt+click directly edits the item name by calling the following method from the createPartControl() method. private void hookMouse() {
viewer.getTable().addMouseListener(new MouseAdapter() {
public void mouseUp(MouseEvent e) {
if ((e.stateMask & SWT.ALT) != 0) {
renameAction.run();
}
}
});
}
|