6.2. Workbench Window ActionsWhere and when an action appears is dependent on the extension point and filter used to define the action. This section discusses adding a new menu to the workbench menu bar and a new button to the workbench toolbar using the org.eclipse.ui.actionSets extension point (see Figure 6-1). Both the menu item and toolbar button open the Favorites view when selected by a user. The user can already open the Favorites view (as outlined in Section 2.5, Installing and Running the Product, on page 86) but a top-level menu will really show off the new product by providing an easy way to find it. Tip A top-level menu is a great way to show off a new product to a user, but be sure to read Section 6.2.9, Discussion, on page 222 concerning the pitfalls of this approach. 6.2.1. Defining a workbench window menuTo create a new menu to appear in the workbench menu bar, you have to create an actionSet extension in the Favorites plug-in manifest describing the new actions. That declaration must describe the location and content of the new menu and reference the action delegate class that performs the operation. Open the Favorites plug-in manifest editor, select the Extensions tab, and click the Add... button (see Figure 6-2). You can also open the New Extension wizard by right-clicking to display the context menu, then select the New > Extension... command. Figure 6-2. The Extensions page of the Manifest editor.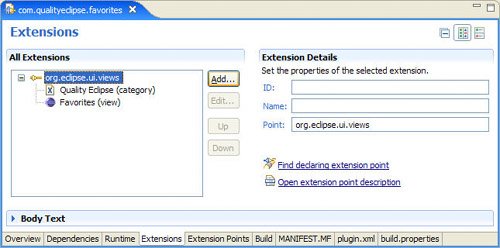
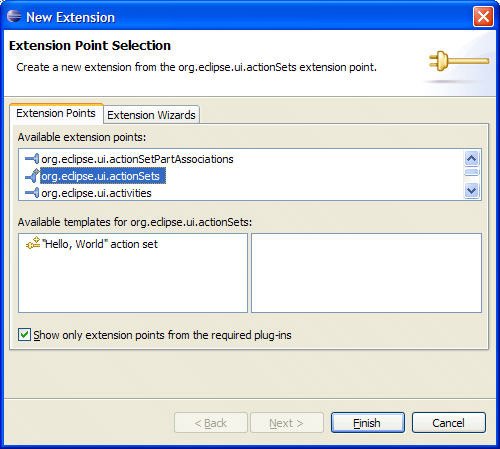
Select org.eclipse.ui.actionSets from the list of all available extension points (see Figure 6-3). If you can't locate org.eclipse.ui.actionSets in the list, then uncheck the Show only extension points from the required plug-ins checkbox. Click the Finish button to add this extension to the plug-in manifest. Figure 6-3. The New Extension wizard showing extension points.
Now, back in the Extensions page of the plug-in manifest editor, right-click on the org.eclipse.ui.actionSets extension and select New > actionSet. This immediately adds a new action set named com.qualityeclipse.favorites.-actionSet1 in the plug-in manifest. Selecting this new action set displays the properties on the right side of the editor. Modify them as follows:
Next, add a menu that will appear in the workbench menu bar by right-clicking on the action set you just added and selecting New > menu. Note that the name of the new action set changes to Favorites ActionSet when the tree selection changes. Select the new menu and set its attributes as follows (see Figure 6-4):
Figure 6-4. The Extensions page showing the Favorites menu's attributes.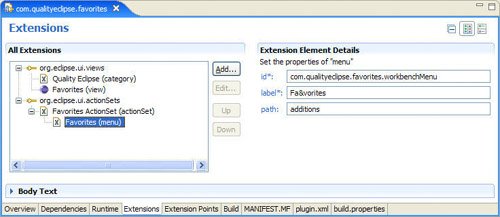
6.2.2. Groups in a menuActions are added not to the menu itself, but to groups within the menu, so first some groups need to be defined. Right-click on the new Favorites menu and select New > groupMarker. Select the new groupMarker and change the name to "content" to uniquely identify that group within the Favorites menu. Add a second group to the Favorites menu; however, this time select New > separator and give it the name "additions". A separator group has a horizontal line above the first menu item in the group, whereas a groupMarker does not have any line. The additions group is not used here, but it exists as a matter of course in case another plug-in wants to contribute actions to the plug-in's menu. 6.2.3. Defining a menu item and toolbar buttonFinally, its time to define the action that appears in both the Favorites menu and the workbench toolbar. Right-click on the Favorites ActionSet and select New > action. Select this new action and enter the following values:
Other attributes, which are discussed in subsequent sections, include the following:
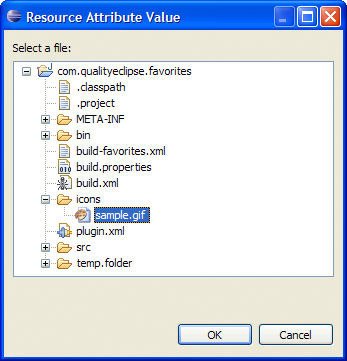
6.2.4. Action imagesNext, associate an icon with the action that will appear in the workbench toolbar. Select the Open Favorites View action added in the previous section, then click the Browse... button that appears to the right of the icon field. In the resulting dialog, expand the tree and select the sample.gif item from the icons folder (see Figure 6-5). Click the OK button and icons/sample.gif will appear in the icon field. Figure 6-5. The Resource Attribute Value dialog for selecting an icon
The path appearing in the icon field and in the plugin.xml is relative to the plug-in's installation directory. Other image-related attributes include hoverIcon and disabledIcon for specifying the image that will be used when the mouse is hovered over the toolbar button and when the action is disabled, respectively. Creating Your Own Icons Several programs are available for creating and modifying images such as Jasc's Paint Shop Pro and Adobe's Photoshop Elements. Using one of these programs, you can create an icon from scratch or start with one of the many icons provided by Eclipse (for starters, see the \icons\full directories located within the plugins\org.eclipse.ui_3.1.2.jar or plugins\org.eclipse.jdt.ui_3.1.2.jar). Icons are typically *.gif files with a transparency color. 6.2.5. Insertion pointsBecause Eclipse is composed of multiple plug-inseach one capable of contributing actions but not necessarily knowing about one another at build-timethe absolute position of an action or submenu within its parent is not known until runtime. Even during the course of execution, the position might change due to a sibling action being added or removed as the user changes a selection. For this reason, Eclipse uses identifiers to reference a menu, group, or action, and a path, known as an insertion point, for specifying where a menu or action will appear. Every insertion point is composed of one or two identifiers separated by a forward slash, indicating the parent (a menu in this case) and group where the action will be located. For example, the Open Favorites View action's menubar attribute (see Section 6.2.3, Defining a menu item and toolbar button, on page 212, and Figure 6-1) is composed of two elements separated by a forward slash. The first element, com.qualityeclipse.favorites.workbenchMenu, identifies the Favorites menu, while the second element, content, identifies the group within the Favorites menu. In some cases, such as when the parent is the workbench menu bar or a view's context menu, the parent is implied and thus only the group is specified in the insertion point. Typically, plug-ins make allowances for other plug-ins to add new actions to their own menus by defining an empty group labeled "additions" in which the new actions will appear. The "additions" identifier is fairly standard throughout Eclipse, indicating where new actions or menus will appear, and is included in it as the IWorkbenchActionConstants.MB_ADDITIONS constant. For example, the Favorites menu specifies a path attribute (see Section 6.2.1, Defining a workbench window menu, on page 209) having the value "additions" that causes the Favorites menu to appear to the left of the Window menu. Because the identifier for the Window menu is window, and if the path attribute of the Favorites menu is set to "window/additions", then the Favorites menu will appear as a submenu in the Window menu itself rather than in the workbench menu bar. Defining an action in an actionSet that contributes to a menu defined in a different actionSet can result in the following error in the Eclipse log file: Invalid Menu Extension (Path is invalid): some.action.id To work around this issue, define the menu in both actionSets. For more information, see Bugzilla entries #36389 and #105949. The toolbarPath attribute is also an insertion point and has a structure identical to the menubarPath attribute, but indicates where the action will appear in the workbench toolbar rather than the menu bar. For example, the toolbarPath attribute of the Open Favorites View action (see Section 6.2.3, Defining a menu item and toolbar button, on page 212) is also composed of two elements separated by a forward slash: The first element, Normal, is the identifier of the workbench toolbar, while additions, the second element, is the group within that toolbar where the action will appear. 6.2.6. Creating an action delegateThe action is almost complete except for the action delegate, which contains the behavior associated with the action. The following are several ways that you can specify the action delegate associated with an action.
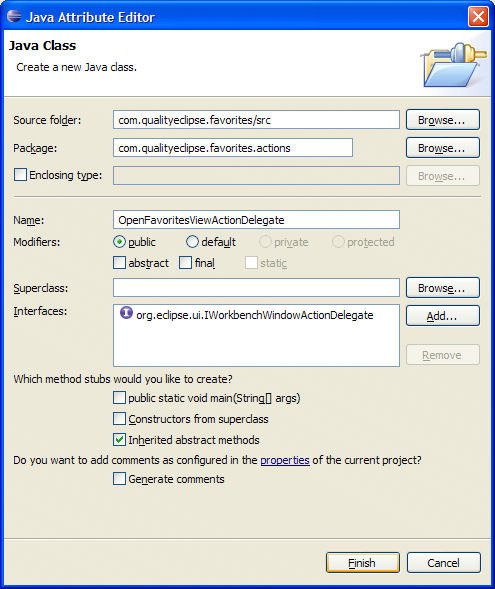
Since you have not already created a class for the action, have Eclipse generate one that can be customized. Select the Open Favorites View action and click the class: label that appears to the left of the class field to open the Java Attribute Editor for the action's class (see Figure 6-6). Figure 6-6. The Java Attribute Editor for an action's class.
Enter "com.qualityeclipse.favorites.actions" in the Package field and "OpenFavoritesViewActionDelegate" in the Name field. Click the Finish button to generate the new action delegate and open an editor on the new class. After the class has been created and the editor opened, modify the class as follows so that the Favorites view will open when a user selects the action. Start by adding a new field and modifying the init() method to cache the window in which this action delegate is operating. private IWorkbenchWindow window; public void init(IWorkbenchWindow window) { this.window = window; } Next, add a constant to the FavoritesView class representing the unique identifier used to open the Favorites view. public static final String ID =
"com.qualityeclipse.favorites.views.FavoritesView";
Finally, modify the run() method of the OpenFavoritesViewActionDelegate class to actually open the Favorites View. public void run(IAction action) {
// Get the active page.
if (window == null)
return;
IWorkbenchPage page = window.getActivePage();
if (page == null)
return;
// Open and activate the Favorites view.
try {
page.showView(FavoritesView.ID);
}
catch (PartInitException e) {
FavoritesLog.logError("Failed to open the Favorites view", e);
}
}
6.2.6.1. selectionChanged methodWhile the action declaration in the plug-in manifest provides the initial state of the action, the selectionChanged() method in the action delegate provides an opportunity to dynamically adjust the state, enablement, or even the text of the action using the IAction interface. For example, the enablesFor attribute (see Section 6.3.2, Action filtering and enablement, on page 227) is used to specify the number of objects to select for an action to be enabled, but further refinement of this enablement can be provided by implementing the selectionChanged() method. This method can interrogate the current selection and call the IAction.setEnabled() method as necessary to update the action enablement. In order for the action delegate's selectionChanged() method to be called, you need to call getViewSite().setSelectionProvider(viewer) in your view's createPartControl() method. 6.2.6.2. run methodThe run() method is called when a user selects an action and expects an operation to be performed. Similar to the selectionChanged() method, the IAction interface can be used to change the state of an action dependent on the outcome of an operation. Guard Code Needed Be aware that if the plug-in is not loaded and the user selects a menu option causing the plug-in to be loaded, the selectionChanged() method may not be called before the run() method, so the run() method still needs the appropriate guard code. In addition, the run() method executes in the main UI thread, so consider pushing long running operations into a background thread (see Section 20.8, Background TasksJobs API, on page 739). 6.2.7. Manually testing the new actionTesting the modifications you have just made involves launching the Runtime Workbench as discussed in Chapter 2, A Simple Plug-in Example. If the Favorites menu does not appear in the Runtime Workbench menu bar or the Favorites icon cannot be found in the toolbar, try the following suggestions:
6.2.8. Adding a test for the new actionBefore the work is complete, you need to devise a test for the new Open Favorites View action. You already have a FavoritesViewTest (see Section 2.8.3, Creating a Plug-in test, on page 93) from which to extract common test functionality. Create a new superclass for all the tests called AbstractFavoritesTest, then pull up the delay(), assertEquals(), and waitForJobs() methods from the existing FavoritesViewTest. The VIEW_ID constant is the same as the FavoritesView.ID constant, so replace it with FavoritesView.ID. Next, create a new test subclassing AbstractFavoritesTest that exercises the new OpenFavoritesViewActionDelegate class. package com.qualityeclipse.favorites.test; import ... public class OpenFavoritesViewTest extends AbstractFavoritesTest { public OpenFavoritesViewTest(String name) { super(name); } Override the setUp() method to ensure that the system is in the appropriate state before the test executes. protected void setUp() throws Exception {
super.setUp();
// Ensure that the view is not open.
waitForJobs();
IWorkbenchPage page = PlatformUI.getWorkbench()
.getActiveWorkbenchWindow().getActivePage();
IViewPart view = page.findView(FavoritesView.ID);
if (view != null)
page.hideView(view);
// Delay for 3 seconds so that
// the Favorites view can be seen.
waitForJobs();
delay(3000);
}
Finally, create the test method that exercises the OpenFavoritesViewActionDelegate class. public void testOpenFavoritesView() {
// Execute the operation.
(new Action("OpenFavoritesViewTest") {
public void run() {
IWorkbenchWindowActionDelegate delegate =
new OpenFavoritesViewActionDelegate();
delegate.init(PlatformUI.getWorkbench()
.getActiveWorkbenchWindow());
delegate.selectionChanged(this, StructuredSelection.EMPTY);
delegate.run(this);
}
}).run();
// Test that the operation completed successfully.
waitForJobs();
IWorkbenchPage page = PlatformUI.getWorkbench()
.getActiveWorkbenchWindow().getActivePage();
assertTrue(page.findView(FavoritesView.ID) != null);
}
After entering the preceding test, the following error will appear in the Problems view: Access restriction: The type OpenFavoritesViewActionDelegate is not accessible due to restriction on required project com.qualityeclipse.favorites. This indicates that the com.qualityeclipse.favorites plug-in does not provide access to the OpenFavoritesViewActionDelegate class to other plug-ins. To remedy this situation, open the plug-in manifest editor to the Exported Packages section (see Section 2.8.1, Test preparation, on page 92), click Add..., select the com.qualityeclipse.favorites.actions package, and save the changes. Now everything is ready to execute the tests. Rather than launching each test individually, the FavoritesViewTest and OpenFavoritesViewTest can be combined into a single test suite named FavoritesTestSuite, which can be launched to execute both tests at once: package com.qualityeclipse.favorites.test;
import ...
public class FavoritesTestSuite
{
public static Test suite() {
TestSuite suite =
new TestSuite("Favorites test suite");
suite.addTest(
new TestSuite(FavoritesViewTest.class));
suite.addTest(
new TestSuite(OpenFavoritesViewTest.class));
return suite;
}
}
While individually launching tests is not a problem now with just two tests; in the future, as more tests are added for the Favorites plug-in, it can save time to have a single test suite. To launch the test suite, select Run... in the launch menu, select the FavoritesViewTest launch configuration that was created in Section 2.8.4, Running a Plug-in test, on page 97, and modify the target to be the new FavoritesTestSuite test suite. 6.2.9. DiscussionTo define a top-level menu or not... that is the question. On the one hand, a top-level menu is a great way to promote a new product that has just been installed, providing a good way for a potential customer to become accustomed to new functionality. On the other hand, if every plug-in defined a top-level menu, then the menu bar would be cluttered and Eclipse would quickly become unusable. Additionally, the customer may become annoyed if he or she does not want to see the menu and continually has to use the multistep process outlined in Section 1.2.2.4, Customizing available actions, on page 14 to remove the menu. What to do? Action sets are one answer to this question. They can be specified in the plugin.xml as visible everywhere in every perspective. Using the new IActionSetDescriptor.setInitiallyVisible() method, you can programmatically override the visibility specified in the plugin.xml so that the top-level menu no longer shows up in any newly opened perspectives. You can create a new action that removes your top-level menu from all current and future perspectives, by using setInitiallyVisible() in conjunction with IWorkbenchPage.hideActionSet(). Your product could contain a checkbox option in your Preference page (see Section 12.2, Preference Page APIs, on page 453) that uses this action to show or hide your top-level menu. Note We submitted a feature request and patch to Eclipse (see Bugzilla entry #39455 at bugs.eclipse.org/bugs/show_bug.cgi?id=39455) for the new IActionSetDescriptor API discussed here, and it was accepted and integrated into Eclipse 3.0 and 3.1. This is a good example of how users can contribute back to Eclipse (see Section 20.6.4, Submitting the change to Eclipse, on page 731) making it a better platform for everyone. Another option is to tie your top-level menu or action set to a particular perspective (see Section 10.2.3, Adding action sets, on page 402). In this way, the menu and actions are only visible when that particular perspective is active. If one or more perspectives are particularly suited for the functionality added by your plug-in, then this may be your best approach. What if an action is editor-related? Section 6.5.2, Defining an editor context action, on page 246 and Section 6.5.5, Defining an editor top-level action, on page 248 discuss adding menus and actions tied to a specific type of editor. With this approach, the top-level menu is only visible when an editor of that type is open. The org.eclipse.ui.actionSetPartAssociations extension point provides yet another option, allowing an action set to be displayed whenever one or more specific types of views or editors are open, regardless of the perspective in which they are opened. This is an excellent way to ensure that specific actions appear in a wide range of perspectives without having to explicitly add the actions to those perspectives. The remainder of this chapter focuses on providing actions in view-specific menus, or as operations directed at specific types of objects rather than top-level menus. In this way, the action will only be visible when it is needed and on the types of objects to which it applies. This approach avoids the top-level menu issue and prevents Eclipse from becoming cluttered. Various approaches for locally scoped actions are covered in subsequent sections. |