| [ Team LiB ] |
|
Creating and Configuring the Physical Cluster EnvironmentClusters can be set up in a variety of ways. In the basic model, there is an administration server with two or more managed servers. The server instances can be on the same or different physical workstations, but the rule of thumb is generally to put one server instance per CPU. To illustrate the concepts in installing and configuring a physical cluster, we will create a very basic example consisting of an administration server with two managed servers, all on the same physical workstation. Now, in any kind of testing or production development, you would want to have these distributed on different CPUs or workstations. However, the assumption is made that as a student you are most likely working on a single workstation environmenthence this simple topology. The installation is shown in Figure 36.1. Figure 36.1. Our simple clustered environment.
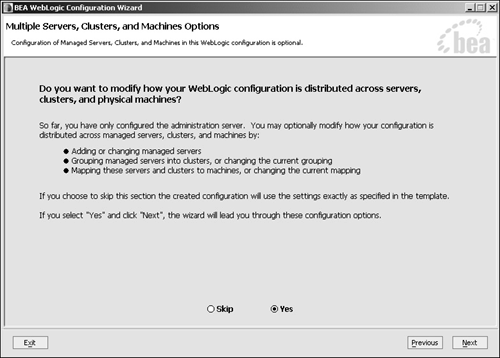
Creating the Cluster DomainThe first step is to make sure that you have a clustering license. The BEA license file is an XML file with a .bea extension. It contains separate license elements and keys for different server functions. Open the license.bea file in the \bea root directory in a text or XML editor. If you see an XML element entry for Cluster with a valid signature and expiration date, you're all set. Otherwise, contact your BEA vendor for a clustering license. The next step is to create the cluster environment. WebLogic 8.1's new Configuration Wizard makes creating a cluster easier than it ever was before. Your domain, administration server, managed servers, and cluster are installed and configured through the GUI. For a complete walkthrough on how to use the Configuration Wizard, please refer to Appendix A, "Quick Reference for Creating New Domains for WebLogic Development." In this chapter, we expand on the clustering options available through the Configuration Wizard. To start the Configuration Wizard from the Start menu, click on Programs As you are going through the Configuration Wizard as explained in Appendix A, at step 6 you'll see a screen asking whether you want to configure your cluster. This screen is shown in Figure 36.2. Figure 36.2. Choose whether to set up clusters.
The Configuration Wizard then shows you a screen in which you can set up your managed servers, as shown in Figure 36.3. When you're finished, click Next to continue.
Figure 36.3. Set up managed servers.
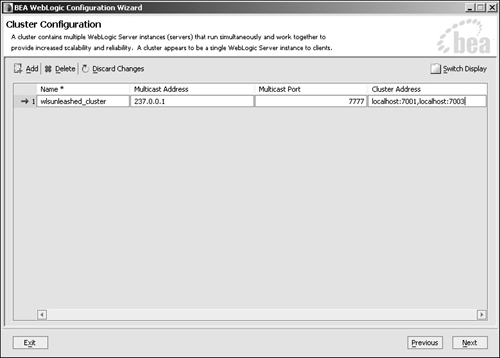
The next window asks you to set up the cluster. Create a cluster as shown in Figure 36.4. When finished, click Next to continue.
Figure 36.4. Create a cluster.
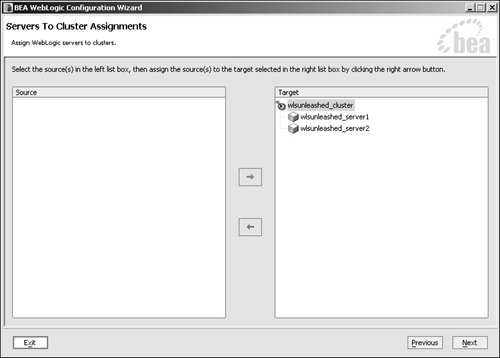
The next step is to assign the managed servers to the cluster. This is very straightforward, as shown in Figure 36.5. Figure 36.5. Assign managed servers to the cluster.
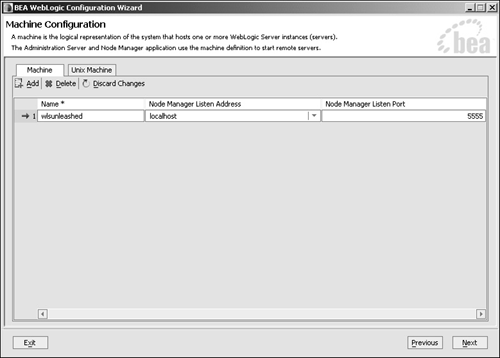
The next step is to set up the host machine. We typically use the machine that has the Node Manager as the host machine because it is used to manage the rest of the WebLogic Server cluster. The administration server connects to the Node Manager on this host. Via the Node Manager, the administration server can start individual managed servers in the cluster. Fill in the details as shown in Figure 36.6 to set up the Node Manager and then click Next. Figure 36.6. Set up the machine configuration.
The next step is to assign the clusters and servers to the machine configuration from the previous screen as shown in Figure 36.7. Figure 36.7. Assign servers to a machine.
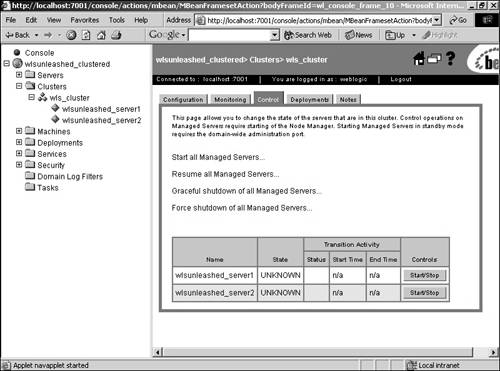
Follow the steps as shown in Appendix A (after step 7 and onward to page 1317), to complete the creation of your clustered domain. For purposes of our example, we named the domain wlsunleashed_clustered. Starting the Administration and Managed Servers in a ClusterNow let's start up the administration server for our new wlsunleashed_clustered domain. You can either click on the link created in the Windows Program Manager at Start After the wlsunleashed_clustered domain has started for WebLogic Server, log in to the Administration Console. Expand the Clusters category on the left, and click on the cluster to see the details of your cluster as shown in Figure 36.7. You can start the managed servers using the Control tab of the cluster as shown in Figure 36.8. You can start all the managed servers or choose to start them individually. Figure 36.8. Start the managed servers.
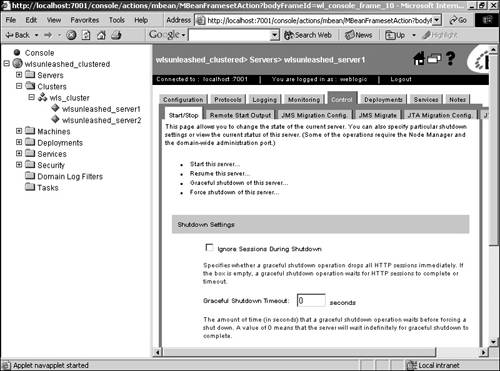
To control the managed servers individually, click on a server and go to the Control tab as shown in Figure 36.9. You can use the links there to start, stop, or resume that managed server. Figure 36.9. Control managed servers individually.
You should probably spend some time browsing the various tabs of the cluster configuration to become familiar with the types of changes that you can make through the administration console. These are pretty straightforward configuration options and enable you to modify the cluster options you used when you first set up your cluster in the Configuration Wizard. You can start the managed servers from the Administration Console or using the startManagedWeblogic command-line script. Using an HTTP Proxy to Access the ClusterNow we have in place our domain with its administration server and clustered managed servers. In our example, where all servers have the same IP address but different ports, client access would be easy because all Web applications would resolve to the same IP address. But what about a real-world deployment, where the managed servers are running on different IP addresses? How would an application know which IP address to resolve to? The answer is to have your clients access your clustered applications via an HTTP proxy server. There are two ways to implement a proxy server:
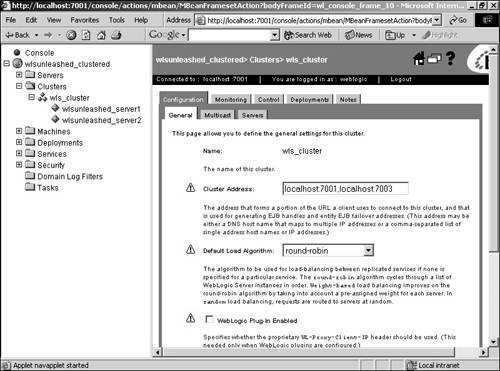
For our example, we will use the HttpClusterServlet on our administrative server in our domain. Using the administrative server for a proxy is okay for development, but in a production environment, you might want to go to an independent instance to work as a proxy. The HttpClusterServlet class is included in the weblogic.jar file, so it's already in the classpath. You need to deploy the HttpClusterServlet just as you would any other servlet (as shown in Chapter 7, "Deploying Web Applications"). The final step is to set a flag to enable the proxies to this servlet. This check box option is on the General tab of the cluster configuration page as shown in Figure 36.10. Figure 36.10. Enabling proxies.
USING THE HTTPCLUSTERSERVLET HttpClusterServlet is a special pre-defined servlet as part of the WebLogic Server that can be used to proxy the requests to a cluster. HttpClusterServlet is set up the same way as other servlets. The following XML snippet explains how to configure a basic HttpClusterServlet in the web.xml file. The defaultServers in the init-param element tag define the list of servers in the WebLogic cluster. <web-app> <servlet> <servlet-name>HttpClusterServlet</servlet-name> <servlet-class>weblogic.servlet.internal.HttpClusterServlet</servlet-class> <init-param> <param-name>defaultServers</param-name> <param-value>wlsunleashed_server1:7001|wlsunleashed_server2:7003 </param-value> </init-param> </servlet> <servlet-mapping> <servlet-name>HttpClusterServlet</servlet-name> <url-pattern>/</url-pattern> </servlet-mapping> <servlet-mapping> <servlet-name>HttpClusterServlet</servlet-name> <url-pattern>*.jsp</url-pattern> </servlet-mapping> </web-app> The <init-param> tag can also be used to define the load algorithm to use as well as to enable debugging. The servlet mapping in the preceding XML snippet redirects all JSP servlet requests to the WebLogic cluster. Similar mappings need to be added for .htm and .html files if the HttpClusterServlet has to serve those files back to the client. The requests are directed to the cluster based on the load algorithm. This servlet forms a bridge between the client and the cluster passing the HTTP requests to one of the servers in the cluster and, on the return, passes the servlet output (for example, an HTML page) back to the client. By default, WebLogic Server uses cookies for storing session identifiers on the client. If the Web browser does not support cookies, URL rewriting can be used to store session identifiers. HttpClusterServlet also facilitates failover to secondary servers in case the primary server goes down. This servlet takes care of forwarding the next request from the client to the secondary server. WebLogic Server promotes the secondary server to the new primary and selects a new secondary server for replicating session state. All this information is updated on the client's session as well for future interactions. HttpClusterServlet is at the heart of the WebLogic-specific implementation of in-memory session replication infrastructure using proxies. The classes are defined in the weblogic.servlet.proxy package. As mentioned earlier, this servlet is similar to other HTTP servlets because the base class to this class, GenericProxyServlet, is derived from the HttpServlet class. This package also provides the following utility classes:
|
| [ Team LiB ] |
|

 BEA WebLogic Platform 8.1