[ Team LiB ] Previous Section Next Section

The Inventory Item Example—COM Client Accessing an EJB

In the inventory item example, we'll expose an Inventory Item EJB and access it through a Visual Basic COM client. The Item EJB can be found in the c:\ch33\jCOM\InventoryItem\earlybound directory. Make sure that it's deployed and available on WebLogic Server. We will access this bean in a late bound and then an early-bound fashion.

The main difference between the early-bound and late-bound examples is that for early bound access, an additional task is required: creating and deploying a type library and wrapper classes for the bean.

The example presumes that you have both WebLogic and the COM client on a Microsoft Windows machine. You'll need Visual Basic 6.0 and the Microsoft MIDL compiler available on your machine as well. The Microsoft MIDL compiler comes bundled with the Microsoft Platform SDK and can be found on Microsoft's Web site. The code files for this example can be found on the accompanying CD-ROM at the back of the book.

First, copy the InventoryItem sample directory from the ch33\jCOM\InventoryItem directory on the accompanying CD-ROM and place it on your machine at C:\ch33\jCOM\InventoryItem\.

Next, we'll set up everything that's required on WebLogic Server to expose the Inventory Item EJB.

WebLogic Server Setup

There are a few things that we will need to do in order to set up the WebLogic Server correctly for this example. This will be done through the WebLogic Server's administrator's console.

First, make sure that the Inventory Item EJB is deployed and is targeted to the examples server.

To enable COM calls on WebLogic Server, do the following:

  1. Bring up the Administration Console.

  2. On the left pane, click Servers and then examples server.

  3. On the right pane, click the Protocols tab and then the jCOM tab.

  4. Check the Enable COM check box.

  5. Click Apply.

  6. Restart the server for these settings to take effect.

Next, we'll need to administer the security settings on WebLogic Server to allow access to our objects. Additional jCOM-specific security settings are required because the COM client will be accessing our objects remotely.

  1. Bring up the Administration Console.

  2. On the left pane, click Services and then jCOM.

  3. On the right pane, enter: java.util.*.

  4. Click Define Policy.

  5. If the Policy Condition lists Caller is a Member of the group everyone, skip to step 7. If not, you must create the policy condition now. In the Policy Statement box, select Caller Is a Member of the Group and click the Add button.

  6. In Enter Group Name, enter everyone and click the Add button.

  7. Next, grant access to all the classes in the Item package containing the EJB. Go back to the Services/jCOM tab and on the right-side pane, enter com.jcom.inventoryitem.*.

  8. In the Policy Statement box, select Caller Is a Member of the Group and click the Add button.

  9. In Enter Group Name, enter everyone and click the Add button.

  10. Next, grant access to the JCOMHelper class used in early binding. Go back to the Services/JCOM tab and on the right-side pane, enter JCOMHelper.

  11. In the Policy Statement box, select Caller Is a Member of the Group and click the Add button.

  12. In Enter Group Name, enter everyone and click the Add button.

NOTE

You can find more in-depth information about granting and revoking access to classes in the BEA electronic documents found at: http://e-docs.bea.com/wls/docs81/secintro/index.html.


Next, register the Java virtual machine where the COM client can find the EJB with the following command:


regjvmcmd.exe examplesServer localhost[7001]

Change the server name and port number where applicable.

For more details on regjvmcmd, refer to "Working with jCOM Tools," earlier in this chapter.

Everything we've done thus far is required for both early and late binding. Now we get to the specific differences between the late and early approaches.

The Inventory Item Visual Basic Client Accessed with Late Binding

This example demonstrates the capability for a Visual Basic client program to access an Enterprise JavaBean using the late binding method. Step-by-step instructions are provided.

Creating the VB Client

Open the VB project InventoryItemLateBound.vbp located in the c:\ch33jCOM\InventoryItem\LateBound directory you created from the files located on the accompanying CD at the back of the book.

Open the form code and the first thing you'll notice is the manner in which a handle to the Item bean is obtained. It is similar to any other VB object creation:


'Bind the EJB ItemHome object via JNDI
  Set mobjHome = CreateObject("examplesServer:jndi: jcom-inventoryitem-itemHome")

Here you reference the server where the bean resides and the JNDI name it was deployed with.

As you can see in Listing 33.2, coding occurs as usual with Visual Basic, but because we do not have access to a type library for the item bean, everything must be referenced as an object. Here you can clearly see the tradeoff you're making. Late binding will get you up and running quickly, but you program somewhat in the dark.

Listing 33.2 Visual Basic Bank Account Client Code Listing
Private Sub ListItem()
Dim objItem As Object
Dim title As String
'Handle errors
On Error GoTo ErrOut
Set objItem = mobjHome.Create()
title = objItem.getItem()
MsgBox ("EJB Accessed:: " + title)
Exit Sub

Run the code by pressing F5. As depicted in Figure 33.11, you should see a message box that displays the results of your EJB method call.

Figure 33.11. Inventory Item Visual Basic client.

graphics/33fig11.gif

The Inventory Item Visual Basic Client Accessed with Early Binding

Early binding requires the creation of a type library that is registered in the client machine's Registry and associated wrapper classes that are compiled and placed in the classpath of WebLogic Server. This can be a somewhat labor-intensive task, so I highly recommend the use of a build tool such as Ant to expedite the process. If you haven't worked with Ant before, now is as good a time as any to start. In the C:\ch33\jCOM\InventoryItem\earlybound directory, you'll find the Ant build script build.xml as well as everything else you need to accomplish early binding. As we go through this process, open each of the files and inspect them. The goal here is for you to later be able to copy and alter these files to suit your own implementations.

Follow these steps to invoke the Inventory Item Visual Basic client with early binding:
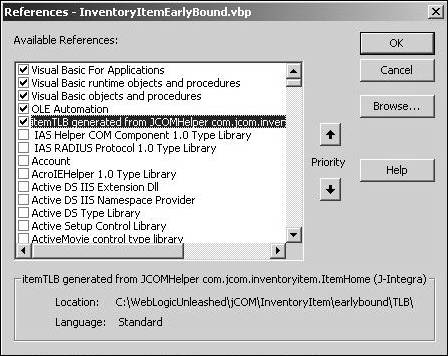
  1. The Ant tool reads from the build.xml file, which calls in properties from the inventoryitem.properties file. Open the inventoryitem.properties file and make any changes necessary referring to the location of your particular WebLogic Server installation. Make sure that the SERVER_NAME points to the WebLogic Server name where the Item.ejb has been deployed. The default is examplesServer.

  2. Next, run cmd.exe and open up a command window. Traverse to the C:\ch33\jCOM\InventoryItem\earlybound directory. Set up the environment by running setInventoryItemEnv.cmd. Remember to do this first—before running any of the following command-line programs.

  3. Initialize the build script with the command ant init.

  4. Compile the jCOMHelper class, which contains a method to narrow an object obtained from WebLogic Server to a local object. The compiled class is placed in the build directory and in the item_earlybound.jar file. In a moment, we'll add all of the wrapper classes we need to this JAR file and then place it in the classpath of WebLogic Server. The command to run is ant compile.helper.

  5. Next, we generate the Java wrappers and IDL file with the java2com tool. java2com recursively goes through the classes you provide (separated by a space) and generates an IDL file that will be compiled into a type library in a subsequent step. At the same time, it creates all the associated wrapper classes you need for WebLogic Server. For more detailed information about java2com, see "Working with jCOM Tools" in this chapter. Bring up the java2com GUI tool with the Ant command ant java2com (see Figure 33.12). Now make the following entries into the java2com tool:

    • Java Classes & Interfaces: JCOMHelper com.jcom.inventoryitem..ItemHome

    • Name of Generated IDL File: itemTLB

    • Output Directory: C:\ch33\jCOM\InventoryItem\earlybound\TLB\

    • Now click on Names so that we can eliminate a few classes before we generate the files as shown in Figure 33.13. We need to do this because by default the java2com tool omits certain classes that, if present at compile time, will generate errors. Select *.toString->'''' and click Remove Selected. Select class java.lang.Class->'''' and click Remove selected. After you have done this, click Close and then Generate.

      Figure 33.13. Map Java names to COM names.

      graphics/33fig13.gif

      In the TLB directory, you'll find the IDL file and all the corresponding Java wrapper source files for the Item bean. Be aware that the generation of an IDL file and wrapper classes for a bean must be done through a single invocation of the java2com tool. This is because the files bear stamped identifiers used to link them together at run time. If you need to, you can move and compile these files on different machines later but initially they must be generated together.

    Figure 33.12. Early binding via the java2com tool.

    graphics/33fig12.gif

  6. We now need to compile all the wrapper classes, jar them, and place them in the class path of WebLogic Server. To compile the classes, use the Ant command: ant compile.wrappers.

    All the compiled wrappers can now be found in the build directory and have been archived in the item_earlybound.jar file. You must place the item_earlybound.jar file and the itemClient.jar found in the c:\\jCOM\InventoryItem\earlybound directory in the classpath explicitly. Having them in an EAR file is not sufficient. In the startWebLogic.cmd for your domain (mydomain is the default), insert


    set CLASSPATH=C:\ch33\jCOM\InventoryItem\earlybound\ item_earlybound.jar;C:\ch33\jCOM
    graphics/ccc.gif\InventoryItem\earlybound\item_Client.jar
    
  7. Next we compile the generated IDL file into a type library. To do this, you must have installed the MIDL compiler we spoke about earlier. In your command window, traverse to the directory where the MIDL compiler is installed and run the SetEnv.Bat so that the MIDL can be found. Go back to the early-bound example directory and run the Ant build tool to compile the type library:


    ant compile.idl
    

    Without the build tool, the syntax would be


    midl itemTLB.idl
    
  8. The resulting type library (itemTLB.tlb) must be accessible to the Visual Basic client. We accomplish this by placing it in the registry of the client machine with the regtlb tool. The Ant build script will invoke regtlb through the ant command:


    ant reg.tlb
    

    Without the build tool, the syntax is

    regtlb /unregsterall (to unregister all existing type libraries)


    regtlb itemTLB.tlb examplesServer
    

Creating the VB Client

Open up the VB project InventoryItemLateBound.vbp located in the c:\ch33\\jCOM\InventoryItem\earlybound directory you created from the files located on the accompanying CD at the back of the book.

From the Projects menu, select References. Make sure that the itemTLB is available for the project as in Figure 33.14.

Figure 33.14. Visual Basic references.

graphics/33fig14.jpg

Open up the form code. Look through the code and notice the differences between this and the late-bound version. The distinction here being that you can now see the methods signatures and attributes of the Item bean as you interact with it. The nomenclature of the code is clearer because we no longer have to refer to everything simply as object.

Run the code by pressing F5, and you should see the same results as shown in the early-bound version you saw earlier.

    [ Team LiB ] Previous Section Next Section