| [ Team LiB ] |
|
The Bank Account ExampleJava Client Accessing a COM ComponentWebLogic Server 8.1 ships with a number of examples that help guide you through the development of various WebLogic Serverrelated technologies. Three of these examples pertain to jCOM specifically and can be found in the \bea\weblogic81\samples\server\examples\src\examples\jcom directory. You'll find that all the provided WebLogic jCOM examples, depict a bank account interface application with COM-based front ends accessing an EJB-housed back end on WebLogic Server. What is not provided, however, is an example going in the opposite direction, showing a Java front end accessing a COM-based back end. We'll remedy that here. In our example, we'll take a similar bank account interface application and serve it up with a Java JSP front end accessing business logic residing in a COM component on the server. This example assumes that you have the WebLogic examples server loaded on your machine. If not, you can still use the example, but you'll have to deploy it into your own WebLogic configuration. The sample code can be found on the accompanying CD-ROM at the back of the book. Creating the JSP Front EndFirst, we'll create the JSP front end for the bank account application. To do this, simply copy the BankAccount.jsp source from the ch33\jCOM\BankApplication directory on the accompanying CD-ROM and place it in the %WEBLOGIC_HOME%\samples\server\examples\build\examplesWebApp directory. BankAccount.jsp contains the presentation and business layer logic for our application. Take a look at Listing 33.1. The first thing you'll notice is that from a Java perspective, there doesn't seem to be any discernable way of telling that the COM component (clsAccount) we're calling is anything other than a regular Java classand that's exactly what we want. All the underlying proxy mechanisms used to access this component are hidden from view. You typically want to break out the business logic from the BankAccount.jsp and place it the middle tier as a servlet, but we've included it here for the sake of expediency. Listing 33.1 BankAccount.jsp
<%! private clsAccount account; %>
<% // Create an Account COM Component and keep a handle to it in the session.
account = (clsAccount)session.getAttribute("objAccount");
if ( account == null )
 account = new clsAccount();
// Keep track of all the user messages during the session.
Vector messages = (Vector)session.getAttribute("messages");
if ( messages == null )
 messages = new Vector();
// Get form variables.
String accountName = request.getParameter("accountName");
boolean NEW_ACCOUNT = true;
if (accountName == null)
 accountName = "";
else
 NEW_ACCOUNT = accountExists(accountName);
Creating the Account COM Back-End ComponentSecond, we'll create the back-end account COM component. This example assumes that WebLogic Server and the COM component will live on the same Windows machine. Create a directory called C:\ch33\jCOM\BankApplication to keep the component in. The account com component for this example was created with Visual Basic. You can copy the associated dynamic link library (Account.dll) for this component from the ch33\jCOM\BankApplication example directory on the CD and place it in the c:\ch33\jCOM\BankApplication directory, or you can perform the following steps with Visual Basic to re-create the component by hand. I highly recommended the latter so that later on you can experiment with your own changes to this component and test the corresponding results. Creating the Account COM Back-End Component by HandUsing Visual Basic, follow these steps to create the account COM back-end component by hand:
Installing the COM Component on the ServerNow we'll perform the tasks required to successfully install the COM component on the server. This is the COM component that will be exposed via jCOM and made available to our Java objects. Registering the ComponentWhether you created the component by hand or simply copied it from the CD-ROM, you'll still have to register it on the Windows machine. You do so with the following command: C:\ch33\jCOM\BankApplication> regsvr32 Account.dll /s If you need to unregister the component later, the command is regsvr32 /u /sAccount.dll Setting Up Component ServicesThis supposes that you're using Windows XP. It could be different depending on which version of Windows you're using. If you're using Windows XP, you can follow these steps to set up component services on your machine: Steps to setup component services on your machine:
NOTE If you get an automation exception such as AutomationException: 0x80040154 - Class not registered at com.linar.jintegra.bp.b(Unknown Source) when running the example, it's because the Component Services step was not performed correctly. If you get an automation exception such as AutomationException: 0x80070005 - General access denied error in 'Invoke' at com.linar.jintegra.Rpc.a(Unknown Source), it's because the security step was not completed properly. So far, we've created a JSP front end and a COM component back end for our application. If you program in Java, Visual Basic, or both, at this point you might be saying to yourself, "But there's nothing special going on here." This is pretty standard fare so far. There's nothing out of the ordinary in the JSP or the COM code that would spark any interest and, of course, this is all by design. com2java Proxy File GenerationThe last step before server setup is to create the jCOM middleware that we'll use to glue these tiers together. Perform the following steps to create these elements:
com2java has created four proxy files for us to be used at the API level to access the Account COM component. They are _clsAccount.java, _clsAccountProxy.java, clsAccount.java, and JintegraInit.java, respectively. We'll compile these classes and place them on WebLogic Server in a directory where they will be available to our application. All the jCOM-related classes needed for compilation can be found in the \bea\weblogic81\server\lib\weblogic.jar file. Make sure that you reference this JAR archive correctly in your class path when compiling. On WebLogic Server, create the directory structure \bea\weblogic81\samples\server\examples\build\examplesWebApp\WEB-INF\classes\com\weblogicunleashed\account and place all four compiled classes there to make them available to our application. WebLogic Server SetupjCOM comes installed with WebLogic Server 8.1 but must be enabled through the Administration Console. We'll now enable COM calls for our application:
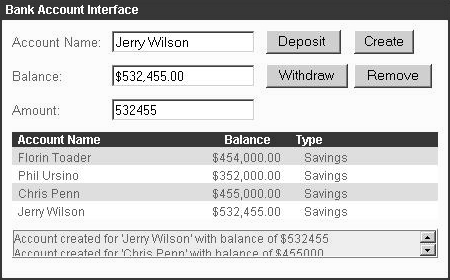
Running the Bank Account Interface ApplicationPoint your browser to http://localhost:7001/examplesWebApp/BankAccount.jsp, and you should see the bank account interface as depicted in Figure 33.10. Figure 33.10. Bank account application.
Within the application, requests are handled by the JSP page, which makes calls to the Account COM component via the clsAccount object. Again, to keep things simple, all data is persisted within the COM object for the duration of a particular session. Ordinarily, the back-end component would cache information to a database as its EJB counterpart does in the WebLogic Serverprovided examples. If you created the COM component by hand, as suggested earlier, you might be tempted to make some minor changes to it and then immediately try to rerun the example. If you do, you'll see the following error pop up on the WebLogic Server Console: java.lang.RuntimeException: Attempt to invoke a non-dispatch method on an object that only This is because the com2java-generated proxy classes specifically make reference to a particular compilation of the COM object. If you set binary compatibility in Visual Basic and the interface for your class does not change you can make minor code changes without the need to re-run com2java. But be aware that if you do not set binary compatibility then any time you make changes to the COM component, or even if you just remake the DLL, you will have to rerun the com2java utility to ensure correct code synchronization. |
| [ Team LiB ] |
|