| [ Team LiB ] |
|
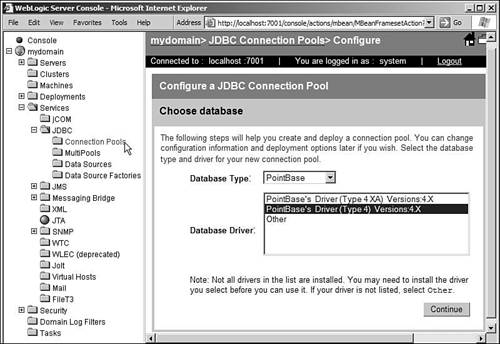
Advanced JDBC FeaturesWebLogic Server 8.1 supports the 2.0 specification of JDBC. With this version, there have been several enhancements to the API. In this specification, the JDBC API has been separated into two parts: the core API and the standard extensions package. All the core classes and interfaces discussed as part of the basic JDBC features continue to remain in the java.sql package. Some new classes and interfaces have been added to this package with the 2.0 specification. Apart from this, the 2.0 specification introduces the javax.sql package, which is the JDBC Standard Extension API. In this section, we go over many of the enhancements of JDBC specification 2.0. JDBC Extensions PackageOne of the most important enhancements to JDBC 2.0 in terms of its relevance to using JDBC in application servers is the new extensions package that has made its way into the JDBC API specification. This package provides several classes that are closely related with other Java standard extensions, such as JNDI and JTA. One of the most important features that the extensions package offers is the way in which you connect with the database. In a two-tier architecture, you obtain a connection to the database by using the DriverManager object. However, for a three-tier application that uses a middleware application server, you can connect to the database by using a DataSource object. Note that while using JDBC with WebLogic Server, the preferred way to obtain a connection is with the use of a DataSource object. In this section, we take a detailed look at the components that help us get a connection from a database by using the DataSource object. Wherever relevant, we'll also see how the particular concept applies in the world of WebLogic Server. Connection PoolsObtaining a connection to a database is often the most expensive part of the JDBC API. For applications that don't perform database operations often, it can be argued that this isn't a huge impact. However, in practice, most applications will access the database quite often. If a connection to the database is opened each time a database operation is made, it can cause a tremendous impact in performance. Some programs might avoid this overhead by opening a connection at initialization time and holding on to the connection, and thus reusing the same connection over and over again for performing its SQL operations. Although this definitely addresses the issue of overhead while opening the connection, it introduces a second problem. Database licenses are usually based on the number of concurrent connections that operate on the databases. Therefore, if you want to have 50 threads servicing client requests with each thread holding onto its own connection, you need 50 concurrent connections to the database. Obviously, this isn't a very cost-effective alternative. To address these two issues, the concept of connection pooling has been introduced. The idea of this concept is that every application thread will not be using its database connection at all times. It's therefore possible to share database connections across application threads. Several threads efficiently share limited resources, with no major impact on performance. Using connection pooling enables you to perform initialization operations once and reuse the connections over and over again. This makes the database operations faster. Because a few connections are shared between many application threads, you can get away with having fewer database licenses, which makes this a very economical alternative. Because the connections are initialized at startup of your application, each request doesn't need to provide the database user ID and password. Those can be provided once, when the connections are established. Using WebLogic Server, you can create connection pools using the server's console. You need to set up several properties of the connection pool, which are used by the server to initialize the pool. These pools are initialized, or in other words, the database connections are established at the server's startup time. Your applications (both client and server side) can borrow a connection from the connection pool, use it, and return it to the pool when the database operations are finished. To create a connection pool, start WebLogic Server and access the console of the server. Make sure that you have the PointBase client library in your CLASSPATH when you start your server. NOTE You can access the WebLogic console by typing the URL http://localhost:7001/console in the address bar of a Web browser after bringing up WebLogic Server. You might have to substitute the hostname and port number according to your situation. Remember that in order for WebLogic Server to use the driver and connect to the database, it should have the driver in its CLASSPATH. You should therefore make sure that you've changed the startup script of the WebLogic Server to include the driver jar file in its CLASSPATH. For PointBase Server, however, WebLogic Server 8.1 automatically includes the required JAR files in the CLASSPATH, so you don't have to change the script. When you see the tree view that describes your domain on the left side, navigate to the link Services On the first screen, you can pick the type of database you want to connect to. There are several predefined database types in the choice box. We'll select the PointBase database type. As soon as you pick the type, the appropriate drivers are displayed in the Database Driver list. You will find that the assistant lists both a driver that's XA compliant, and one that isn't. Note that depending on what type of database you pick, the following screens will be different. In this section, we discuss all the steps only for a PointBase database. However, these steps are conceptually very similar for any given database type. This step is demonstrated in Figure 10.5. Figure 10.5. Creating a connection poolChoose Database.
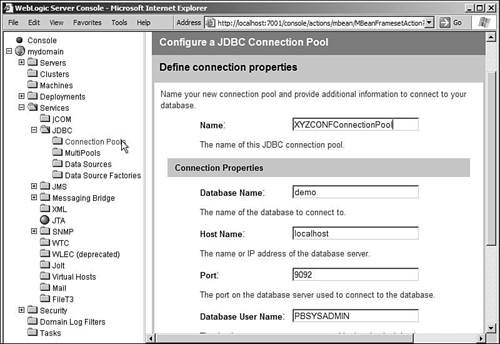
Pick the non-XA-compliant driver and click Continue. This takes you to the Define Connection Properties step. In the next screen of the assistant, you can specify the properties that will be used to connect to the database.
This step of the Connection Pool assistant is shown in Figure 10.6. Figure 10.6. Creating a connection poolDefine Connection Properties.
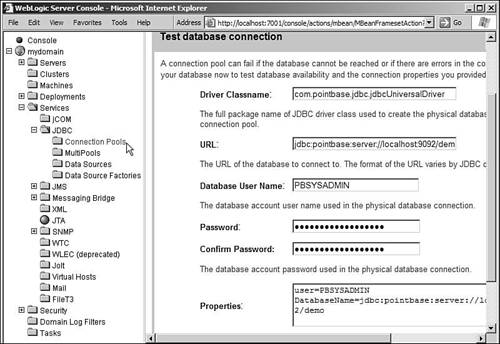
After you click Continue on this screen, the assistant takes you to the Test Database Connection screen where you can optionally test the configuration. Here, you can see the driver class name, the URL, the database user name, the passwords, and any database-specific properties. All these values are prefilled with information that has been gathered by the assistant in the previous steps. If you want to change any of these values, you may do so in this step. Typically, if you've entered all the values in step 2 correctly, you shouldn't have to change these values. At this point, you can either test the connection using these properties or skip the step. It is advisable to test the connection and make sure that all your configuration entries are working fine. You can see a screenshot of this step in Figure 10.7. Figure 10.7. Creating a connection poolTest Database Connection.
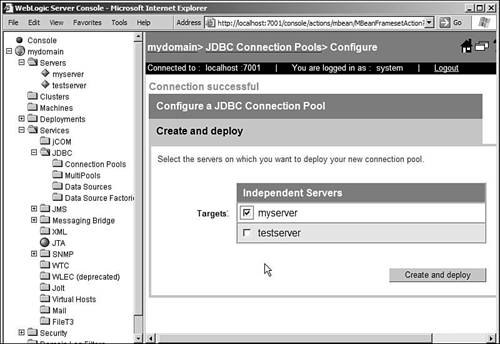
Once you click on the Test Connection button, if the connection could not be created successfully, the assistant remains on this screen and displays the error on the top of the screen. Make your changes and click the Test Connection button again. If the connection is successful, the assistant takes you to the Create and Deploy step. However, if you decide to skip the Test Database Connection step, you are still taken to the Create and Deploy screen. This is the step in which you get to pick the clusters or the servers on which you want the connection pool to be deployed. If you have only one server in your domain, you aren't given an option to pick. The assistant automatically deploys the connection pool on that server. If you have more than one server, you can deploy the connection pool on more than one server. If you don't pick any server to deploy the connection pool, the pool will be created but won't be deployed on any server. You can change this deployment later by changing the properties of the pool. You can see a screenshot of this step in Figure 10.8. Figure 10.8. Creating a connection poolCreate and Deploy.
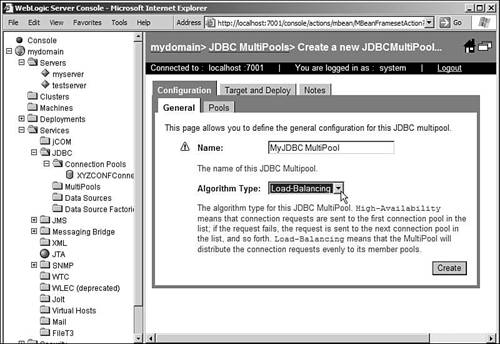
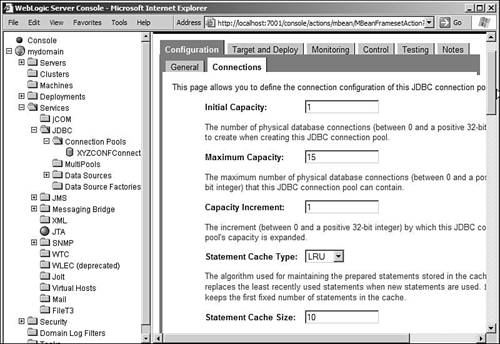
If you chose to skip the Test Database Connection step and create the connection pool, and if your configuration has any errors, the connection pool will be created but not deployed. You'll have to fix these errors and restart WebLogic Server before the connection pool can be deployed on the server(s). After you've completed all the required steps in creating a connection pool, the wizard completes and takes you to the Connection Pool Configuration page. Here you can see all the configured connection pools and their deployment status. You'll also find the connection pool that we just created. Clicking on this will take you to the General tab of the Connection Pool Configuration page. Here you can navigate to the Connections tab to change the maximum capacity of your connection pool. Capacity planning for a connection pool is an iterative process. By default, WebLogic Server sets this value to 15. If your connection pool has been targeted on a cluster, the number of connections in the pool depends on the number of servers in a cluster. For example, if a pool is configured with 5 connections and is targeted on a cluster with 3 servers, a total of 15 connections are produced. You can also change other parameters of the connection pool in this screen. For a list and description of parameters that can be changed on this screen, see the "Tuning Your Connection Pool" section later in this chapter. Multi-poolsMulti-pools are nothing but a pool of connection pools. Your application can get connections from any of the connection pools while using a multi-pool. Each connection within a connection pool that belongs to a multi-pool will be identical to the others; that is, all connections within a connection pool are made to the same database, using the same user ID and password. However, different connection pools within the multi-pool may be associated with different databases. Multi-pools serve one of the following two purposes. You must determine which of these you need the most and must configure your multi-pool to use that algorithm.
You can create a multi-pool using the administration console by navigating to the link Services Multi-pools can be targeted to a single WebLogic Server only. However, a DataSource that points to a multi-pool can be targeted to a cluster. Multi-pools also support only localas opposed to distributedtransactions. Figure 10.9 shows the creation of a multi-pool using the WebLogic Server console. Figure 10.9. Creating a multi-pool using the WebLogic console.
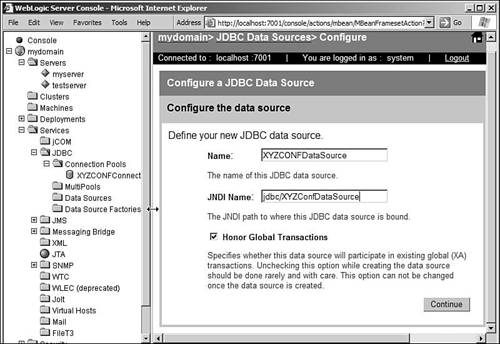
DataSourceNow that we've created a connection pool, the next step is to actually pull out a connection from the pool and use it. This is where the DataSource object comes in. The DataSource is like a factory for server-side database connections. It's configured in the server console and it utilizes a single connection pool or a multi-pool. For this reason, you'll configure a DataSource after you configure the connection pool or a multi-pool. A connection pool or a multi-pool can be referred to by multiple DataSources. When a connection is requested from this factory, it returns a connection from the pool. The DataSource object itself can be looked up from the JNDI tree of WebLogic Server. At the time of configuring a DataSource object, you can provide the name under which this object should be published in the JNDI tree. WebLogic Server 8.1 includes an assistant (wizard) to configure a new DataSource. To kick off this assistant, navigate to the Services The first step is to configure the data source. In this screen, you can enter the name and the associated JNDI name for the DataSource. For our example, specify the name as XYZCONFDataSource and the JNDI name as jdbc/XYZConfDataSource. You'll also find a check box, which is checked by default, that controls the behavior of the DataSource object to honor global transactions. In the early versions of WebLogic Server, transactional DataSources had to be created using what used to be known as TxDataSources. In this version of WebLogic Server, that's no longer necessary. By selecting the option to honor global transactions, you're essentially authorizing the DataSource to participate in existing global transactions. You should have no reason to uncheck this option because you would typically want your connections to be able to handle global transactions. When you're done, click the Continue button. The screen shot showing this step of the DataSource creation is shown in Figure 10.10. Figure 10.10. Creating a DataSource: Configure the Data Source
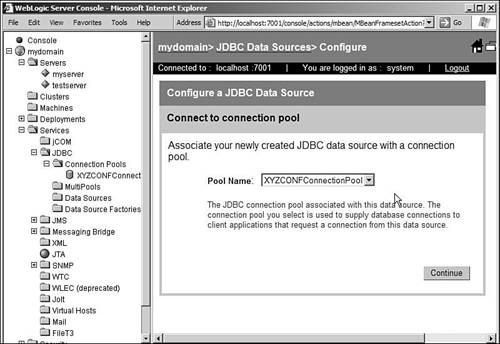
In the next screen, you can configure your DataSource to connect to a connection pool or a multi-pool. This can be seen in Figure 10.11. The drop-down box lists all the configured connection pools and multi-pools, and you can select the pool you're interested in. Click on Continue when you're done. Figure 10.11. Creating a DataSource: Connect to a Connection Pool.
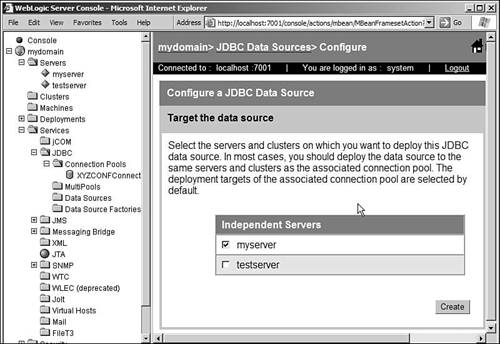
In the next screen, you can target your DataSource to a server or a cluster. If you have a cluster, you'll have an option of targeting your DataSource to the entire cluster or to some servers within the cluster. Select the server on which you want to target this DataSource object and click Create. The screen shot of this step is shown in Figure 10.12. Figure 10.12. Creating a DataSource: Target the Data Source.
Now that we've created the DataSource, let's use it to get hold of a connection to the database. After you configure a DataSource and start WebLogic Server, the DataSource object is created and loaded in the JNDI tree under the given JNDI name. Your application can simply look up the DataSource object by using this published name and request a Connection from the object. The following code snippet obtains a Connection by using the DataSource object that we created earlier: Context ctx = new InitialContext(); DataSource ds = (DataSource) ctx.lookup( "jdbc/XYZConfDataSource" ); Connection aConnection = ds.getConnection(); In the first line of this code, we create the InitialContext, which returns the initial context to the JNDI tree. For more information about JNDI, refer to Chapter 8, "Naming and Directory Services with JNDI." After we obtain an InitialContext, we can lookup the DataSource object by using the logical JNDI name that we provided while creating the DataSource. A Connection can now be obtained from the DataSource by using its getConnection method. When this method is called, the DataSource object contacts the connection pool, obtains a free connection, and returns it. After a connection is returned, you can use it to perform various database tasks such as creating a Statement, PreparedStatement, committing your updates, and so forth. When you invoke the close method on this connection, the physical connection is not closed, but the connection is returned back to the connection pool. The advantage of using the DataSource to obtain a connection is that your program doesn't need to have any idea about the artifacts of connecting with the database. For example, in our earlier discussion of creating database connections for a two-tier application, we saw that while using the DriverManager to obtain a connection, we had to specify the URL, the user ID, and password in the program in order to connect to the database. This can make applications difficult to port. By using the DataSource instead, you can separate the tasks of a developer and a deployer. The developer simply assumes the existence of a data source that will provide certain types of data. The deployer will configure this data source at a later time, while configuring the application. Moreover, the DriverManager class has the inherent disadvantage of being a synchronized class, which can potentially have performance problems for your application. Generally speaking, you can use a DataSource for a three-tiered application and a DriverManager for a two-tiered application. You can use the DataSource to obtain connections from WebLogic Server from both client- and server-side applications. When you want to obtain the DataSource object from a server-side application, you can create the InitialContext with no parametersthe context to the JNDI tree present in the same JVM is returned automatically. While using it from a client context, you have to create the InitialContext, passing to it parameters that identify the server. When you obtain a connection from the DataSource (and hence, from a connection pool), WebLogic provides you with a logical connection. But, in some cases, you might actually require the physical connection rather than the logical connection. You'll typically want to do this if you want to use extra functionality provided by the vendor's connection object, which isn't part of the standard JDBC specification. You can obtain the physical database connection by using a WebLogic Server extension: weblogic.jdbc.extensions.WLConnection. All connections returned by the connection pool are of this type. If you cast the connection into this type, you can then invoke the getVendorConnection method to return the physical vendor connection from the logical connection. Of course, you must be aware of the class that provides the vendor connection so that you can cast it appropriately and use it. Using a physical connection has its disadvantages. The container will not provide any sort of connection management features, such as error handling, statement caching, and so on when you work with a physical connection. When you close the physical connection by invoking its close method, that connection is not reused. The connection pool replaces that connection with a new connection. A direct consequence of this is that the statement cache (if any) associated with that logical connection is also lost, not to mention the extra time involved in re-creating a new database connection. For these reasons, you're strongly discouraged from using physical connections. The JSP DisplayItemsTable.jsp demonstrates the use of a DataSource to obtain a Connection. To execute this JSP, copy the directory JDBCWebApp that's packaged along with the sources in this book into the applications directory under the WebLogic domain (for example, mydomain). Make sure that the PointBase database server is up and running. After starting WebLogic, type the URL http://localhost:7001/JDBCWebApp into the address bar of your browser to execute the JSP. This server makes use of the DataSource under the name jdbc/XYZConfDataSource in the JNDI tree. So, remember to configure this DataSource and its associated connection pool before you attempt to deploy this application. TxDataSourceEarlier in this chapter, we saw how to combine several tasks into logical transactions using JNDI. You may either use the auto-commit feature of JDBC (thus turning every call to the database into its own transaction), or you can turn this feature off and commit or roll back database operations at logical points. This will work fine with databases, but imagine if you want to include other tasks that do not involve a database inside your transaction. For instance, XYZ Confectionaries might want to send a message to a JMS queue whenever a customer purchases more than a preset quantity of an item. The Customer Service department might monitor this queue and send thank you letters to high-volume customers. So, how does this operation get rolled back if the database update rolls back? Obviously, it isn't possible to do this by using the transaction feature of JDBC without explicitly writing code to do it. WebLogic Server enables you to work with transactions at a much higher level than by using JDBC. This is achieved by using JTA. When you use JTA, you can include several other WebLogic components in your transaction. Obviously, you can also include database operations in your transaction. The transaction commits or rollbacks are taken care of by the container. You can read more about JTA in Chapter 9. To use JTA for transactions, you must select the Honor Global Transactions check box while creating your DataSource. While using a global transactionenabled DataSource (also known as a TxDataSource) in the context of a JTA transaction, the data source ensures that the same connection is returned to various parts of your application that are in the context of the same transaction. This way, all database operations are assured to be part of the transaction. Advanced ResultSetThe class java.sql.ResultSet also contains two advanced features: the capability to scroll and update ResultSets. Scrolling in a ResultSetWhen iterating through a ResultSet, you were able to move in one directionforwardby using its next method. However, you can also move backward within a ResultSet object. You can move to an absolute row within a ResultSet as well, thus providing random access to rows within it. Not all ResultSets are scrollableyou'll have to specifically request the Connection to create a Statement that's capable of returning a scrollable ResultSet. This can be done by specifying a parameter in the createStatement method of the Connection object. This parameter identifies two things to the Connection: whether the ResultSet should be scrollable and whether any changes made to the underlying data store should be reflected back into the ResultSet. The createStatement method also takes a second parameter, which indicates whether you also want to update the rows in the ResultSet. We'll look more at updating ResultSets in the following section. The following code fragment creates a Statement, which will return a scrollable, nonupdateable ResultSet when the query is executed: Statement stmt = aConnection.createStatement( ResultSet.TYPE_SCROLL_SENSITIVE, ResultSet This code fragment is very similar to the one that we used in the previous chapter, except for the two parameters in the createStatement method. The first parameter can take three different values:
We look at this parameter in depth in the following sections. Apart from ResultSet.CONCUR_READ_ONLY, which indicates that the ResultSet isn't updateable, the second parameter can also take the value ResultSet.CONCUR_UPDATABLE, which indicates otherwise. These two parameters are optional, and you may continue to create a nonscrollable, read-only ResultSet using the same notation as used previously. CAUTION Remember that both the parameters are ints, so your compiler will not detect it if you switch these parameters around. Like forward-only result sets, the cursor is initially positioned before the first row in a scrollable result set. Whereas calling the next method is the only way to move to a data row in a forward-only result set, you have a choice in the case of a scrollable result set. The previous method is complementary to the next method and can be used to move the cursor to the previous row relative to the current row in the ResultSet. Like the next method, this method also returns false when the boundary condition is reachedthat is, when the cursor has reached the first row in the ResultSetand can therefore be used in a while loop. The methods beforeFirst and afterLast move the cursor before the first row and after the last row, respectively. The methods first and last move the cursor to the first and last row, respectively. The absolute method moves the cursor to an absolute row number. The cursor moves from the beginning of the ResultSet for positive numbers, and from its end for negative numbers. Thus, the command absolute(1) will position the cursor at the first row, while absolute(-1) will position it at the last row. Note that any row numbers we talk about while discussing scrollable result sets are the row numbers within the result set as returned from the query. This is not the row number as stored within the database. The relative method positions the cursor on a row that's relative to the current position of the cursor. Again, positive numbers advance the cursor, whereas negative numbers move the cursor back. For example, if the cursor is currently on the seventh row, the method relative(-1) moves the cursor to the sixth row, whereas relative(1) moves it to the eighth row. You can get the current row in which the cursor is positioned by calling the getRow method. To verify whether the cursor is at a particular position in the ResultSet, you can use the methods isBeforeFirst, isAfterLast, isFirst, and isLast. These methods return boolean values and can be used to check for boundary conditions of the cursor. The sample program com.wlsunleashed.jdbc.Example5.java demonstrates scrolling in a ResultSet. The JDBC 2.0 API also provides similar methods to create prepared statements to make them return scrollable and updateable result sets. Also, keep in mind that irrespective of what type of result set you want to use, the underlying database and the driver should support that type of result set. If a database or driver doesn't support scrollable result sets, you might be given a forward-only result set along with a SQLWarning indicating the same. Updating Data Using a ResultSetIn the previous section, we saw that the createStatement method takes optional parameters indicating the type of ResultSet returned upon a successful database query. The second parameter that this method takes is called as the concurrency type, and determines whether the data in the result set can be updated directly. A value of ResultSet.CONCUR_UPDATABLE makes the Statement create an updateable result set. You can create result sets that are forward only, but updateable. Creating a scroll-sensitive result set will refresh the data in the result set after you update the data. Updating data using a result set is a three-step process (after the query has been executed). The first step is to position the cursor on the row where you want to update the data. This can be done by using one of the positioning methods for scrollable result sets as discussed in the previous sections. For forward-only result sets, you can do this by repeatedly calling the next method until you reach the desired row. Next, update the data in the columns. The ResultSet interface provides with several updateXXX methods that you can use to update the data. Like the getXXX methods discussed earlier, you'll find updateXXX methods for each Java data type. You can pass either the column index (within the ResultSet) or the column name to the updateXXX method, along with the data. For instance, to update the item stock of the first item queried, to fifty, you could use the following code fragment: rs.first(); rs.updateDouble( "STOCK_QTY", 50.0 ); After all the updates have been performed on the row, the third step is to actually update the underlying database with the changes made to the ResultSet. This can be done by calling the updateRow method on the ResultSet. You can call more than one updateXXX method to update multiple columns before updating the entire row with a single call to updateRow. If you reposition the cursor to a different row after changing the data on a row but before calling the updateRow method, your changes will be lost. You can cancel all updates to a row before calling updateRow by calling the cancelRowUpdates method. The following code fragment updates the stock for the first item queried: Statement stmt = aConnection.createStatement( ResultSet.TYPE_SCROLL_SENSITIVE, ResultSet The file com.wlsunleashed.jdbc.Example6.java demonstrates the process of updating data using an updateable result set. Inserting Rows Using a ResultSetIt's possible to insert rows by calling the executeUpdate method on a Statement object and passing it an INSERT statement. It's also possible to insert rows using result sets. You have to create updateable result sets to be able to insert a new row. The process of inserting a row involves moving to a buffer area within the result set that can hold the new row, updating the values of the new row within the buffer, and then inserting the row into the database. The first step is to move to the buffer area, which can be done by calling the special method moveToInsertRow. You can imagine that this method moves you into an empty row within the result set, which isn't really part of the result from the query. After moving into this empty row, you can update the fields in the row by calling the updateXXX rows for all the fields. After all the field values have been entered, this row can be inserted into the database by calling the insertRow method. The following code snippet inserts a new item into the ITEM table: Statement stmt = aConnection.createStatement( ResultSet.TYPE_SCROLL_SENSITIVE, ResultSet While inserting a row, if you don't supply values to a column by using an updateXXX method, that field is set to SQL NULL. If the field in the database doesn't allow NULL values, you'll get an SQLException when the insertRow method is executed. When the cursor is on the insert row, you can call any of the cursor-positioning methods discussed earlier, such as previous, first, last, and so on. When you're on the insert row, you can also use another positioning methodmoveToCurrentRow, which positions the cursor to the current row in the result set. The current row is not the insert rowit's the row in which the cursor was positioned when you invoked the moveToInsertRow method. Deleting Rows Using a ResultSetYou can also delete a row from an updateable result set. To do this, move to the row that has to be deleted and call the deleteRow method on the ResultSet. The following code snippet deletes the third row returned in the query: rs.absolute(3); rs.deleteRow(); CAUTION Different database drivers behave differently when the deleteRow method is invoked. Some drivers will remove the row from the ResultSet, whereas others will leave a blank row where the row existed before deletion. Therefore, you'll need to keep this in mind while designing your application to work with multiple databases or drivers. Reflecting Database Changes in a ResultSetThe data returned by a query is normally pretty much static until you run the query again. The consequence of this is that when the data changes in the data storeeither because of an update that you executed or someone else didthe changes will not be visible to you until you re-execute the query. However, it's possible for you to refresh the data using certain types of result sets even while it is open. Of course, this will depend on whether the database and the driver that you use supports this behavior. This can be done by using a scroll-sensitive result set by setting its type to ResultSet.TYPE_SCROLL_SENSITIVE. Note that just making the result set scroll sensitive does not automatically refresh the row when any changes occur. You must invoke a refreshRow method on the result set for it to refresh the row. This method actually performs a requery in the database under the covers, without using any data cache that the driver might use; therefore, this is one absolute way of ensuring that you have the current data in the database. But for this very same reason, this method is quite expensive and you should use it only if your application absolutely cannot do without the most recent data in the database. If your result set is not of the scroll-sensitive type, refreshRow method does nothing. You can use this feature of JDBC along with the appropriate transaction isolation level discussed earlier to determine what type of changes are visible to your code. For example, consider a module that orders items in XYZ Confectionaries. This module initially checks for the stock of the item, and if it finds it, the module adds a new bill and bill item. Now, at this point, if we want to double-check whether we still have enough stock before we actually update the stock, the following code block will do it for us:
try
{
   Statement stmt = aConnection.createStatement(
                ResultSet.TYPE_SCROLL_SENSITIVE,
                ResultSet.CONCUR_UPDATABLE);
   ResultSet rs = stmt.executeQuery( "SELECT STOCK_QTY, UNIT_PRICE " +
                " FROM XYZCONF.ITEM WHERE ITEM_ID = " +
                itemToBuy );
   rs.next();
   if (rs.getDouble(1) > numRequested)
   {
     // add a new bill
     // add a new bill item
     // refresh the stock
     rs.refreshRow();
     // check for the stock one last time
     double newStock = rs.getDouble(1);
     if (newStock > numRequested)
     {
       rs.updateDouble(1, newStock - numRequested);
       rs.updateRow();
     }
     else
     {
       //rollback transaction here
     }
   }
}
catch (SQLException sqle)
{
   // rollback the transaction here
}
RowSetsRowSets enable easy transportation of tabular data over the network. They also help in providing scrollable and updateable result sets when the underlying database driver doesn't support these features. In this section, we briefly look at RowSets and some of the additional features provided by WebLogic in working with them. RowSets can be of two types, depending on the implementation: connected and disconnected. While using disconnected RowSets, the user can modify the data contained in the RowSet in memory, as if she were modifying the underlying database. The changes aren't transmitted to the database immediately. When the user is satisfied with the changes, she can accept them, which then sends the changes over to the database. This is the behavior that makes disconnected RowSets a good choice to send data over the network. WebLogic Server provides an implementation of disconnected RowSets. It's important to remember that the following discussion of RowSets is very much dependent on the implementation of RowSets in WebLogic Server. Creating RowSetsRowSets are created using the RowSetFactory. This class can be found in the package weblogic.jdbc.rowset. This factory returns a WebLogic implementation of the RowSet, which is represented by the interface weblogic.jdbc.rowset.WLCachedRowSet. The following code snippet creates a RowSet: WLCachedRowSet rowSet = RowSetFactory.newInstance().newCachedRowSet(); MetadataEach RowSet is associated with metadata that can be retrieved from the RowSet by using the getMetaData method. The interface that represents the WebLogic Server implementation of a RowSet metadata is weblogic.jdbc.rowset.WLRowSetMetaData, which extends the javax.sql.RowSetMetaData interface. You can use this object to get and set much useful information, such as concurrency policy, of the underlying database. WLRowSetMetaData rowSetMetaData = (WLRowSetMetaData) aRowSet.getMetaData(); Populating a RowSetRowSets may be populated either directly or using a ResultSet object. To populate the RowSet using a ResultSet object, use the populate method of the RowSet. The following code snippet assumes that we've already executed the query and obtained the ResultSet object: rowSet.populate(myResultSet); A second mechanism of populating RowSets is directly using the relevant database connection information and a query. The connection information can be passed in a couple of formats. They are
Needless to say, we recommend using the DataSource name because that's the way of getting database connections for a three-tiered application. After passing in the database connection information, you can set the command (the SQL statement) and the values and execute it. The following code snippet performs these operations. The first statement assumes the existence of a DataSource object under the JNDI name jdbc/theDataSource.
rowSet.setDataSourceName("jdbc/theDataSource");
rowSet.setCommand("SELECT * FROM BILL_ITEMS WHERE item_id = ?");
rowSet.setInt(1, 10);
rowSet.execute();
The RowSet interface provides several setXXX methods to set the values for various parameters. Each parameter is represented by a placeholder (the question mark in the SQL). The setXXX methods replace the parameter represented by the index with the value passed in. In this example, we replace the item ID with the number 10. After setting the value, we then execute the RowSet by invoking the execute method. Reading from a RowSetAs in a ResultSet object, you can iterate through a RowSet using the next method. You can read the values of the columns using the getXXX methods defined in the interface. These methods take either the index of the column or the column name as a parameter. The following code snippet reads and prints the contents of the RowSet created earlier:
while (rowSet.next()) {
  System.out.println("bill id = " + rowSet.getInt("bill_id"));
  System.out.println("item id = " + rowSet.getInt("item_id"));
  System.out.println("quantity = " + rowSet.getDouble("quantity"));
}
Updating a RowSetBefore you update a row in the RowSet, you should first identify the primary key by invoking the setPrimaryKeyColumn method on the metadata.
WLRowSetMetaData rowSetMetaData = (WLRowSetMetaData) aRowSet.getMetaData();
rowSetMetaData.setPrimaryKeyColumn("ITEM_ID", true);
After you've done this, updating a RowSet is very similar to updating a scrollable ResultSet. As a matter of fact, the RowSet interface extends the ResultSet interface; therefore, you have access to all the methods in the ResultSet. Thus, you invoke various updateXXX methods on the RowSet object to update the columns. At the end of the updates, invoke the updateRow method to update the row. The difference between updating the data using a ResultSet and a RowSet is that these updates are not reflected onto the database when you invoke the updateRow method. After you invoke all the update methods, you have to accept your changes. This can be done by invoking the acceptChanges method. You can invoke several updateRow or cancelRowUpdates methods before you accept the changes once. rowSet.acceptChanges(); Deleting and Inserting a Row Using a RowSetAs with updates, you can delete or insert rows using a RowSet in exactly the same way as with ResultSets. Deleting a row requires that you first identify the primary key by invoking the setPrimaryKeyColumn method on the metadata. After you've done this, remember to invoke the acceptChanges method to commit the changes from memory into the database. The file com.wlsunleashed.jdbc.Example7.java demonstrates the use of a RowSet to insert, update, and delete rows from a database. To use this, you must use the runtime JARs offered by JDK 1.4 or higher. Concurrency PolicyAs you know by now, RowSets implemented by WebLogic can be updated without being connected to the database (because they are disconnected). In many cases, the processes of reading the RowSet and updating it happen in two different transactions. So, it's quite possible that in between these two operations, the underlying data in the database will have been updated by other transactions, and thus the data in the RowSet might be outdated. WebLogic Server RowSet implementation uses optimistic concurrency policy to ensure data concurrency. When you try to update or delete a row in the database using a RowSet, the implementation verifies whether the data in the database was modified after it was read into the RowSet. This is done by including the data that was read in the WHERE clause of the update or delete SQL statement. If the data has changed, the implementation raises an OptimisticConflictException. Applications can trap this exception and requery the RowSet before updating. You have the ability to determine which fields of the table are used for checking for concurrency. You can set the concurrency strategy in the WLRowSetMetaData object obtained from the RowSet by invoking the setOptimisticPolicy method. This method takes an int. The various values that this method can take are defined as constants in the WLRowSetMetaData interface. These values and the concurrency mechanism they represent are described in Table 10.4. Executing Stored ProceduresStored procedures are a very efficient way of performing tasks within a database. Because these are stored and executed within the database, there's very little data access overhead. As the name implies, these procedures are precompiled and stored within the database. Although a discussion of writing stored procedures is much beyond the scope of this chapter, it's important to remember that you should prefer writing stored procedures and accessing them for performing data intensive operations. JDBC enables you to execute a stored procedure from within your Java application, pass values to it, and optionally obtain results in a standard way for all RDBMSs. To do that, you will use a CallableStatement. As usual, the CallableStatement object is also returned by the Connection object. To receive this object, invoke the prepareCall method of your Connection object. This method takes a String, which indicates the stored procedure to be invoked, using a special escape syntax. The syntax for invoking a stored procedure resembles the following if the procedure you're invoking does not return a result:
{call procedure_name[(?,?,...)]}
Here the question marks (?) indicate IN / OUT parameters of the procedure. As you can see, these are optional, and you can have a stored procedure that doesn't take any input and doesn't return any output. The procedure_name is the actual name of the procedure within the database. If your procedure returns data, the syntax would be
{? = call procedure_name[(?,?,...)]}
Needless to say, a stored procedure that doesn't have any IN / OUT parameters and does not return any output can be invoked using the syntax
{call procedure_name}
IN ParametersAfter you create a CallableStatement with IN parameters, you can load the actual values by invoking the appropriate setXXX method on the CallableStatement object. These methods take the name of the IN parameter and its actual value as parameters. There are also alternative signatures that take the IN parameter index (which begins at 1). You can specify literal parameters, which are hard-coded values, in your escape syntax. The index obviously doesn't include these literal parameters. For example, assume that there's a procedure for updating stocks in the XYZ Confectionary system. It takes an item ID and a stock quantity as input, and updates the corresponding records. To invoke this stored procedure, the following code snippet is to be used:
1. String sql = "{call updateStock(?,?}";
2. CallableStatement csmt = Connection.prepareCall(sql);
3. csmt.setInt( "item_id", 1 );
4. csmt.setDouble( 2, 10.0 );
5. csmt.executeUpdate();
In this code snippet, we first prepare a CallableStatement by invoking the prepareCall method and passing in the two parameter placeholders. In lines 3 and 4, we subsequently replace the placeholders with actual values. In line 3, we use the representation that takes the parameter name, and in line 4, we use the representation that takes the parameter index. After loading all the values, we execute the update by invoking the executeUpdate method. OUT ParametersOf course, your stored procedure can return values as output and you can have OUT parameters. To access these OUT parameters, you must first register those parameters as output parameters in your CallableStatement object. To do this, invoke the registerOutParameter method, which takes either the parameter index or the parameter name, along with other information about that parameter, such as the type of the parameter, its scale, and so on. The types of parameters are specified as integers, which are defined as constants in the class java.sql.Types. Remember that all OUT parameters in your stored procedure must be registered with the CallableStatement before you execute the procedure. NOTE You can learn more about the mapping between Java types and SQL types in the Sun documentation at the URL http://java.sun.com/j2se/1.4.1/docs/guide/jdbc/getstart/mapping.html. For example, consider a procedure that returns a result set containing a list of all items that were purchased (from the BILL_ITEM table), as well as the total quantity of items, along with the total cost for all the purchases.
String sql = "{? = call getItemsPurchased(?, ?)}";
CallableStatement csmt = Connection.prepareCall(sql);
This procedure takes no inputs. Now we'll register the OUT parameters. As you can see from the escape syntax, this procedure contains two OUT parameters. We'll register this parameter as an output parameter with the CallableStatement object. csmt.registerOutParameter(2, java.sql.Types.DOUBLE, 2); csmt.registerOutParameter(2, java.sql.Types.INTEGER); We've registered our first output parameter (cost) as a Double, with a scale of 2. This will return a double value with two decimal places. We then registered the second parameter as an Integer. This will return the total number of items purchased. You have to repeat this step for all the output parameters returned by your stored procedure. After we do this, we can then execute the stored procedure by invoking the executeQuery method of the CallableStatement object. This method returns a ResultSet, which can then be processed as discussed in the earlier sections of this chapter. After processing the rows of the ResultSet, you can retrieve the OUT parameter values using appropriate getXXX methods present in the CallableStatement object. Remember that this is the recommended order of processing outputs from stored procedures (that is, OUT parameters are processed after the ResultSet is processed), owing to certain DBMS restrictions. If your procedure doesn't return a result set, you can invoke the executeUpdate method of the object. You can still access the OUT parameters by using the CallableStatement object. INOUT ParametersStored procedures also allow you to define INOUT parameters, which act as both inputs and outputs from the stored procedure. The usage of these parameters is very similar to IN and OUT parameters, but in this case, you invoke both the appropriate setXXX method as well as the registerOutParameter method on this parameter. Batch UpdatesApplications are sometimes required to perform multiple updates of the same type. For instance, consider the Purchasing department of XYZ Confectionaries when new stocks of various items come in. The department must update the stock of all the items at this time. Another example is when the unit prices of different items go up. One way of to perform multiple updates of the same type is to call the executeUpdate method over and over again, once for each row. If you want to use updateable result sets, you still have to make multiple calls to updateRow method after updating each row. Obviously, this isn't very efficient because it amounts to many trips between your application and the database. You can avoid SQL compilation and improve performance by using a PreparedStatement, but that still doesn't avoid the problem of multiple database trips. To address this issue, JDBC 2.0 introduced the concept of batch updates. A batch update is a set of SQL statements that's submitted to a database as one unit for batch processing. You may combine batch updates using a Statement, a PreparedStatement, or a CallableStatement. For example, consider our requirement of updating the stock of several items in XYZ Confectionaries. The following code block will take care of creating a statement, adding three updates to a batch, and finally sending it to the database for processing. We look at what each line does after first looking at the code fragment. Assume that items is an array of item IDs, and newStock is an array containing new stock values for the corresponding items.
1.  try
2.  {
3.    aConnection.setAutoCommit( false );
4.    Statement stmt = aConnection.createStatement();
5.    for (int i = 0; i < items.length(); i++)
6.    {
7.      stmt.addBatch( "UPDATE XYZCONF.ITEM SET STOCK_QTY = " +
8.           newStock[i] + " WHERE ITEM_ID = " +
9.           items[i]);
10.   }
11.   int [] updateCounts = stmt.executeBatch();
12.   conn.commit();
13. }
14. catch (BatchUpdateException bue)
15. {
16.   System.out.println("SQLException: " + bue.getMessage());
17.   System.out.println("SQLState: " + bue.getSQLState());
18.   System.out.println("Code: " + bue.getErrorCode());
19.   System.err.print("Update counts: ");
20.   int [] updateCounts = bue.getUpdateCounts();
21.   for (int i = 0; i < updateCounts.length; i++)
22.   {
23.     System.out.println("oper : " + (i+1) + " = " + updateCounts[i]);
24.   }
25.   rollback(conn); //function that handles the rollback.
26. }
27. catch (SQLException sqle)
28. {
29.   sqle.printStackTrace();
30.   rollback(conn); //function that handles the rollback.
31. }
In line 3, we turn the auto-commit feature off. This ensures that each update is not independently committed to the database. This will allow for accurate checks for errors later in your code. As a reminder, if you have autocommit set to true, each operation within the batch transaction is considered a separate operation and is committed immediately. If you set it to false, you have control of whether to commit the entire batch transaction or roll it back. In lines 7, 8, and 9, we add a batch operation to the Statement object by calling its addBatch method. This operation does not send the SQL command to the databaseit merely registers the command as a part of a batch transaction within the statement object. This block of code will add as many SQL operations into the batch as there are items in the array passed to this code snippet. After all the operations have been added successfully, we then send the batch to the database in line 11 by invoking the executeBatch method. This method does not take any parameters and can possibly send multiple SQL operations to the database, unlike the executeUpdate method, which sends in a single operation. The DBMS executes these operations in the same order they were added into the Statement object. If all operations succeed, the database returns update counts for each operation, which indicate the number of rows affected by each of these operations. These update counts are returned as an int array back to the calling method. Thus, after line 11 has been executed, we'll have as many items in the updateCount array as there are items, and each of the entry should be the value 1this is because each of our updates should affect a single row in the database table. After executing the executeUpdate method, all the batch operations added earlier using the addBatch method are cleared from the Statement object. You can also manually clear the operations if you want to restart the transaction by calling the clearBatch method on the Statement object. Batch updates can result in two kinds of exceptions. Like any other JDBC API, this method also throws an SQLException when there are any problems in accessing the database. Apart from this, the executeBatch method also throws an SQLException when any operation in the batch requires that a ResultSet be returned to the calling process. For example, if you add a query in your batch processing, the executeBatch method will throw an SQLException back. You can execute only SQL commands (both DDLs and DMLs) that return an update count as a result of their execution in a batch transaction. Examples of such commands are INSERT, UPDATE, DELETE, CREATE TABLE, ALTER TABLE, and so on. The addBatch method won't result in an exception when you try to add queries using it because the statements aren't validated until you actually try to execute the batch. If none of the preceding conditions occurs, you know that the method was able to successfully attempt to execute all the SQL statements. However, it's possible that one or more of the SQL statements within the batch transaction may have a syntax error, or there could be something else wrong with the statement. In such cases, this method throws a BatchUpdateException. This exception is a subclass of SQLException, and for this reason, you'll have to catch this type of exception before you catch SQLException. The BatchUpdateException object contains the same information as SQLException does. It also contains a method called getUpdateCounts, which returns the update count int array back to you. If the third operation in your batch failed, this array will now consist of two entries because only the first two operations would have been attempted. Each of these entries will give you the number of rows affected by the corresponding operations. If you had turned auto-commit off, you have the option of rolling back your entire batch operation at this point, if you so choose. The file com.wlsunleashed.jdbc.Example8.java demonstrates a batch update. This process simply updates the stock of the first five items in the ITEM table to the passed values. Statement CachingUsing PreparedStatement or CallableStatement increases performance considerably, but preparing these statements involves quite a processing overhead in communicating between the application server and the database. In cases in which you have to prepare these statements over and over, WebLogic Server provides an option to cache these prepared statements to minimize this overhead during subsequent calls. This is done using statement caching. Each connection maintains its own cache of statements, although the options of caching are specified at the connection pool level. You can specify the caching options for a connection pool using the WebLogic Server console. In order to set up a statement cache, start the WebLogic Server console by typing in http://localhost:7001/console on your browser address bar. Navigate to the Services Figure 10.13. Tuning your connection pool.
Here you can create a cache and assign an algorithm to determine which statement is to be stored in the cache. The two algorithms that are available to you are
You can also specify the cache size for each connection pool (and therefore every connection within it) using the console. You must determine this number very carefully because there's a potential downside to caching statements. Each open prepared or callable statement may potentially reserve DBMS cursors. Therefore, if your cache size is huge, it implies many open cursors, which might cause undesirable results. Remember that if you set the cache size to 10 on a connection pool with 10 connections deployed across two servers, the total number of statements cached is 2 serversx10 connections/serverx10 statements/connection, which is 200 statements! Setting the cache size to 0 disables caching. SQL3 Data Type SupportThe next version of the ANSI/ISO SQL standard defines new data types that are commonly referred to as the SQL3 data types. JDBC 2.0 supports these very useful data types. It provides interfaces that represent these data types so that you can use them as if they were similar to other SQL data types. There are five different interfaces that represent the various SQL3 data types. They are
Arrays, BLOBs, and CLOBs offer a very big advantage in terms of efficiency in storing large data. RDBMS are usually optimized to work well with these data types, and therefore offer better efficiency while using them as compared to breaking them down into multiple smaller columns. Also, the API itself does not always query these objects when you try to retrieve them. A query simply returns a reference to these objects, thus making your queries faster and more efficient. At the point when you need to actually use the data stored within the column, you would call appropriate methods defined by these interfaces to materialize the object. You can retrieve and update these fields just as you would with any other regular SQL data type. These fields may be fetched using a ResultSet object or by invoking a CallableStatement. Both interfaces provide you with getXXX methods (getBlob, getClob, and so on) that enable you to work with these data types. For instance, the following code snippet reads the database for the image of the item from the ITEM table (after making appropriate changes to the database schema, of course):
ResultSet rs = stmt.executeQuery( " SELECT IMAGE FROM XYZCONF.ITEM " +
                " WHERE ITEM_ID = 1 " );
rs.next();
Blob myImage = rs.getBlob(1);
To update these types of fields, you would invoke the appropriate setXXX method (setBlob, setClob, and so on) of a PreparedStatement. For instance, the following code snippet updates the image of the item in the BILL_ITEM table with the image obtained in the previous code snippet:
PreparedStatement ps = aConn.prepareStatement( "
           " UPDATE XYZCONF.BILL_ITEM SET IMAGE = ? " +
           " WHERE ITEM_ID = 1 " ) ;
ps.setBlob(1, myImage);
As we discussed, Arrays, BLOBs and CLOBs are not queried from the database all the time, and only references are returned to your code. So, if you want to query the actual object, how do you do it? The interfaces have methods that enable you to materialize the stored data. For instance, the BLOB interface gives you a getBinaryStream method, whereas the CLOB interface provides you with a getAsciiStream method. Both these methods return an InputStream, which you can process as you would process a normal Java InputStream object. You can refer to the API documentation of JDBC 2.0 for a description of the different methods provided. You can find the documentation in Sun's Web site at the URL http://java.sun.com/j2se/1.3/docs/api/java/sql/package-summary.html. The Struct data type behaves a little differently from what we've been discussing so far about other SQL3 data types. A Struct interface represents a user-defined type in SQL, also known as a UDT. Types can be created by using the CREATE TYPE SQL command and used as column data types. It's quite easy to notice that you don't have a getStruct method in either the ResultSet or the CallableStatement interface. The reason for this is that you will use the getObject method, and then cast the returned object to the Struct interface. You can then access the attributes of your UDT from within the Struct object. Similarly, you can update UDTs by calling the setObject method. Apart from these SQL3 data types, JDBC 2.0 also enables you to work with SQL distinct types. Distinct types are user-defined types that are built based on existing data types. For instance, you could create a distinct type of NUMERIC(16, 2) and call it as DECIMAL. It's easy to see that the new type is based on the basic NUMERIC data type. Such types map to the same Java type as the underlying data type. For instance, in this example, DECIMAL maps to java.math.BigDecimal as its underlying data type. NUMERIC also maps to the same Java data type. Therefore, you'll use the getBigDecimal and setBigDecimal methods to work with this distinct type. |
| [ Team LiB ] |
|
 JDBC
JDBC