Previous Page
Next Page

Using a Spool Directory

For convenience, you can copy frequently installed packages to a spool directory. If you copy packages to the default spool directory, /var/spool/pkg, you do not need to specify the source location of the package when using the pkgadd command. The pkgadd command, by default, will look in the /var/spool/pkg directory for any packages specified on the command line.

Note

Spooling Packages Versus Installing Them Copying packages to a spool directory is not the same as installing the packages on a system.


You can add a software package to a spool directory by following the steps described in Step by Step 2.2.

Step By Step 2.2: Adding a Package to the Spool Directory

1.
Log in as root.

2.
Make sure the spool directory exists.

3.
Add a software package to a spool directory using the pkgadd command, as follows:

pkgadd -d <device-name> -s <spool directory> <pkgid>

in which

  • -d <device-name> specifies the absolute path to the software package. <device-name> can be the path to a device, a directory, or a spool directory.

  • -s <spool directory> specifies the name of the spool directory where the software package will be spooled. You must specify a <spool directory>, a directory where the software will be put.

  • <pkgid> is optional. It is the name of one or more packages, separated by spaces, to be added to the spool directory. If omitted, pkgadd copies all available packages.

4.
Use the pkginfo command to verify that the package has been copied to the spool directory, as follows:

pkginfo -d <spool directory> | grep <pkgid>

The pkginfo command will return a line of information about the package if it has been copied to the spool directory properly. If it returns an empty command line, the package has not been successfully copied to the spool directory.


The following is an example of how to copy a software package to the /var/spool/pkg directory:

pkgadd -d /cdrom/sol_10_305_sparc_4/Solaris_10/Product -s /var/spool/pkg SUNNWman

The system responds with

Transferring <SUNWman> package instance

Now type the following to list the packages in the /var/spool/pkg directory:

pkginfo -d /var/spool/pkg <cr>

The system responds with

system     SUNWman On-Line Manual Pages

Installing Software from the Command Line

Use the pkgadd command to install additional software packages from the command line. In the previous section, we used pkgadd to add software to a spool directory. To install this software on the system, type

pkgadd <cr>

Any software that has been spooled to the /var/spool/pkg directory will be listed. In this example, I spooled a package named SFWgawk. After typing the pkgadd command, the system responds with

The following packages are available:
  1  SFWgawk     gawk - pattern scanning and processing language \
                (sparc) 3.0.6,REV=2002.03.27.20.41
Select package(s) you wish to process (or 'all' to process \

all packages). (default: all) [?,??,q]:

After pressing the Return key, you may see a message like the following:

Using </opt> as the package base directory.
## Processing package information.
## Processing system information.
## Verifying package dependencies.
WARNING:
    The <SFWgcmn> package "Common GNU package" is a
    prerequisite package and should be installed.
Do you want to continue with the installation of <SFWgawk> [y,n,?]

Enter y to install the prerequisite package. When finished, you'll see a message as follows:

Installation of <SFWgawk> was successful.
The following packages are available:
  1  SFWgawk     gawk - pattern scanning and processing language \
                (sparc) 3.0.6,REV=2002.03.27.20.41
Select package(s) you wish to process (or 'all' to process \
all packages). (default: all) [?,??,q]:

Enter q to finish and you'll return to the shell prompt.

Removing Software Using pkgrm

You can remove software packages from the command line using the pkgrm command. For example, to remove the software package named SUNWman, type

pkgrm SUNWman <cr>

The system responds with

The following package is currently installed:
   SUNWman On-Line Manual Pages
           (sparc) 43.0,REV=75.0

Do you want to remove this package? [y,n,?,q]

Enter y and press the Enter key. You'll see a list of files being removed followed by a message similar to this one:

## Updating system information.
Removal of <SUNWman> was successful.

Solaris Product Registry

The Solaris Product Registry enables you to do the following:

  • View a list of installed and registered software and some software attributes.

  • Find and launch an installer.

  • Install additional software products.

  • Uninstall software.

The main difference between the Product Registry and the other tools is that the Product Registry is designed to be compatible with more of the newer installation wizards and Web Start 3.0.

To start up the Solaris Product Registry, type the following:

/usr/bin/prodreg

The Product Registry window shown in Figure 2.1 appears.

Figure 2.1. The Product Registry window.


To view the contents of the system registry, double-click the magnifying glass next to Solaris System Software. The registry will be expanded and the contents listed. Click any folder listed to get more information on that package. I clicked on Entire Distribution and then Apache Web Server, and the information shown in Figure 2.2 was displayed.

Figure 2.2. Apache Web Server information.


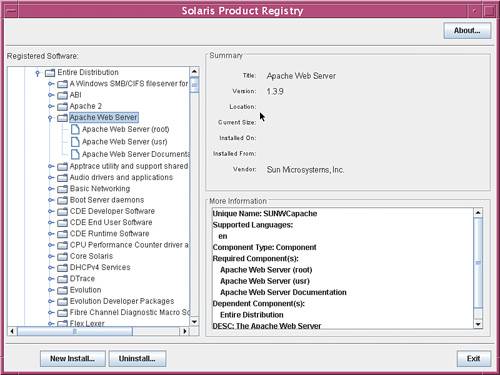
Along with listing information about all installed software products on your system, use the Solaris Product Registry to check the integrity of software products installed on the system. Follow the steps outlined for listing installed software. After you see the package you want to check, click its name in the window titled Software Installed in Solaris Registry. If all or part of the product is missing, the message Missing files in one or more components displays after the Installed From attribute.

You can install a software package with the Solaris Product Registry by following the steps described in Step by Step 2.3.

Step By Step 2.3: Installing Software Using the Solaris Product Registry

1.
Log in as root.

2.
Insert the CD-ROM that contains the software you want to add to the system. When you insert the CD-ROM, the Volume Manager automatically mounts the CD-ROM.

3.
Start the Solaris Product Registry as outlined earlier in this section.

4.
Click the New Install button at the bottom of the Solaris Product Registry window. The Product Registry displays the Select Installer dialog box, which initially points to the /cdrom directory.

5.
When you find the installer you want, click its name in the Files box and then click OK.

6.
The installer you selected launches Web Start installer. Follow the directions displayed by the installer you selected to install the software. For more information on the Web Start Installer, see the next section.


You can also use the Product Registry to remove software by following these steps:

You can remove a software package with the Solaris Product Registry by following the steps described in Step by Step 2.4.

Step By Step 2.4: Uninstalling Software Using the Solaris Product Registry

To uninstall software, go into the Solaris Product Registry window and follow these steps:

1.
Click the System Registry folder in the window titled Software Installed in Solaris Registry and click the software package you want to remove. Read the software attributes to make sure this is the software you want to uninstall.

2.
Click the Uninstall button at the bottom of the Solaris Product Registry window. The software product you selected is uninstalled.


Web Start Installer

The Web Start installer enables you to add software to a system on which you have installed the Solaris operating environment. The Solaris Web Start program installs only those components in the software groups that you skipped when you initially installed the Solaris operating environment. You cannot change to another software group after installing or upgrading.

To add software to your system using the Web Start installer, see Step by Step 2.5.

Step By Step 2.5: Adding Software Using Web Start

1.
Log in to the system as root.

2.
Load the CD-ROM into the CD-ROM drive.

This procedure assumes that the system is running volume management (vold). See Chapter 1, "Managing File Systems," for more details.

3.
Change directories to find the Solaris Web Start installer. It is a file named "installer" that's usually located in the top-level directory of the CD-ROM.

4.
Execute the installer by typing ./installer or by double-clicking the Installer icon in the File Manager or Solaris Product Registry window (as described in the preceding section). You can run the installer in a GUI interface or from the command line. To run the installer from the command line, execute the installer as follows:

./installer -nodisplay

In the following example, I've installed the Solaris CD-ROM labeled "Solaris 10 Companion CD" into the CD-ROM drive. vold automatically mounts the CD-ROM

1.
After inserting the CD into the CD-ROM drive, type the following to begin the installation:

/cdrom/cdrom0/installer -nodisplay

The following dialog begins:

Select the type of installation you want for each product.

     No Install   Default   Install   Custom Install   Product
     ----------   -----------------   --------------   -------
 0.  [ ]          [X]                 [ ]             
 Application/Accessibility
 1.  [ ]          [X]                 [ ]             
 Application/Editors
 2.  [ ]          [X]                 [ ]             
 Application/Networking
 3.  [ ]          [X]                 [ ]             
 Application/Publishing
 4.  [ ]          [X]                 [ ]             
 Application/Utilities
 5.  [ ]          [X]                 [ ]              Desktop
/Environment
 6.  [ ]          [X]                 [ ]             
 Development/Languages
 7.  [ ]          [X]                 [ ]             
 Development/Libraries
 8.  [ ]          [X]                 [ ]             
 Development/Tools
 9.  [ ]          [X]                 [ ]              System/Daemons
 10. [ ]          [X]                 [ ]              X/Applications
 11. [ ]          [X]                 [ ]              X/Window
 Managers
 12.                                                   Done
   Enter the number next to the product you wish to change.
 Select "Done" when
   finished [12]:

2.
Deselect items 19 and press Enter to continue. The following messages are displayed on the screen:

Checking disk space.

The following items will be installed:

Product: X/Applications
Location: /opt
Size: 101.15 MB
-----------------------
stardic - Star Dictionary online translation tool,  v1.3.1     3
.14 MB
xterm - Terminal emulator for X Windows,  v196     395.32 KB
sane - Scanner Applications,  v1.0.12     8.82 MB
rxvt - ouR eXtended Virtual Terminal,  v2.7.10     177.44 KB
xcpustate - display CPU states and statistics,  v2.5     40.05 KB
xmcd - Motif CD Audio Player,  v3.2.1     5.66 MB
gimp - GNU Image Manipulation Program,  v1.2.1     41.16 MB
vnc - Virtual Network Computing,  v3.3.7     1.57 MB
xmms - X MultiMedia System,  v1.2.10     6.04 MB
asclock - the AfterStep clock,  v1.0     34.19 MB
 Product: X/Window Managers
 Location: /opt
 Size: 14.34 MB
 --------------------------
afterstep - X11 window manager,  v1.8.8     37.55 MB
WindowMaker - X11 Window Manager,  v0.80.2     7.91 MB
fvwm - X11 virtual window manager,  v2.4.3     3.08 MB

Ready to Install

1. Install Now
2. Start Over
3. Exit Installation

   What would you like to do [1]?

3.
Press Enter to Install Now and a license agreement is displayed. Press y to accept the agreement and continue the install. The system will show you the progress of the installation and, when complete, will display the following message:

Installing X/Window Managers
|-1%--------------25%-----------------50%-----------------75
%--------------100%|

Installation details:

    Product               Result     More Info
 1. X/Applications        Installed  Available
 2. X/Window Managers     Installed  Available

 3. Done

4.
Press Enter to complete the installation.


Previous Page
Next Page