Volume ManagementObjective: Explain how to perform access or restrict access to mounted diskettes and CD-ROMs. Volume management (not to be confused with Solaris Volume Manager [SVM] described in Chapter 10) with the vold daemon is the mechanism that manages removable media, such as the CD-ROM and floppy disk drives. Mounting and unmounting a file system requires root privileges. How do you let users insert, mount, and unmount CD-ROMs and USB flash disks without being the administrator (root)? After a file system has been mounted and you remove the medium, what happens to the mount? Usually when you disconnect a disk drive while it is mounted, the system begins displaying error messages. The same thing happens if you remove a flash disk or CD-ROM while it is mounted. Volume manager, with its vold daemon, provides assistance to overcome these problems. The vold daemon simplifies the use of disks and CDs by automatically mounting them. Volume manager provides three major benefits:
To begin, let's look at the two devices that the system administrator needs to manage: the floppy disk drive and the CD-ROM. Volume manager provides access to both devices through the /vol/dev directory. In addition, Volume Manager creates links to the removable disk, CD-ROM, and USB devices through various directories, as shown in Table 1.20.
The vold daemon automatically creates the mount point and mounts file systems when removable media containing recognizable file systems are inserted into the devices. For example, when a CD is inserted, vold automatically creates a mount point in the /cdrom directory and mounts the CD-ROM file system onto this mount point. It then creates a symbolic link to /vol/dev/aliases/cdrom0 and /cdrom/cdrom0 as described in the previous table. Note Most CDs and DVDs are formatted to the ISO 9660 standard, which is portable. So, most CDs and DVDs can be mounted by volume management. However, CDs or DVDs with UFS file systems are not portable between architectures. So, they must be used on the architecture for which they were designed. For example, a CD or DVD with a UFS file system for a SPARC platform cannot be recognized by an x86 platform. Likewise, an x86 UFS CD cannot be mounted by volume management on a SPARC platform. The same limitation generally applies to diskettes. However, some architectures share the same bit structure, so occasionally a UFS format specific to one architecture will be recognized by another architecture. Still, the UFS file system structure was not designed to guarantee this compatibility. With a removable disk, however, the file system is not automatically mounted until you issue the volcheck command. The volcheck command instructs vold to look at each device and determine whether new media has been inserted into the drive. On some removable disks such as floppy disks, vold cannot continually poll the disk drive like it does on a CD because of the hardware limitation in these removable drives. Continuously polling a removable disk for media causes a mechanical action in the disk drive and causes the drive to wear out prematurely. All USB devices are hot-pluggable, which means that the device is added and removed without shutting down the OS or the power. USB storage devices will be mounted by vold without any user interaction. When you hot-plug a USB device, the device is immediately seen in the system's device hierarchy, as displayed in the prtconf command output. When you remove a USB device, the device is removed from the system's device hierarchy, unless the device is in use. If the USB device is in use when it is removed, the device node remains, but the driver controlling this device stops all activity on the device. Any new I/O activity issued to this device is returned with an error. In this situation, the system prompts you to plug in the original device. If the device is no longer available, stop the applications. After a few seconds, the port becomes available again. The rmformat command is used to format, label, partition, and perform various functions on removable media such as USB storage devices. For example, to use the rmformat command to format a Zip drive, type the following: rmformat -F quick /vol/dev/aliases/zip0 The system displays the following information: Formatting will erase all the data on disk. Do you want to continue? (y/n) y ......................................................................... The -F option is used with one of the following options:
After formatting the device, you can use the newfs command to create a file system on the device as follows: /usr/sbin/newfs -v /vol/dev/aliases/zip0 You can also use the rmformat -l command to list the removable media devices on the system. Using this command provides detailed information about the device, such as the name used by vold and both the logical and physical device names as follows: rmformat -l The system displays the following information: Looking for devices...
1. Volmgt Node: /vol/dev/aliases/rmdisk1
Logical Node: /dev/rdsk/c5t0d0s2
Physical Node: /pci@1e,600000/usb@b/hub@2/storage@4/disk@0,0
Connected Device: TEAC FD-05PUB 1026
Device Type: Floppy driveThe vold daemon is the workhorse behind Volume Manager. It is automatically started by the /etc/init.d/volmgt script. vold reads the /etc/vold.conf configuration file at startup. The vold.conf file contains the Volume Manager configuration information. This information includes the database to use, labels that are supported, devices to use, actions to take if certain media events occur, and the list of file systems that are unsafe to eject without unmounting. The vold.conf file looks like this: # ident "@(#)vold.conf 1.26 00/07/17 SMI" # # Volume Daemon Configuration file # # Database to use (must be first) db db_mem.so # Labels supported label cdrom label_cdrom.so cdrom label dos label_dos.so floppy rmdisk label sun label_sun.so floppy rmdisk # Devices to use use cdrom drive /dev/rdsk/c*s2 dev_cdrom.so cdrom%d use floppy drive /dev/rdiskette[0-9] dev_floppy.so floppy%d use rmdisk drive /dev/rdsk/c*s2 dev_rmdisk.so rmdisk%d # Actions eject dev/diskette[0-9]/* user=root /usr/sbin/rmmount eject dev/dsk/* user=root /usr/sbin/rmmount insert dev/diskette[0-9]/* user=root /usr/sbin/rmmount insert dev/dsk/* user=root /usr/sbin/rmmount notify rdsk/* group=tty user=root /usr/lib/vold/volmissing -p remount dev/diskette[0-9]/* user=root /usr/sbin/rmmount remount dev/dsk/* user=root /usr/sbin/rmmount # List of file system types unsafe to eject unsafe ufs hsfs pcfs udfs Each section in the vold.conf file is labeled with its function. Of these sections, you can safely modify the devices to use, which are described in Table 1.21, and actions, which are described in Table 1.22.
The "Devices to Use" section of the file describes the devices for vold to manage. vold has the following syntax: use <device> <type> <special> <shared_object> <symname> <options> The <special> and <symname> parameters are related. If <special> contains any shell wildcard characters (that is, has one or more asterisks or question marks in it), <symname> must have a %d at its end. In this case, the devices that are found to match the regular expression are sorted and then numbered. The first device has a 0 filled in for the %d, the second device found has a 1, and so on. If the special specification does not have shell wildcard characters, the symname parameter must explicitly specify a number at its end. The "Actions" section of the file specifies which program should be called if a particular event (action) occurs. The syntax for the Actions field is as follows: insert <regex> <options> <program> <program_args> eject <regex> <options> <program> <program_args> notify <regex> <options> <program> <program_args> The different actions are listed in Table 1.22. In the default vold.conf file, you see the following entries under the "Devices to Use" and "Actions" sections: # Devices to use use cdrom drive /dev/rdsk/c*s2 dev_cdrom.so cdrom%d use floppy drive /dev/rdiskette[0-9] dev_floppy.so floppy%d use rmdisk drive /dev/rdsk/c*s2 dev_rmdisk.so rmdisk%d # Actions eject dev/diskette[0-9]/* user=root /usr/sbin/rmmount eject dev/dsk/* user=root /usr/sbin/rmmount insert dev/diskette[0-9]/* user=root /usr/sbin/rmmount insert dev/dsk/* user=root /usr/sbin/rmmount notify rdsk/* group=tty user=root /usr/lib/vold/volmissing -p remount dev/diskette[0-9]/* user=root /usr/sbin/rmmount remount dev/dsk/* user=root /usr/sbin/rmmount When a CD is inserted into the CD-ROM named /dev/dsk/c0t6d0, the following happens: The system administrator can modify vold.conf to specify which program should be called if media events happen, such as eject or insert. If the vold.conf configuration file is modified, vold must be told to reread the /etc/vold.conf file. Signal vold to re-read the configuration file by sending a -HUP signal to the process as follows: pkill -HUP vold Several other commands help you administer Volume Manager on your system. They are described in Table 1.23. To some, volume management might seem like more trouble than it's worth. To disable volume management, remove (or rename) the file /etc/rc3.d/S81volmgt. Then issue the command /etc/init.d/volmgt stop. If you want to have volume management on the CD but not the floppy disk, comment out the entries in the "Devices to Use" and "Actions" sections of the vold.conf file with a #, as follows: # Devices to use use cdrom drive /dev/rdsk/c*s2 dev_cdrom.so cdrom%d #use floppy drive /dev/rdiskette[0-9] dev_floppy.so floppy%d use rmdisk drive /dev/rdsk/c*s2 dev_rmdisk.so rmdisk%d # Actions #eject dev/diskette[0-9]/* user=root /usr/sbin/rmmount eject dev/dsk/* user=root /usr/sbin/rmmount #insert dev/diskette[0-9]/* user=root /usr/sbin/rmmount insert dev/dsk/* user=root /usr/sbin/rmmount notify rdsk/* group=tty user=root /usr/lib/vold/volmissing -p remount dev/diskette[0-9]/* user=root /usr/sbin/rmmount remount dev/dsk/* user=root /usr/sbin/rmmount With the changes made to /etc/vold.conf, when the vold daemon starts up, it manages only the CD-ROM and not the floppy disk. Using Volume Managementvold is picky. Knowing this is the key to keeping vold from crashing or not working for some reason. With other computers, such as Windows PCs, you can eject CD-ROMs with no problems. With Solaris, vold isn't that robust, so the system administrator needs to follow a few ground rules when using volume management:
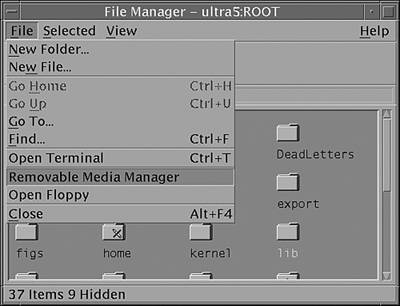
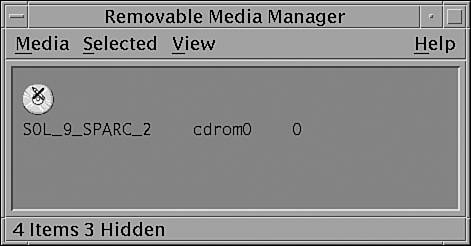
I have found that the most reliable way to use floppy disks is via the Removable Media Manager GUI in the Common Desktop Environment (CDE) or Java Desktop Environment (JDE). Problems seem to be minimized when using floppy disks if I go through the media manager GUI versus the command line. Step by Step 1.12 describes how to access the Removable Media Manager GUI.
Troubleshooting Volume ManagerYou might have problems with mounting a floppy or a CD-ROM. First, check to see if Volume Manager knows about the device. The best way to do this is to look in /vol/dev/rdiskette0 and see if something is there. If not, the volcheck command has not been run or a hardware problem exists. If references to /vol lock up the system, it means that the daemon has died, and you need to restart the vold daemon as described earlier. If vold is working properly, insert a formatted floppy disk and type volcheck followed by an ls -l as follows: volcheck ls -l /vol/dev/rdiskette0 The system responds with this: total 0 crw-rw-rw- 1 nobody nobody 91, 7 Oct 13 14:56 unlabeled Note Unlabeled Volumes The volume is unlabeled; therefore, the file in /vol/dev/rdiskette0 is called unlabeled. Check to make sure that a link exists in /floppy to the character device in /vol/dev/rdiskette0. Type the following: ls -l /floppy The system responds with this: total 18 lrwxrwxrwx 1 root nobody 11 Oct 13 14:56 floppy0 ->\ ./noname Note Diskettes that are not named (that is, they have no "label") are assigned the default name of noname. If a name is in /vol/dev/rdiskette0, as previously described, and nothing is mounted in /floppy/<name_of_media>, it's likely that data on the medium is an unrecognized file system. For example, perhaps it's a tar archive, a cpio backup, or a Macintosh file system. Don't use Volume Manager to get to these file types. Instead, access them through the block or character devices found in /vol/dev/rdiskette0 or /vol/dev/diskette0, with user tools to interpret the data on them, such as tar, dd, or cpio. If you're still having problems with Volume Manager, one way to gather debugging information is to run the rmmount command with the debug (-D) flag. To do this, edit /etc/vold.conf and change the lines that have /usr/sbin/rmmount to include the -D flag. For example: insert /vol*/dev/diskette[0-9]/* user=root /usr/sbin/rmmount -D This causes various debugging messages to appear on the console. To see debugging messages from the Volume Manager daemon, run the daemon, /usr/sbin/vold, with the -v -L10 flags. It logs data to /var/adm/vold.log. This file might contain information that could be useful in troubleshooting. You might also want to mount a CD-ROM on a different mount point using volume management. By default, vold mounts the CD-ROM on the mount point /cdrom/cdrom0, but you can mount the CD-ROM on a different mount point by following the instructions in Step by Step 1.13. Now, instead of using the /vol directory, vold will use /test as the starting directory. Displaying a File System's Disk Space UsageSeveral options are available in Solaris for displaying disk usage. This chapter describes four commands:
Use the df command and its options to see the capacity of each file system mounted on a system, the amount of space available, and the percentage of space already in use. Note Full File Systems File systems at or above 90% of capacity should be cleared of unnecessary files. You can do this by moving them to a disk, or you can remove them after obtaining the user's permission. The following is an example of how to use the df command to display disk space information. The command syntax is as follows: df -F fstype -g -k -t <directory>Table 1.24 explains the df command and its options.
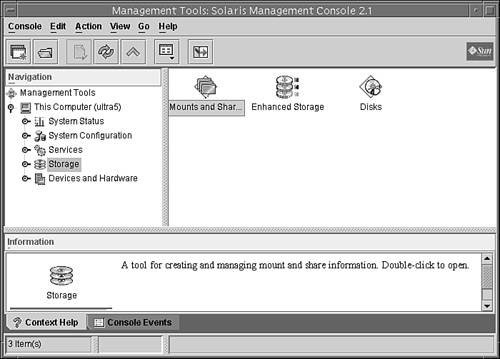
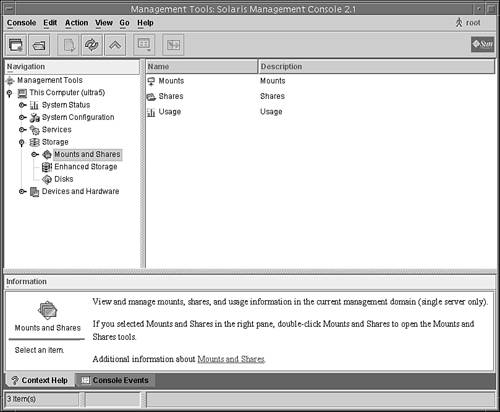
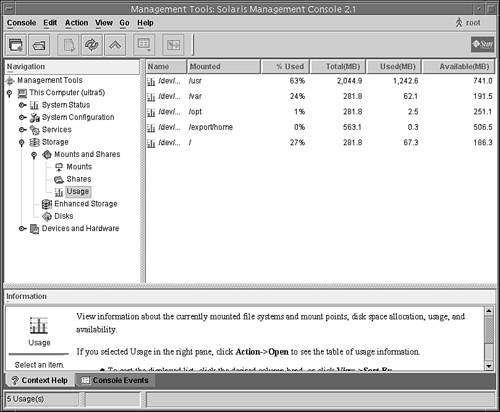
The following example illustrates how to display disk space information with the df command. Type the following: df -k The system responds with this: File system kbytes used avail capacity Mounted on /dev/dsk/c0t0d0s0 384847 233835 112528 68% / /devices 0 0 0 0% /devices ctfs 0 0 0 0% /system/contract proc 0 0 0 0% /proc mnttab 0 0 0 0% /etc/mnttab swap 535968 1008 534960 1% /etc/svc/volatile objfs 0 0 0 0% /system/object /dev/dsk/c0t0d0s6 5117182 2916567 2149444 58% /usr fd 0 0 0 0% /dev/fd /dev/dsk/c0t0d0s1 577286 56583 462975 11% /var swap 534960 0 534960 0% /tmp swap 535000 40 534960 1% /var/run /dev/dsk/c0t0d0s4 480815 105097 327637 25% /data /dev/dsk/c0t0d0s5 1091142 1806 1034779 1% /opt /dev/dsk/c0t0d0s7 480815 2073 430661 1% /export/home In this example, we used the -h option to output the information in a more readable format so that you can see the difference: df -h The system responds with this: File system size used avail capacity Mounted on /dev/dsk/c0t0d0s0 376M 228M 110M 68% / /devices 0K 0K 0K 0% /devices ctfs 0K 0K 0K 0% /system/contract proc 0K 0K 0K 0% /proc mnttab 0K 0K 0K 0% /etc/mnttab swap 523M 1008K 522M 1% /etc/svc/volatile objfs 0K 0K 0K 0% /system/object /dev/dsk/c0t0d0s6 4.9G 2.8G 2.0G 58% /usr fd 0K 0K 0K 0% /dev/fd /dev/dsk/c0t0d0s1 564M 55M 452M 11% /var swap 522M 0K 522M 0% /tmp swap 522M 40K 522M 1% /var/run /dev/dsk/c0t0d0s4 470M 103M 320M 25% /data /dev/dsk/c0t0d0s5 1.0G 1.8M 1011M 1% /opt /dev/dsk/c0t0d0s7 470M 2.0M 421M 1% /export/home Notice that the -h option scales the values to a more readable format. In both examples, you'll see disk usage information displayed for each currently mounted file system. You can also use the Solaris Management Console (SMC) Usage tool, which provides a graphical display of the available disk space for all mounted file systems. To use the Usage tool, follow the procedure outlined in Step by Step 1.14.
Displaying Directory Size InformationBy using the df command, you display file system disk usage. You can use the du command to display the disk usage of a directory and all its subdirectories in 512-byte blocks. When used with the -h option, values are scaled to a more readable format. The du command shows you the disk usage of each file in each subdirectory of a file system. To get a listing of the size of each subdirectory in a file system, type cd to the pathname associated with that file system and run the following pipeline: du -s *| sort -r -n This pipeline, which uses the reverse and numeric options of the sort command, pinpoints large directories. Use ls -l to examine the size (in bytes) and modification times of files within each directory. Old files or text files greater than 100KB often warrant storage offline. The following example illustrates how to display the amount of disk space being consumed by the /var/adm directory using the du command. The largest files are displayed first, and the -k option displays the file size in 1024 bytes. Type the following: du -k /var/adm|sort -r -n The system responds with this: 2230 /var/adm 1785 /var/adm/sa 4 /var/adm/acct 1 /var/adm/streams 1 /var/adm/sm.bin 1 /var/adm/passwd 1 /var/adm/log 1 /var/adm/exacct 1 /var/adm/acct/sum 1 /var/adm/acct/nite 1 /var/adm/acct/fiscal In this example we use the -h option to output the information in a more readable format so that you can see the difference: du -h /var/adm|sort -r -n The system responds with this: 4K /var/adm/acct 2.3M /var/adm 1.8M /var/adm/sa 1K /var/adm/streams 1K /var/adm/sm.bin 1K /var/adm/passwd 1K /var/adm/log 1K /var/adm/exacct 1K /var/adm/acct/sum 1K /var/adm/acct/nite 1K /var/adm/acct/fiscal Note The sort Command Notice that the files are not listed by file size. This is because the -n option to the sort command sorts data numerically, not by file size. The number 4 is a larger number, numerically, than the number 2. The -n option does not take into account that 4KB is smaller in size than 2.3MB. |