|
|
< Day Day Up > |
|
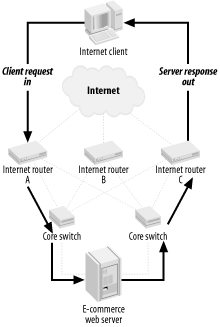
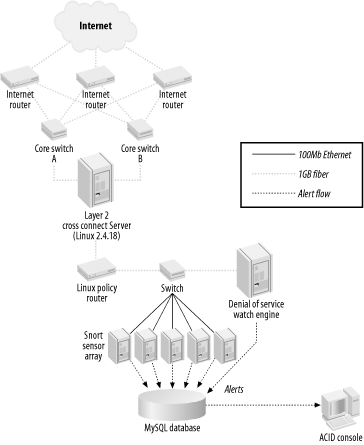
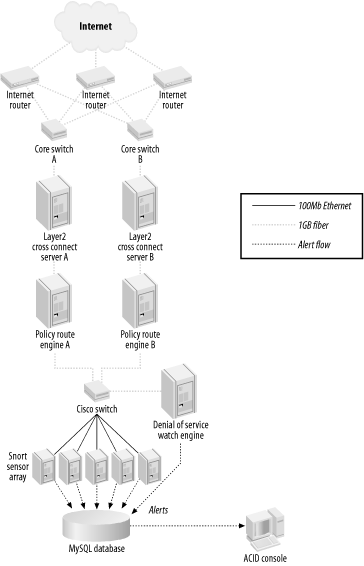
13.3 The IDS Distribution System (I(DS)2)So there I was, faced with a strict budget and the mandate to monitor up to 400 Mbps of sustained bandwidth (which did not necessarily follow a symmetric path through the pair of core switches and three Internet routers) with an IDS system. I examined a variety of solutions to make this work—commercial and open source—and nothing worked, given the requirements and budget. I needed to build (or have someone help me build) a solution that used off-the-shelf hardware and open source software that could keep up with the monstrous volume of traffic. From this was born the IDS Distribution System (I(DS)2). 13.3.1 A Little BackgroundI (Christopher Gerg) am the Network Security Manager for a data center hosting company (and ISP) that has an OC-48 SONET ring connecting the data centers (there are two of them) with the telecom central offices. There are three redundant OC-3 Internet connections from the SONET ring. This traffic all collapses on a pair of large Cisco switches and from there onto our data center customers. We do not use symmetric routing; as a result, a request can come in from the Internet to one of our customers in the data center by entering in router A, passing through switch A, and then return to the client through switch B and out router C. Simply setting up a SPAN port on one of switches would potentially only allow half of the conversation to be watched. Figure 13-4 illustrates this asymmetric routing. Figure 13-4. Asymmetric routing 13.3.2 The SolutionThe multithreaded Linux-kernel-based policy routing engine was a good start: fast, thrifty with CPU utilization, and flexible (routing can be based on protocol or IP address). The only problem is that the routing engine only acts on packets destined for the MAC address of an interface installed in the system. Given the extensibility of the Linux kernel, a custom module that would take all traffic in one interface, change the MAC address to that of the policy routing system, and send the modified packets out another interface had to be developed. This module was created and turned out be easily configured and not very CPU-intensive. It is referred to as the Layer 2 Cross-Connect (a.k.a l2cc, a.k.a the MAC Munger—I still call it the MAC Munger, but we needed a grown-up name). This kernel patch allowed me to take the traffic from a SPAN port on each core switch, aggregate it into one stream, change the MAC address of each packet, and forward the stream onto the Linux Policy Router. The policy router can be configured to send all traffic to or from a range of addresses to a particular IP address (the IP address of a Snort sensor interface). The traffic can also be routed based upon source or destination port, allowing me to send all web traffic to a particular sensor, all FTP traffic to another sensor, and so on. The inside interface of the Policy Router is plugged into a fast LAN switch using a Gigabit fiber link that also has the sensor's promiscuous monitoring interfaces connected. Up to this point, all the traffic travels on Gigabit fiber links. The switches are able to use 100 Mbps Fast Ethernet ports and traffic is balanced so as not to over-saturate these links. The switch I am using has two Gigabit links, so I created a SPAN port for the distribution switch that watches the entire flow of traffic. A dedicated sensor watches this SPAN port for portscans and signs of denial-of-service attacks. Using tcpdump on this portscan sensor, I can record all traffic between two hosts for later examination—an excellent troubleshooting and forensic tool. Figure 13-5 illustrates the IDS Distribution System. Figure 13-5. The IDS Distribution System (1 Gbps capacity) With the policy router acting on packets, it was trivial to send particular packets to particular NIDS sensors. After testing, it was determined that the systems could keep up with Gigabit Ethernet at full line rates. CPU utilization for the l2cc system at 400 Mbps was 23%; the policy router ran at 24%. These are 1 GHz Pentium III systems. Since Internet traffic travels through two VLANs (one on each core switch), a pair of NIDS distribution systems could work in tandem to watch up to two Gbps of traffic! This potential capacity allows me to monitor traffic for the foreseeable future. Figure 13-6 illustrates the two-legged mechanism that allows the load balancing of up to two Gbps of traffic. Figure 13-6. IDS Distribution of up to 2 Gbps 13.3.3 InstallationInstallation of the IDS Distribution system involves a few steps, including one kernel patch and recompile and one kernel configuration and recompile. Before launching into the steps below, you need a SPAN port configured on the switch you are monitoring that is making a copy of the traffic you want to watch. This may be more than one SPAN port, as in my example. You need a system for the Layer 2 cross-connect, configured with one network interface for each of the inbound SPAN ports, and one for the outbound aggregated traffic stream. I also include an additional interface that is on the dedicated (and protected) management network. The outbound port of the Layer 2 cross-connect is plugged directly into one of the interfaces on the Linux policy router system. You need another interface for the outbound routed traffic, connected directly to the distribution switch. Again, I use an additional interface on the management network. Next, you need the distribution switch. It can be any enterprise-class workgroup switch. I use a Cisco Catalyst 3550 for my setup. It has 24 10/100 Fast Ethernet ports and 2 Gigabit fiber ports. The outbound interface of the policy router plugs into one of the fiber ports and the other fiber port is configured as a SPAN port of the first. The portscan/DoS-watch Snort sensor is plugged into the fiber SPAN port and watches All the traffic. Finally, configure as many Snort sensors as you need to ensure that CPUs and memory are not being used up and packets aren't being dropped. Configure each with a promiscuous network interface that accepts traffic routed to its IP address by the policy router. There's another interface on the management network, also used for database communication. My configuration has a dedicated database server running MySQL. This could be one of the sensor systems in your environment, or perhaps an existing database server. 13.3.3.1 Layer 2 cross-connectThe Layer 2 cross-connect (MAC Munger) can be downloaded from http://www.sourceforge.net/projects/l2cc. It contains instructions in the README (nearly the same as what's below). It consists of a kernel patch and an administration application. The kernel patch has been built to work with the stock 2.4.18 kernel. Development is ongoing to move it to a more modern kernel. Check the web site for updates. Download the archive and extract it to something like /usr/local/src/l2cc/. Assuming your kernel source resides in /usr/src/linux/, execute the following command line to patch the kernel: # cd /usr/src/linux # patch -p1 < /usr/local/src/l2cc/l2cc-linux/l2cc-0.010.diff Configure the kernel to enable l2cc: # cd /usr/src/linux # make menuconfig Turn on these options: Code maturity level options --->
[*] Prompt for development and/or incomplete code/drivers
...
Networking options --->
[*] Layer 2 Cross Connectr (EXPERIMENTAL) (NEW)Compile and install the kernel as required for your system/distribution. If you have any problems with this, check the README at the top level of the Linux kernel source tree. Compile the l2ccadm admin utility: # cd /usr/local/src/l2cc/l2cc-linux # make l2ccadm If you get errors, try modifying the CFLAGS variable in the Makefile. The Makefile is documented to help with this. To run the Layer 2 cross-connect, use the l2ccadm utility. This utility has the command line to change the MAC addresses of all packets captured on the SPAN port interfaces to the MAC address of the outside interface of the policy router, and forward the packet out another interface: l2ccadm [-a|-d] -i <interface name for SPAN port side> -o <interface name of policy router side> -m <MAC address of outside interface of policy router>
13.3.3.2 Policy routerThere is nothing fancy about the policy router—it uses standard Linux policy router kernel functionality. Indeed, it does not even have to be a Linux policy router. I used it because I am familiar with Linux policy routing and I was on a tight budget. It's turned out to work magnificently. You need to enable policy routing in the kernel using menuconfig: # cd /usr/src/linux # make menuconfig Turn on these options: Networking options ---> ... [*] IP: advanced router [*] IP: policy routing Compile and install the kernel as required for your system/distribution. If you have any problems with this, check the README at the top level of the Linux kernel source tree. Now, configure the policy routing to route ranges of addresses to particular sensors. In the example shell script below, we send all traffic to and from 10.10.0.0/16 to the sensor with the IP address of 172.30.16.11 and all traffic to and from 10.20.0.0/16 to the sensor with the IP address of 172.30.16.12. eth0 is the inbound aggregated stream from the l2cc system and eth1 is the outbound interface that routes traffic to the sensors. #!/bin/tcsh # Rules to send all traffic to and from designated range to route table 31 ip rule add type unicast from 10.10.0.0/16 table 31 ip rule add type unicast to 10.10.0.0/16 table 31 # Rules to send all traffic to and from designated range to route table 32 ip rule add type unicast from 10.20.0.0/16 table 32 ip rule add type unicast to 10.20.0.0/16 table 32 # map route table 31 to sensor at designated address out from eth1 ip route add default via 172.30.16.11 dev eth1 table 31 # map route table 32 to sensor at designated address out from eth1 ip route add default via 172.30.16.12 dev eth1 table 32 ip route flush cache echo Showing Rules... ip rule list ip route list table 31 ip route list table 32 All that's left to do is plug in the sensors and get Snort configured and running. |
|
|
< Day Day Up > |
|