|
|
< Day Day Up > |
|
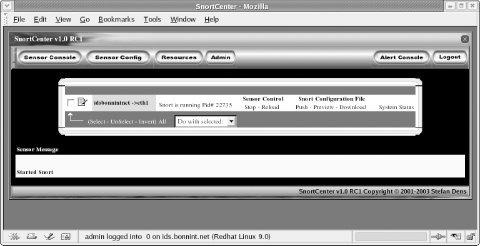
11.4 Logging In and Surveying the LayoutWith each release of SnortCenter, additional components are added to or removed from the web interface layout. The most recent version of SnortCenter as of this writing requires an initial login. After successfully logging in, the default SnortCenter home page displays all configured sensors and their current state of operations. This information helps to immediately determine if Snort is running and fully functional on all the configured sensors. In most cases—as with the example shown in Figure 11-2—SnortCenter displays only a single sensor, because the sensor agent is running on the same system as the management console. This is the recommended architecture for launching a new intrusion detection system and is a common configuration for small networks. It is also a useful configuration for learning how to use Snort. As you become more familiar with Snort, you will probably install additional sensors throughout your network. Figure 11-2. The initial SnortCenter login displaying all configured sensors
The trickiest part of understanding SnortCenter is navigating its myriad drop-down menus and understanding their functions. The terms used in each menu may not be entirely self-explanatory, and they may not always make sense. But once you are familiar with each menu and its purpose, SnortCenter becomes second nature. The menus displayed on the initial page are Sensor Console, Sensor Configuration, Resources, and Admin. Although these links are fairly self-explanatory, they deserve a more detailed inspection. To the far right on the main page are some standard navigational buttons. The first, Alert Console, links to your default ACID web page. This link is configured within the config.php file located in the snortcenter/ directory. The last icon is a Logout button. Always log out and shut down your browser when you are through with SnortCenter. Leaving an unattended and open configuration menu is never a good idea. The next few sections are a close-up examination of each menu and its purpose. Although the location of each function may change in later releases, the basic items and tasks should remain the same. 11.4.1 Sensor ConsoleThe Sensor Console button allows you to view, add, and remove sensors from your configuration. Remote sensors are added and maintained by the SnortCenter management console via this link. The Sensor Console button also refreshes the default page that displays all configured sensors. Whether you're adding a sensor on the local management console or on some other remote system, the configuration settings remain basically the same. The only items that change are the IP addresses and allowable subnets or address ranges. If at some later time you also wish to remove a remote sensor from production or need to upgrade the system on which it runs, do so by selecting the Remove Sensor link. 11.4.2 Sensor ConfigurationThe Sensor Configuration menu lets you modify existing rules and select different options within the snort.conf file. Instead of editing the file by hand, you can make all desired changes from the GUI console. All settings can be modified—variables, preprocessors, ruletypes, classifications, and so on. The items listed in this drop-down menu are selection options shown in the following order: Rule Selection, Variable Selection, Preprocessor Selection, Output Plugin Selection, RuleType Selection, Classification Selection, and Reference Selection. Each of the items listed offers a range of editing choices for modifying Snort for a particular local or remote sensor. Possibly the most important item is the Rules Selection drop-down menu. These are the same rules that are either downloaded off the Internet via the SnortCenter option or in a compressed file from the Snort download page. The top portion of the page lists options for viewing or hiding different rules. After starting the IDS, all items listed initially under the Rule Policy Templates section to the far left can be activated by clicking on the red Xs and changing them to green checkmarks. Leave those categories you do not wish to monitor disabled. The Rule Category Overview link to the far-right offers a complete perspective on all downloaded rules and shows which categories are enabled and disabled. The Edit tool allows you to customize the
individual rule fields; any field with the option shown in bold can
be modified. To create a new rule, select Resources
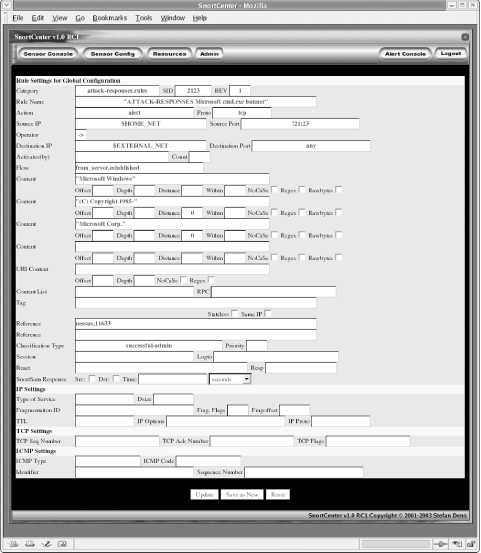
The other selections listed under Sensor Config enable or disable individual features. The Variable Selection and Preprocessor Selection drop-down menu items can be left with default values enabled. The values in these menus are easy to turn on or off. Clicking a green checkmark deactivates that particular variable. Modifying the variables themselves again falls under the Resources drop-down menu option. The other item of importance under the Sensor Config menu is the Output Plugin Selection. This item allows you to configure the database settings your Snort sensors use to report activity. Modifying the plug-in requires going to the Resources drop-down menu. The menus RuleType, Classification, and Reference can either be left alone or enabled. Be careful choosing the items you activate or leave disabled. Unless you are absolutely certain what each feature does, leave the items in these three menus in their default settings. 11.4.3 ResourcesThe third drop-down menu on the SnortCenter page is the Resources link. The Resources menu exists to add new features to the Snort rules, modify existing rules, or create new rules. For each of the items listed under the previous menu, a similar feature can be added or customized under Resources. The standard method is to view existing items and then add a new item to the existing list. For example, the View Rules list under Resources and Rules shows all available Snort rules. Next to each rule is an Edit icon, which, when clicked, brings up all possible fields available for editing changes, complete with assigned values for that particular rule. Figure 11-3 shows the menu for rule settings. Figure 11-3. Edit or modify existing rules to suit You aren't required to fill in all the fields. Additional values can be added or removed from the settings and updated to the rule or saved as a new rule. These include settings such as SnortSAM options, specific logto: filenames, and IP, TCP, and ICMP settings. If you do decide to edit an existing rule, you should, as a matter of habit, always increment the rule option rev or increment the rev field one number. This step makes tracking default rules against those customized by users much simpler. 11.4.3.1 Creating a new ruleTo create a new rule, it's often easiest to start with an existing rule. Start by finding the type of rule that corresponds to the type of packet you want to monitor. For example, to create a rule that watches TCP packets for some particular contents, select one of the existing rules (i.e., sid 2093) and click the Edit button. Then make the following changes:
Keeping this book open to Chapter 7 during this process might be helpful during this process. Very often, the default settings generated by SnortCenter are
adequate. Once you have approved the new rule, enable it under the
Sensor 11.4.4 Additional ResourcesThe same functions for adding new rules apply to the remaining options listed under the Resources menu. The items shown under the Variables, Preprocessors, Output Plugins, Rule Types, Classifications, and Reference headings can all be edited to suit. You can also create new options based on existing rules or even start from scratch. Again, familiarize yourself with existing constructs and the manner in which they are created before attempting to fashion a new resource. If you make any mistakes in the syntax, the SnortCenter program or Snort will let you know. Pay close attention to the Output Plugins selection. The current Outplut Plugin displays the name of the sensor, the database name and type, and the username and password for logging into the database. These options are defined during the IDS setup routine. If you decide to modify these options or create a new database, be certain to edit these variables as well. The Rule Type feature is also crucial to running Snort properly. The normal procedure is to use the "log" attribute rather than the "alert" feature. 11.4.5 AdminThe final drop-down menu is called Admin. This link ties into the download and installation options of new rules from the Snort rule page. It is also used for various administrative tasks, such as configuring existing users and granting new users access to the SnortCenter management console. The first option under the Admin menu grants users the ability to import or update rules. This can be done in several ways. The first and most common method is to update the rules directly from the Internet, with an automated script that grabs a compressed file from the Snort download site. The location of the script is configured in the config.php file in the SnortCenter directory. Remember that after downloading the complete rule set and then pushing it out to the customized snort.conf file, all custom or edited rules are overwritten, except those within the local.rules section. Rather than downloading all rules, you may prefer to add new rules as they become available. For example, shortly after the SQL Slammer worm appeared on the Internet, the Snort administrators posted a custom rule that recognized the worm's signature. The best method for creating or adding custom signatures is to use the Copy & Paste option under the Admin menu. Paste the new rule directly into the database in the area provided. When new rules are posted on the Snort site, any user can copy and paste them directly into the database using this link. Another option is to download the compressed rule base onto your local machine, open the SnortCenter web interface, and select the "Upload file" option under the Admin menu. Browse for the file stored locally and upload it to the database on the IDS server. This is a useful option for users on slow connections who still require the full rule database. This file is easily transferable via floppy disks or CDs. Another important listing under the Admin menu is User Administration, which is designed to add and edit permissions for users with access to the local SnortCenter web page. You can also specify the email address associated with each user. The default configuration is "admin" and "change" as the username and password, respectively. Modify these immediately after the initial install. The remaining options under each of the drop-down menus are self-explanatory. The best method for learning the SnortCenter management console is to test each option under the drop-down menus and become familiar with its individual use. |
|
|
< Day Day Up > |
|