|
|
< Day Day Up > |
|
10.4 Analyzing the Captured DataOnce you have familiarized yourself with the main interface, investigate the actual functionality of the ACID page in more detail. Here is where you can examine the types of packets hitting your network and what they contain. This section closely details the searching and graphing capabilities of ACID. Although it attempts to clarify the nuances of each page and the results presented therein, it cannot explain every minor detail or categorize all possible attack scenarios. The best thing to do is to become acquainted with each listing and the data it contains as we work through this section. 10.4.1 Tracking the AlertsAfter checking the main ACID web page for the latest attacks, your first point of reference for additional details will probably be the Unique Alerts link. All alerts are sorted here, by time, with the oldest signature listed first. The most recent unique alert is placed last. The default Alert Listing page has several columns containing data, most of which also link to detailed content. The page is broken down by column headings in the following manner:
To the far left of these columns are radio buttons for selecting a particular alert. These buttons link to the drop-down Actions menu at the bottom of the page. Select a unique alert or signature and then choose an action, such as adding the signature by type to the AG, deleting the alert, or emailing yourself or someone else a summary of the alert. Clicking the Selected button then performs the specified action.
Under the Signature column heading, notice the links listed in brackets and highlighted in blue. Most of these links are labeled [snort]; when clicked, they launch a web page displaying the associated Snort rule. Often there is an additional reference to Bugtraq, Nessus, CVE, Whitehats, or some other security-related site providing more data about the offending signature. 10.4.1.1 Viewing the packetThere is no lack of information about logged signatures. ACID provides links aplenty to signature repositories. Your task as a security administrator is to determine if the selected alert represents a valid attack or security threat. The best way to determine this is to closely inspect the packet, the systems against which it was sent, and its point of origination. First, check the classification under which the signature falls. A misc-activity classification is perhaps not as serious as an attempted-admin classification. Any sort of policy-violation should not be discounted. All classtypes are listed in the etc/ directory within the Snort source code. The file classification.config lists the classification shortname, a brief description, and a priority level. A priority of 1 is the most severe, while 2, 3, and 4 indicate diminishing levels of severity. The individual classtype listings and their ratings follow: # # config classification:shortname,short description,priority # not-suspicious,Not Suspicious Traffic,3 unknown,Unknown Traffic,3 bad-unknown,Potentially Bad Traffic, 2 attempted-recon,Attempted Information Leak,2 successful-recon-limited,Information Leak,2 successful-recon-largescale,Large Scale Information Leak,2 attempted-dos,Attempted Denial of Service,2 successful-dos,Denial of Service,2 attempted-user,Attempted User Privilege Gain,1 unsuccessful-user,Unsuccessful User Privilege Gain,1 successful-user,Successful User Privilege Gain,1 attempted-admin,Attempted Administrator Privilege Gain,1 successful-admin,Successful Administrator Privilege Gain,1 # NEW CLASSIFICATIONS rpc-portmap-decode,Decode of an RPC Query,2 shellcode-detect,Executable code was detected,1 string-detect,A suspicious string was detected,3 suspicious-filename-detect,A suspicious filename was detected,2 suspicious-login,An attempted login using a suspicious username,2 system-call-detect,A system call was detected,2 tcp-connection,A TCP connection was detected,4 trojan-activity,A Network Trojan was detected, 1 unusual-client-port-connection,A client was using an unusual port,2 network-scan,Detection of a Network Scan,3 denial-of-service,Detection of a Denial of Service Attack,2 non-standard-protocol,Detection of a non-standard protocol or event,2 protocol-command-decode,Generic Protocol Command Decode,3 web-application-activity,access to a vulnerable web application,2 web-application-attack,Web Application Attack,1 misc-activity,Misc activity,3 misc-attack,Misc Attack,2 icmp-event,Generic ICMP event,3 kickass-porn,SCORE! Get the lotion!,1 policy-violation,Potential Corporate Privacy Violation,1 default-login-attempt,Attempt to login by a default username and password,2 In order to view the Query Results page to find out more about a signature, click on the appropriate link under the Total # column. Every instance of each captured packet is logged here. The most pertinent column is the one labeled "ID," falling under the first heading. The ACID program groups each logged data packet with its own unique identification tag. Click on the ID tag to view the contents in detail. Figure 10-4 is a graphical representation of a typical packet capture. ACID breaks the data down into four categories: Meta Criteria, IP Criteria, Layer 4 Criteria, and Payload Criteria. The first category displays the most basic information, the signature triggered, and the sensor that logged it. The second grouping shows the source and destination address, along with header length, flags, time to live, checksum data, and other items gathered from the packet header. The third grouping displays Layer 4 data such as protocol type, source and destination port, and the length of the packet captured. Finally, the fourth grouping shows the actual payload in hexadecimal or translated text. Figure 10-4. The breakdown of a logged packet viewed under ACID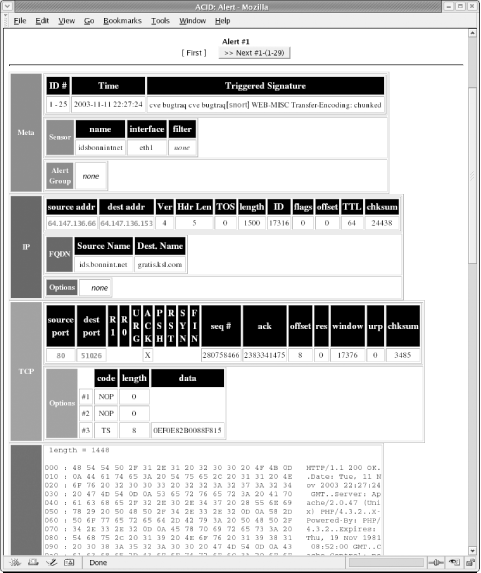 Note that the format in Figure 10-4 resembles typical captured Snort content. If certain packets merit a more detailed query, use the provided links on both top and bottom to proceed to the next captured packet in that categorization.
10.4.1.2 Identifying known attacksIn most cases, it only takes a few hours to gather enough packets to collect a repository of known attacks against your system or network. Depending on the average amount of traffic traveling through the network, you may soon find yourself overwhelmed with alerts. ACID and Snort do a fine job of explaining what they think each attack might be. It never hurts, however, to perform some reconnaissance and examine the packet yourself. Some of the most common attacks seen on intrusion detection sensors exploit known Windows vulnerabilitiessome of which are quite old, yet remain troublesome on many unsecured machines. There are a fair number of new exploits aimed at unpatched Linux machines, along with attacks designed for well known applications such as Oracle. Figure 10-5 shows the ACID event page after Snort detects a well known attack. This screenshot displays the packet content of a WEB-IIS encoding access attempt. This is a known exploit whose packets are still detected by many intrusion detection systems. Because there are no IIS machines in our network, this attack can usually be ignored. Figure 10-5. Examining a typical attack signature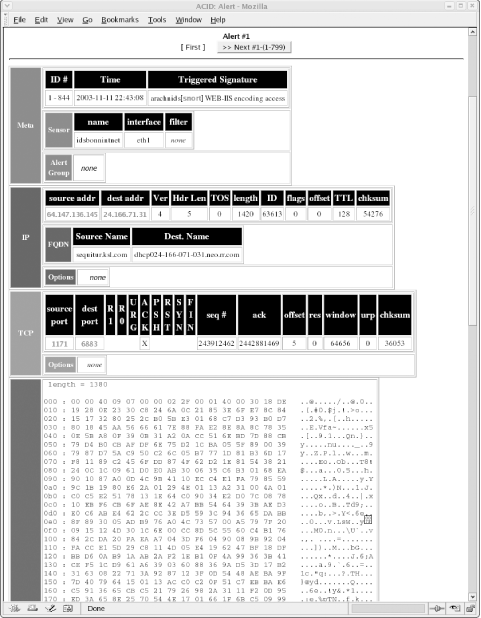 But if you are running applications or services vulnerable to this exploit, the alert is a valid one. Know what systems make up your network and be aware of the exploits designed to attack them. Just because the attack targets another operating system does not mean you should not take additional precautions to shore up your own machines, no matter what platform they are using. The importance of this alert depends on the location of the sensor relative to your firewall and web server. If the sensor is in your DMZ or in front of your firewall, it may see many harmless attacks. But if it's behind the firewall, you have to ask yourself how an IIS attack made it through the firewalleven if the attack itself is harmless (because you aren't using IIS). Such an attack should never be seen in the internal network and may mean someone (or something) has gotten in. Packets with nonidentifiable yet suspicious content should be looked at closely. Sometimes Snort misidentifies new or recent attacks because the packet shares common elements with previous attack patterns. The result may be confusing, but is still a warneingand possibly your only warningthat something is amiss. 10.4.1.3 Notifying the offenderThere is much information to be gleaned from the links on the Query Results page. The columns labeled Source Address and Dest. Address show not only the ports from which attacks originate and those ports to which they are destined, but provide links to related IP addresses within the ACID database. Here you can find out more about the originating IP address. The hypertext link points to a page displaying the number of times that a specific IP address appeared as either the source or destination, along with a timestamp of its first and last occurrence. The ACID page has quick links to sites such as ARIN, RIPE, APNIC, and LACNIC for performing registry lookups in authoritative databases. There are also links to external sites for executing DNS, whois, and SamSpade lookups. If, for instance, you detect an external IP address attempting to perform multiple administrative connections and if that same IP address appears under different classifications, it would be wise to contact the administrator of that IP address block and inform him of the offending IP address, along with the time and date of the attack. Include a copy of your Snort alert with the email. Most ISPs provide an email address reserved for attacks originating from their system. If one is not available, try the prefix "abuse" or "postmaster" with the ISP's registered domain name. 10.4.1.4 Searching the databaseAfter you've become acquainted with the basic alerts and web pages linked to logged packets, use the interactive Search function on the main ACID web page. This is perhaps ACID's most versatile feature since it queries the database for specific occurrences. One reason for using the Search function is to determine the number of attacks launched against a server from a particular subnet or IP address. It then becomes a simple matter to add rules to the firewall to counteract the attacking IP address or addresses. The Search function also registers the number of attacks within a specific time framealways a useful feature for determining when to ramp up security or when not to bring down the network firewall for a much needed update. Basing updates on the types of attacks seen is another method of staying ahead of the attackers. The Search function allows most administrators to determine potential weakness or find patterns not normally seen in a cursory overview. Figure 10-6 shows an example of the Query Results page. Pay close attention to each of the fields and the variables they search. Figure 10-6. Performing a search of the database brings up the Query Results page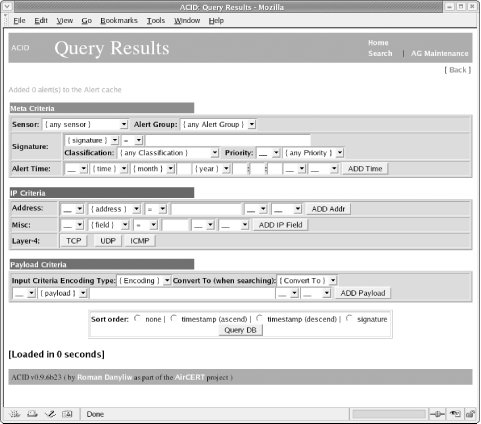 Clicking the Search link brings up the Query Results page. This page has three different sections from which to select varying options. You can build requests based on any of the Meta Criteria, including the signature name, its classification, or the alert time. To perform a search based on the IP address of the source or destination machine, fill in the appropriate fields under the IP Criteria section. You can also look for any instances that match specific IP header fields, or you may choose an option based on Layer 4 or protocol type. The last section from which you can input variables is the Payload Criteria section. Input any data that may be encountered in the payload. If you are aware of a certain string of characters that belong to the Nimda or CodeRed virus, input that string here and search for matching packets. For instance, in the case of CodeRed, we want to look for a string of characters that represent a unique "fingerprint." CodeRed copies CMD.EXE (the Windows command shell) to the web root and renames it ROOT.EXE, so we'll look for "/root.exe". As another example, the following string of characters is found in a SQL Slammer infection attempt (SQL Slammer is entirely contained in a single UDP packet): "|81 F1 03 01 04 9B 81 F1 01|". In each part of the query, you can add multiple criteria by clicking the Add button on the right. Lastly, select the sort order method you prefer in the final field. The Query DB button inputs your data and looks for corresponding matches in the database. All packets matching your criteria will be displaced. 10.4.1.5 Graphing data for viewingNot everyone enjoys viewing raw data or perusing Snort alerts, particularly not management. My own experience is that most executives wish to be shown the data or results in a simple-to-read and easy-to-understand fashion. You can accomplish this via graphs charting the history of attacks and their severity. Images are a simple means of presenting sometimes complicated data in an easy-to-understand format. The graphs generated using ACID are no exception. ACID supports on-the-fly graphing via its Graph Alert Data link. Figure 10-7 shows the Graph Alert Data page. Figure 10-7. Using the variables listed, graph all alerts logged by the system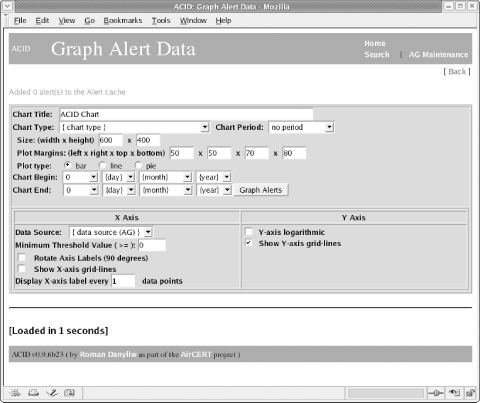 Choose the plot type (bar, line, or pie chart) and select the time periord for the graph. The time it takes to create a chart or graph can vary, depending on the amount of data requiring reading and the speed of the IDS machine. Be patient when generating graphs that track longer periods of time, such as a month or more. Because no book or set of instructions can cover all possible charts, you'll have to do some experimentation. Try different graphing combinations with small data sets until you find an informative and appealing format is found. Figure 10-8 is a graph that uses the default values. Even a graph as simple as this conveys the importance of intrusion detection. This image plots the number of alerts received throughout a 24-hour period over the course of five days. Its results are fairly typicalmost attacks occur later in the day, from late afternoon and into the night. Figure 10-8. An example graph charting alerts logged over a period of five days Based on this graph, an administrator might keep closer watch on network traffic prior to leaving for the day, and also review the captured packets every morning to inspect attacks that occurred in the late evening. He might even consider keeping a closer eye on traffic throughout the evening in order to inspect the alerts generated. The Graph Alert detection time link located directly below the Snapshots section on the main ACID page also generates a graph. This option produces a visual rendering of all detected alerts. Rather than worrying about Meta, IP, or Payload criteria, this link renders data fast, in a graphical format. This option is recommended for managerial types who want to know how many probes, scans, or overall attacks were logged by the system within a fixed period of time. It is also suggested for helpdesk personnel who need to produce a graph of the day's attacks. Users who do not have permission to delete alert records should use this option.
Figure 10-9 displays the overall number of alerts logged in a few days time period. Notice that you can graph days in the futuer as well as the past. Days with registered alerts are highlighted in blue. This image was generated via the "Graph Alert detection time" link. Figure 10-9. Quickly graph all alerts on an hourly, daily, or weekly basis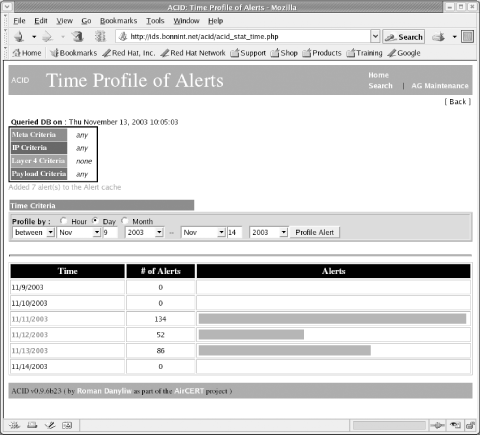 10.4.2 The Ongoing Use of the ACID ConsoleSo you have Snort running, logging alerts to the database, and ACID running to watch events as they unfold. How can you make the most of this setup? While a single person can check the ACID console periodically, you may want to consider deputizing several people to watch the read-only ACID viewer interface we set up earlier. This will have the benefit of increasing awareness of security in your environment and gets more eyes and perspectives watching for problems. This is especially valuable in larger organizations, where the information technology departments are Balkanized. What might appear to be a false positive to you might be a portent of doom for one of the admins in another department. To be sure, a fair amount of training is necessary, but ACID is fairly straightforward to use. Over time, as the ACID console works, alerts will build up (especially on high-traffic networks). You may choose to review the alerts at a certain point and then flush them out of the system. For instance, you might purge all alerts over two weeks old. The best way to do this is to search for alerts in a range of dates and delete the entire query. Another option is to delete alerts when they have been determined to be false positives, or when the potential attack is mitigated or investigated. There's a problem with simply deleting the alerts and forgetting about them. When the alert is gone, you might lose some ability to do a forensic analysis of an attack in the future. Perhaps the alert you deleted today is just a precursor to another, more heinous attack that will occur next week. Archival data could be valuable. There are regulatory mandates that specify how long some IDS logs must be keptHIPAA, GLBA, and Sarbannes-Oxley all have record retention requirements. HIPAA says that all system logs must be archived for six years! This regulation can put an immense strain on long-term information storage and retrieval mechanisms. What I have done at some customer installations is move older alerts (for example, all alerts older than two weeks) to another database with its own ACID console. The archive database is simply backed up periodically and the archives kept in long term storage in case they are needed. This strategy keeps my primary ACID console lean and quick, but still allows me access to older alert archives. It can easily be scripted. |
|
|
< Day Day Up > |
|
