|
|
< Day Day Up > |
|
Performing a Wireless Network Security AssessmentIt would be easy for me to tell you that due to the security dangers of wireless networking, you should just not allow any wireless access on your network. However, that would be analogous to telling you to stick your head in the sand and hope the problem will go away. Wireless access is not going away. It is one of the hottest areas for growth and investment in the technology area. Vendors are churning out wireless adapters for all kinds of devices at a scary and ever-cheaper rate. Many retail companies such as McDonald's and Starbucks are installing wireless access points in their stores to attract customers. Intel Centrino laptops have a wireless radio built right in. Your users will come to expect the freedom that wireless LAN technology brings. They will want to be able to log on with their wireless-enabled laptops anytime, anywhere. This means that you are going to have to deal with your wireless security sooner or later. The tools in this chapter will help you assess your wireless network security and take steps to improve it if need be. It will also help you to deploy a wireless LAN solution more securely if you are doing it for the first time. Equipment SelectionTo perform wireless network security assessments, you will need at a minimum a wireless network card, a machine to run it on, and some software. Wireless CardsMost of the software covered in this chapter is free, but you will have to buy at least one wireless network card. There are many different manufacturers to choose from and prices are quite competitive. Expect to pay from $40 to $80 for a basic card. You will want to carefully research your choice of manufacturers and models because not all cards work with all wireless software packages. There are basically three different chipsets for 802.11b devices. The Prism II chipset by Intersil is probably the most common and is used by Linksys, the largest manufacturer of consumer wireless cards. The Lucent Hermes chipset is used in the WaveLAN and ORiNOCO cards and tends to be in higher-end corporate equipment. Cisco has its own proprietary chip, which has some special security features. The Prism II cards will work on Kismet wireless, the Linux software reviewed in this chapter, but not on the Windows platform. D-Link cards work with Windows but not with the Windows security toolkits that are commonly available. Also, models of particular manufacturers can be important. The older Linksys USB cards used a different chipset and do not work on well Linux. To add to this confusion, some of the newer protocols aren't supported yet by many packages. The current versions of the software packages reviewed in this chapter don't support the newer 802.11g standard. The major vendors have yet to release their interface code for software developers to write to. Once they do, the drivers should become available shortly thereafter. You should check the respective software Web sites before purchasing your equipment for supported cards and protocols. For purposes of these reviews, I used the ORiNOCO Gold PCMCIA card, which works well with both the Windows and Linux software. Hardware and SoftwareIn terms of hardware to load the software on, just about any decently powered machine will do. The UNIX software ran fine for me on a PII 300 with 64MB of ram. The Windows software should also run on a system like this. You should definitely load the software on a laptop since you are going to be mobile with it. There is a Palm OS version of Kismet Wireless and a Pocket PC version of NetStumbler available, so you can even put them on palmtops. There are now wireless cards available for both major platforms (Palm and Pocket PC) of the smaller handheld computers that can take advantage of this software. You should also make sure you have plenty of hard disk space available if you intend to attempt cracking WEP keys. This requires anywhere from 500MB to several gigabytes of space. Be careful not to leave the machine unattended if you are sniffing wireless data and don't have a lot of extra spaceyou could easily fill up your hard drive and crash the computer. If you are auditing your wireless perimeter and want to know exact locations, you may also consider getting a small handheld GPS receiver. Make sure your GPS device has an NMEA-compatible serial cable to interface with your laptop. With this hardware, you can log the exact points from which your wireless access points are available. The products covered in this chapter have the capability to take GPS data directly from the receivers and integrate it into the output. Finally, if you can spring for GPS-compatible mapping software such as Microsoft MapPoint, you can draw some really nice maps of your assessment activity. AntennasFor wireless sniffing around the office, the built-in antennas on most cards work just fine. However, if you really want to test your wireless vulnerability outdoors, you will want an external antenna that lets you test the extreme range of your wireless network. After all, the bad guys can fashion homemade long-range antennas with a Pringles can and some PVC. You can buy inexpensive professional-grade wireless antennas from several outfits. I bought a bundle that came with the ORiNOCO card and an external antenna suitable for mounting on the top of a car. This is another reason you need to choose your wireless card carefully. Some cards allow external antennas to be attached but others do not. You should be sure the card(s) you purchase have a port for one if you intend to do wireless assessments. Cards known to allow external antennas are the ORiNOCO mentioned earlier as well as the Cisco, Samsung, and Proxim cards. Now that you have the background and the gear, let's check out some free software that will let you get out there and do some wireless assessments (on your own network, of course!).
NetStumbler is probably the most popular tool used for wireless assessments, mainly because it is free and it works on the Windows platform. In fact, it is so popular that its name has become synonymous with war driving, as in "I went out NetStumbling last night." I guess the author so-named it because he "accidentally" stumbled on wireless networks while using it. NetStumbler isn't considered truly open source since the author doesn't currently make the source available. However, it is freeware and it is worth mentioning since it's the most widely used tool on the Windows platform. There are many open source add-ons available for it (one of these is discussed later in this chapter). It also has a very open source mentality in terms of its user community and Web site. The Web site is highly informative and has lots of good resources for wireless security beyond just the program. There is also a mapping database where other NetStumblers enter access points that they found while using the program. If your company's wireless network is in the database and you want it removed, they will be happy to do that for you. Installing NetStumbler
When the installation is complete, you are ready to start Netstumbling. Using NetStumblerWhen you start NetStumbler , the main screen displays (see Figure 10.4). Figure 10.4. NetStumbler Main Screen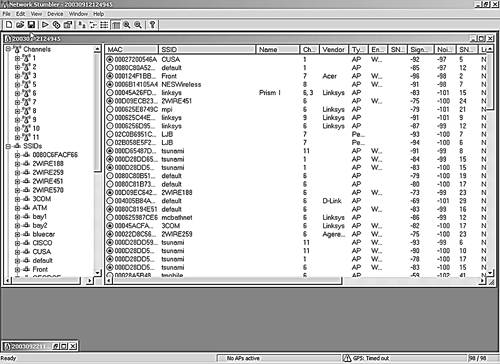 In the MAC column, you can see a list of access points NetStumbler has detected. The network icons to the left of the MAC address are lit up green if they are currently in range. The icon turns yellow and then red as you pass out of range. Inactive network icons are gray. The graphic also shows a little lock in the circle if that network is encrypted. This gives you a quick way to see which networks are using WEP. NetStumbler gathers additional data on any point that it detects. Table 10.2 lists the data fields it displays and what they signify.
As you go about your network auditing, the main NetStumbler screen fills up with the wireless networks that you find. You will probably be surprised at the number of networks that show up around your office. And you will be even more surprised at how many have encryption turned off and are using default SSIDs. The left side of the screen displays the different networks detected. You can organize them using different filters. You can view them by channel, SSID, and several other criteria. You can set up filters to show only those with encryption on or off, those that are access points or peers (in ad-hoc mode), those that are CF pollable (provide additional information when requested), and any that are using default SSIDs. On the bar along the bottom of the main screen you can see the status of your wireless network card. If it is functioning properly, you will see the icon blinking every second or so and how many active access points you can see at that moment. If there is a problem with the interface between your network card and the software, you will see it here. On the far right of the bottom bar is your GPS location if you are using a GPS device. The blinking indicates how often you are polling for access points. NetStumbler is an active network-scanning tool, so it is constantly sending out "Hello" packets to see if any wireless networks will answer. Other wireless tools, such as the Kismet tool discussed later in this chapter, are passive tools in that they only listen for the beacon signals. The downside of the active tools is that they can miss some access points that are configured not to answer polls. The upside of an active scanning tool is that some access points send out beacon signals so infrequently on their own that you would never see them with a passive tool. Also, keep in mind that active polling can set off wireless intrusion detection systems. However, very few organizations run wireless detection systems, and if you are using NetStumbler only as an assessment tool for your own network, then being stealthy shouldn't be that important to you. If you click on an individual network in this mode it shows a graph of the signal-to-noise ratios over the times that you saw the network. This lets you see how strong the signal is in different areas (see Figure 10.5). Figure 10.5. NetStumbler Signal Graph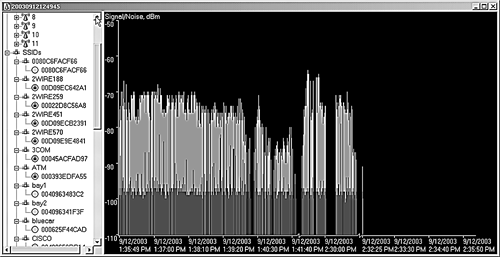 NetStumbler OptionsUnder the View menu, select the Options submenu to display the dialog box for setting NetStumbler options. Table 10.3 lists the tabs and the choices available.
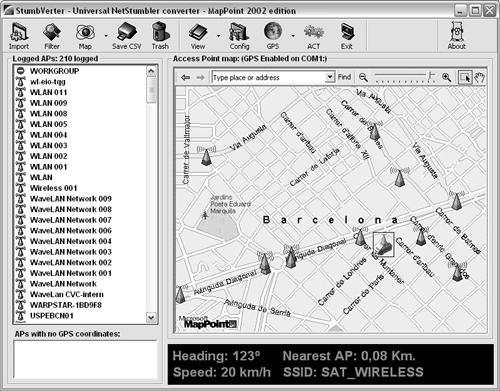
Saving NetStumbler SessionsNetStumbler automatically starts saving your session each time you open it. This lets you examine your NetStumbler sessions at another time. By default, sessions are saved in a native NetStumbler format. You can also save the sessions as text for importing into a spreadsheet or word processor and in the wi-scan format, which is a budding file standard for wireless sniffing logs. You can also export them in a number of formats. NetStumbler assigns a unique number that is a combination of the date and time for each session at the top of the window (see Figure 10.5). This is helpful for tracking your sessions and results. You can change this name to something more descriptive if you like. Now that you have a lot of data about your wireless perimeter, you may want to produce some reports, either for management or for a customer if you are doing this as a consultant. If you have been collecting GPS data, you can create some nice maps with the Microsoft MapPoint program and the open source tool discussed next.
StumbVerter is a neat little program that takes the output from NetStumbler and converts it into input for the Microsoft MapPoint program. It has functionality beyond the basic NetStumbler program, including:
You must have a legal license for Microsoft MapPoint 2002 software to use StumbVerter. I know this is getting away from the idea of free software, but the functionality this adds is well worth the extra $200.00 that MapPoint will set you back. And of course, the StumbVerter software itself is freeware. Several projects are underway to develop a program to convert NetStumbler files into something free, such as a MapQuest or MapBlast map (but none of these were far enough along as of publication to include). At any rate, if you have to present reports to management, the color maps will definitely help your case. Installing StumbVerter
Once you have all these installed, you can start working with NetStumbler and StumbVerter. Using StumbVerter
Green towers represent encrypted access points; red towers represent unencrypted access points. The signal strength is shown by the waves coming out of the top of the icon: the more waves, the stronger the signal. If you single-click on a specific access point, the map centers on that point and shows you the informational balloon. Initially, this shows the network's SSID. Double-clicking on it shows all the notes associated with that AP and lets you add comments. The View menu has several options for manipulating and cleaning up your map. For example, you can remove the Points Of Interest (POIs) that MapPoint inserts, unless you want these for illustrative purposes. You can hide certain informational balloons if you want to show only the APs. You can also use the drawing tools to add any text, graphics, or other items to the map. When you are ready to save your map, you can either save it as a native MapPoint file or choose the CSV option if you want to save it in a text format suitable for importing into other programs. The antenna comparison feature is useful for comparing several external antennas or different cards with built-in antennas to see which ones work best. You can import up to three different NetStumbler files, and StumbVerter grades them against the same access points and shows you the results side by side (see Figure 10.7). This can be helpful in deciding what card to use or which antennas work best if you are making one yourself. Figure 10.7. StumbVerter Antenna Comparison Screen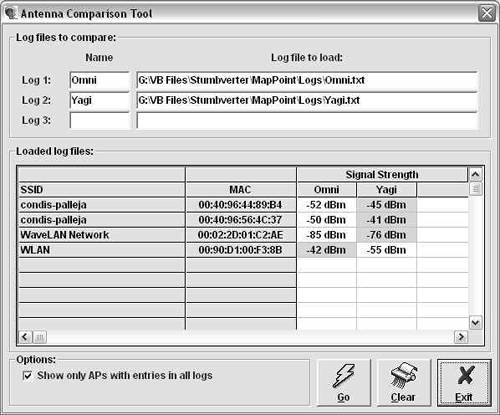 Now that you know about some great Windows tools, I will switch platforms and talk about Linux tools. While the Windows tools are easier to install and use, there are some things that the Windows tools don't do yet, such as passive scanning and WEP cracking attempts.
Kismet Wireless is one of the leading wireless sniffers for the Linux operating system. There are several programs, including AeroSniff and Prism2Dump, that work well on Linux as well. I chose to review Kismet because of its growing support base and add-on modules in addition to its support for a wide variety of wireless hardware. It is also a client-server tool like Nessus, which gives it even more flexibility. Another nice thing about using the Linux platform is that you can run WEPcrack and AirSnort, which are Linux-only programs right now. As of publication, there weren't any really good WEP testing open source software available for the Windows platform, though I expect this to change. Kismet has some features that go beyond the basic functionality of a program like NetStumbler. Kismet works with a number of other programs and can be designed to gather weak encryption keys for cracking attempts by external programs. You can even run Kismet in IDS mode to look for intrusion attempts coming from your wireless network. Installing Your Network Interface Card and DriversBefore loading Kismet, you should make sure your card supports it. Kismet currently works with the following wireless cards:
Theoretically, Kismet should work with any card that uses the Prism II and Hermes chipsets or ones that can be put into rf_mon or Monitor mode, but your results may vary. I recommend that you stick with one of the above cards for the fewest problems. Now the fun really begins. There are several steps to getting your Linux system ready to be a wireless sniffer. These steps will vary slightly depending if you have a different hardware and software configuration than the procedure. Check the documentation on the Kismet Web site to see if there are specific instructions for your hardware.
Installing KismetIf you made it through all that unscathed, you are ready to actually load the program.
You are ready to start using Kismet to audit your wireless network. Using Kismet WirelessStart Kismet by running the executable file from the command line or from an X-Windows terminal that supports the Curses toolkit. The main interface displays (see Figure 10.8). Kismet immediately starts reporting any wireless networks in your area and information on them. Figure 10.8. Kismet Wireless Main Screen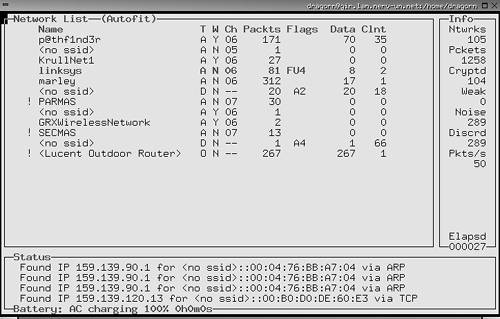 The interface is divided into three main sections. The Network List section on the left shows all the currently active wireless networks that Kismet can see and some basic information on them: the SSID of the network (if available), the type (access point versus node), whether or not it is encrypted using WEP, the channel it is broadcasting on, the number of packets intercepted so far, any flags on the data, and the amount of data going through the network. The display is color coded with active networks appearing in red and ones that are no longer active in black. The Info box on the right shows overall statistics for this capture session, including the total number of networks sensed, the total number of packets, the number of packets that were encrypted, weak networks perceived, packets with a high noise level, packets that were discarded, and the average number of packets per second. The Status box on the bottom contains a scrolling view of events as they happen. Messages pop up when new networks appear or other events happen. Because Kismet is a command line tool, albeit with a GUI, it uses key commands to control its functions. Table 10.7 lists the key commands available from the main screen.
As noted above, you can expand views of information on each network detected to show all the details on a particular access point by entering i at the command line. Figure 10.9 illustrates this output. Figure 10.9. Kismet Network Detail Screen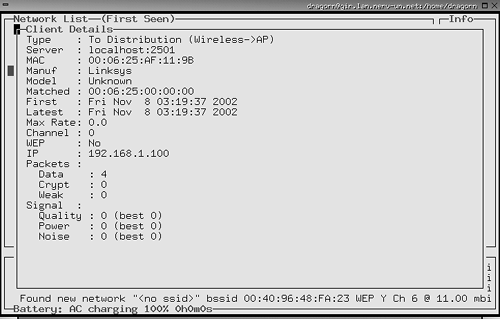 You can also expand the network box to full screen and see additional information on each network, such as the manufacturer of the equipment detected using the z command. This may make it easier to organize your access points into groups if you are trying to track a particular set of APs and want to be able to filter the others out. Do this with the g and u commands to group and ungroup, respectively. The sound feature is handyit beeps when you detect new networks. You can toggle that option off using the m command if you are going in and out of many network's reception areas. Otherwise you get a cacophony of beeps! Kismet GPS SupportKismet has the ability to record GPS data if you have a GPS receiver plugged into your machine. You need the GPS daemon software GPSD for Kismet to read it. You can get GPSD at http://russnelson.com/gpsd/. You must enable GPS support when compiling Kismet using the compile-time parameters in Table 10.4. Kismet then automatically picks up the coordinates of any networks sensed and logs them. You can take this one step further and map these coordinates just like with the Windows program. Kismet comes with a built in program called GPSMAP that automatically plots the data collected onto maps in .gps format. The downside is you have to provide your own GPS-calibrated map. There is an open source mapping program for Linux called GPSDrive, which you can download from http://gpsdrive.kraftvoll.at/index.shtml. Kismet IDSYou can also set up Kismet as a wireless IDS. Kismet will intercept incoming signals and detect wireless traffic that is known to be associated with war driving or other suspicious wireless activity. It detects about 10 different kinds of traffic, including NetStumbler polls and activity from Airjack and other wireless hacking tools. Currently this IDS capability is fairly limited, but expect it to expand in the future. And, since it's open source, you can always expand it yourself by writing your own alerts. You can also pipe your Kismet data through a traditional IDS such as Snort for more detailed analysis. The IDS feature is set in kismet.conf and is turned off by default. You can also set up Kismet to gather known cryptographically weak keys for a program such as AirSnort, the next tool in this chapter, which analyzes wireless packets and attempts to crack the WEP encryption.
The authors developed AirSnort as a practical application to demonstrate the weakness in the WEP, the wireless encryption protocol. A paper entitled "Weaknesses in the Key Scheduling Algorithm of RC4," written by the cryptographic experts Fluhrer, Martin, and Shamir, detailed a theoretical weakness in the WEP algorithm, describing how some of the Initialization Vectors (IVs) were weak. Packets encrypted with these weak IVs could be collected and eventually enough data would be present to extrapolate the shared secret key. This allowed the packets to be easily decrypted. Two tools were released shortly thereafter, AirSnort and WEPCrack, that employed the described weakness to recover WEP keys, effectively cracking WEP. They are both good tools, but AirSnort has some additional functionality as a wireless sniffer. AirSnort is now an open source project hosted on SourceForge.net and has been extended and improved considerably since its release. Given that there are no real alternatives under Windows for doing this, AirSnort and WEPCrack are currently the only viable alternatives for testing your WEP. Uses for AirSnortWhy use AirSnort on your wireless network? Some might say there is no legitimate use for the program and its only purpose is as a hacker's tool. However, I believe that the only way to know what the exposure on your wireless network is for you to do what the hackers do to see if your encryption is crackable and the amount of time it takes to do it. AirSnort lets you do just that. By attempting to crack your wireless encryption, you can see if it is crackable. If you are using standard WEP, then it is merely a matter of time. It is a mathematical certainty that it can be cracked at some point using this tool. The question is, how long does it take? If it's a very long time, you can reasonably assume you are pretty safe. If the traffic level on your wireless LAN is small, then it might take days or even weeks. This puts your network out of the realm of practicality of most casual hackers. However, if it's a busy network, then someone might be able to pick up enough packets to break it in a few hours or a day. Knowing this will help you to better protect your network. It can justify putting in further protections, such as better physical controls or limiting the traffic on that network. It also might justify upgrading your wireless equipment. Cisco Aeronet gear uses a variation of WEP called LEAP to improve and fix the weakness with the original WEP protocol. A wireless network using that protocol should be uncrackable, at least with readily available tools. You may find that your traffic level doesn't make it practical to crack your encryption. Either way, you'll sleep better at night knowing. Installing AirSnortGetting the drivers and software working for AirSnort can be quite a chore. Its requirements closely match those of the Kismet program. Refer back to the "Installing Your Network Interface Card and Drivers" section and follow that procedure. Finally, when all the moons align and you get all these things in order, you are ready to install the program. This is the easy part.
Running AirSnortAirSnort has three primary executable files.
AirSnort accept files from other wireless sniffers as along as they are saved in pcap format. Kismet, our Linux wireless tool of choice, will specifically pull out interesting packets for AirSnort ahead of time, saving this step. You don't have to do all the data collection at once. AirSnort can save a session and let you open it later and add to it. This makes AirSnort a particularly dangerous tool to wireless networks, because someone doesn't have to spend a single uninterrupted session near your facility to collect enough packets to crack your network. They can split their collection activities into smaller, less noticeable time increments, assuming the target network doesn't change its keys often. Once you have AirSnort installed, you can start it by typing airsnort at the command line. The interface is simplicity itself: it is a single screen that shows the interesting packets and the total number of encrypted and unencrypted packets. The top section shows you settings such as NIC card type and so forth. On the left, you can change some settings, such as the breadth the number of guessing attempts AirSnort will make for each key bytefor either 40-bit or 128-bit decryption attempts. The default is 3 for 40-bit encryption and 2 for 128-bit encryption. If you don't have a lot of data or you have a lot of excess processing power, you can try increasing this slightly, but don't go much more than 4 or 5. After that, it is time to just sit back and collect packets. Don't expect to be able to crack WEP keys in just a few moments. For AirSnort to work properly, it needs approximately 1,500 to 4,500 packets with weak keys. This amounts to between 100MB and 500MB of data. On a moderately busy network, it might take a day or more to collect this much data. On slower networks it could take much longer and on busier networks much less. Expect it to take at least a couple of hours but probably longer. Of course, all of this is based on a little luck too, so your results may vary from an hour to never. Generally, you want to spend about as much time collecting data as you think the average outsider might be able to spend undetected. And of course, AirSnort's resume session feature could make this time window much shorter since they could use multiple collection sessions. When a successful crack of the WEP key has occurred, it appears in both plain text and the original hexadecimal on the far left of the display and the capture session ends. Happy WEP cracking! What do you do if you find your WEP keys? Well, don't panic, because most casual hackers won't go to the trouble. However, you should think about taking steps to increase the security of your wireless network to make it harder for outsiders to collect this data. There are a number of steps you can take, ranging from replacing your equipment to reconfiguring and changing your AP position. You will have to decide based on the sensitivity of the data on your network which ones are appropriate. |
|
|
< Day Day Up > |
|