As noted above, the feature of SUSE Linux that is most distinctive is YaST. YaST (Yet another Setup Tool) is both the installer and a complete configuration tool for all the most important features of the system. YaST is designed in a modular way: when used for system configuration tasks, it loads a particular module according to the task being undertaken, but it is also possible to run a particular module separately without loading the entire YaST menu system. YaST can be run both in graphical mode and in text mode (ncurses interface). The functionality in either mode is identical: you can think of the two YaST user interfaces as alternative "skins" exhibiting the same underlying logic. What is important is that you can run YaST with all features in a text-only ssh session for remote system administration purposes.
| Note |
You can also enable VNC in YaST (even during installation). This allows access to a graphical session from a remote VNC client, but should be considered less secure than ssh. |
YaST has always been the distinguishing feature of SUSE Linux, and it has grown organically with the SUSE distribution. In earlier versions, YaST was a monolithic program; with the release of YaST 2 it became modular. Traditionally the YaST license has been a controversial issue; YaST was released under a license that, although it made the source available, restricted redistribution of the program by third parties. This had two important effects: it made it illegal to resell unofficial copies of SUSE CDs, and it made it impossible for third parties to create a distribution based on SUSE.
At the Novell Brainshare event in March 2004, Novell announced that future versions of YaST will be released under the GPL. This change was first made in SUSE Personal and Professional version 9.1.
A normal SUSE installation follows the following pattern: Booting from the installation medium loads ISOLINUX, which in turn starts YaST. At the start of the initial boot, you are offered the opportunity to enter boot parameters, and to vary the defaults in other ways. In particular, you can change the screen resolution of the graphical installer or choose a text mode install. You can also choose to make use of a different installation medium.
There are a number of built-in boot options (including a "safe settings" installation and the rescue system). The bottom of the initial boot screen offers several options using function keys, as listed in Table B-3.
|
Key |
Function |
|---|---|
|
F1 |
Help |
|
F2 |
Change screen resolution or choose text-based install |
|
F3 |
Choose where to load the installation files from (CD-ROM, SLP, FTP, HTTP, NFS, SMB, hard disk) |
|
F4 |
Choose language |
|
F5 |
Verbosity |
|
F6 |
Choose to load an external driver |
In rare cases the screen may go blank as soon as it tries to start the framebuffer graphics display used throughout the rest of the installation. If this happens, you may need to choose a different resolution using the F2 key, or if nothing else works, choose a text-based installation. If you are forced to take this option, it does not necessarily mean that you will not be able to get graphics to work after installation.
The F3 key offers the option to get the installation files from somewhere other than the CD or DVD, which you booted from. SUSE has always offered an FTP installation option for the Professional version-you can download a minimal boot CD (or set of boot and modules floppies) from the FTP site and start the install, which you then point elsewhere to get the installation files for the main part of the installation. Any of the protocols listed will work, so the installation DVD could be shared from a Windows machine on the network (the SMB option) or the files could be on an NFS, FTP, or HTTP (web) server somewhere. You can also install from a copy of the DVD on a hard disk partition; you could create that partition and copy the files onto it by first booting the rescue system before you start the installation. New in SUSE 9.1 is the SLP (service location protocol) option. Also known as zeroconf and based on the same standard as Apple's rendezvous feature, this allows a server to use the SLP protocol to advertise itself as containing an installation source; the SLP option will automatically find and use that service.
In addition to using a remote source for the SUSE distribution rpm files, you can also create an installation source for third-party software that YaST can understand. You can find details on this process at http://portal.suse.de/sdb/en/2004/02/yast_instsrc.html.
YaST is a big program. If you are trying to install on a machine with insufficient memory (less than 128MB), you may have difficulties. In such cases it is useful to create a swap partition manually before starting the installation and configure the system to use it during installation; you should also run the installation in text mode. You will see a message that reads "Your computer does not have enough memory to run YaST. To continue, configure some swap space." You are then given the opportunity to activate an existing swap partition on the disk. If there is no swap partition, you should abort the installation and create one; you can do this by rebooting into the rescue system and using fdisk to create a suitably sized partition that should be given the partition ID 82 (Linux swap). You then need to run the mkswap command to format the partition as a swap partition. So typically you would do something like this:
# fdisk /dev/hda
Then in the fdisk program, press the n key to create a new partition, followed by the p key for a primary partition, then select the partition number (1 if there are no partitions on the disk), then press t to change the partition type (choose 82 for swap).
Write out the partition table with the w command, exit fdisk, and reboot to restart installation.
Once the installer has started and the language has been selected, a screen loads which summarizes a proposal for installation. The proposal includes a a suggested set of defaults together with a suggestion for partitioning based on the partitions found on the disk. This suggestion may or may not be useful; in a simple case (one Windows partition found which fills the whole disk), it will suggest a sensible choice (resize the Windows partition and create Linux swap and root partition). In more complicated cases where there are already Linux partitions on the disk, the suggestion may be a "destructive" one. In any case, you can choose an option giving you full control over the partitioning.
YaST's partitioning tool provides a graphical interface to the task of partitioning the disk(s) and choosing the filesystems: it supports the creation of swap, ext2, ext3, reiserfs, xfs, and jfs partitions. It also contains a very user friendly interface for the setting up LVM (the logical volume manager) and software RAID.
| Note |
If you are resizing a Windows partition it is advisable to use the Windows disk tools first (the scandisk and defragmentation tools). Although the resizer is very reliable, as with any such software, you are advised to back up first. |
The other item in the summary screen that you may wish to change is the software selections default. You can make broad changes to this by choosing one of a number of software groups (such as "gnome system" or "kernel development") and you can make detailed changes at the level of individual packages. If you are using SUSE Linux Professional, the default options are a reasonably good choice for a desktop system (with KDE as the desktop), which you can build on later. The software selections screen allows you to choose according to a SUSE-designed set of installation scenarios or by package groups (based on the information contained internally within the actual RPM packages). Package dependencies should be handled intelligently; if you choose two packages that are incompatible or packages that have alternative dependencies, you will be offered a "conflict resolution" window in which to choose how to solve the problem.
Before proceeding with the installation, the main screen also offers the following setting options:
System-A hardware detection tool. This will report all the hardware that YaST can find on your system; it's useful as a way of checking possible problems with particular devices.
Keyboard-Choose your keyboard type and language. Usually this will have been correctly detected and/or assumed based on your language choice, but you may need to change it here.
Booting-Choose grub or lilo for booting. By default, SUSE will boot the system with grub. If a Windows partition is present, the grub configuration will include it in the grub menu. Note that on SUSE, the grub apparatus is all in /boot/grub. The file /etc/grub.conf is required only for the functionality of the grub-install command: the grub menu is stored in the file /boot/grub/menu.lst. There are certain cases (in particular if you are booting from certain raid arrays or other types of disk that grub cannot directly read) where you may need to use lilo rather than grub for booting.
Time zone-If the installer has not guessed your time zone correctly on the basis of the language information you gave it, you can set it here.
Default runlevel-This setting defaults to 5 (that is, full networking with graphics and graphical login). If you wish to set up a server system without graphics, you should set this to runlevel 3.
Once you have agreed to all the choices in this screen and have chosen to go on, a confirmation dialogue appears. If you agree to proceed, YaST creates the partitions and file systems, and then starts the package installation. The package installation takes the bulk of the time needed for installation; exactly how long depends heavily on the speed of your processor and CD drive (and of course, the number of packages you have selected), but YaST will display a running estimate for the time remaining.
If you are installing from CDs, the system will reboot after package installation from the first CD is complete. On rebooting, a simple dialogue box will prompt you for the second CD and package installation will continue. If you are using another method, then the first reboot will take place at the end of the installation.
After the package installation is complete, there are certain other formalities to be completed. You need to set the root password, and provide networking details. In the networking setup, be sure that you complete all sections: the menu system here is not as well designed as it could be. If you are using a laptop with a PCMCIA network card, be sure to click the PCMCIA check box. YaST will then offer to do a first online update; you should do this provided the network configuration was successful and gives you access to the Internet. You are then invited to create an initial nonroot user. Note that on some versions of SUSE (including 9.1) in this screen "autologin" is the default. This may not be what you want; in that case you need to uncheck this check box (it's easy to forget to do this and annoying too; you then need to look at the kdm configuration file to fix it.)
After displaying the release notes, the last task is the setup of specific hardware including graphics cards, printers, and sound. In most cases an intelligent guess will already have been made for the graphics and sound setup, and you can simply accept the defaults.
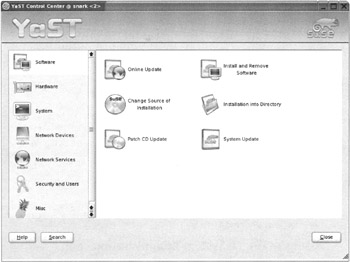
YaST has gradually gained more features and capabilities over time. It is able to control and configure most of the functions of the system. Its modular design means that new features can easily be added, and the recent announcement of its new GPL license and the publishing of open APIs will enable third-party vendors to write YaST modules to configure their own hardware and software. Figure B-6 shows the YaST startup screen.
If you are using the KDE desktop you can start YaST from the KDE menu. If you are not running as root, you will be prompted for the root password and the graphical version of YaST will start.
From the command line, the command yast (as root) will start the YaST in test mode, while yast2 will start it in graphical mode. If you are running the graphical display as a nonroot user, you should switch user to root with the sux command (rather than su) to make it possible for the graphical version to run.
You can start an individual YaST module without starting the YaST control centre, for example, the command
# yast2 printer
will start the printer configuration module.
You can get a list of all the installed YaST modules with this command:
# yast2 -l
Note that it's possible that not all available YaST modules are installed on the system. You can check this by searching for "yast" in the software installation module.
When YaST is used to configure the system, it makes changes to a set of files under the directory /etc/sysconfig/. Before YaST exits, it runs a tool called SuSEconfig that propagates those changes across the system to "do the right thing". Like YaST, SuSEconfig is modular. It contains a script for each YaST function, and these scripts can be run independently. They are found in the directory /sbin/conf.d/. If you make a manual change in a particular file in /etc/sysconfig/, you can run the relevant script in that directory.
When YaST is started, whether in text (ncurses) or graphical mode, exactly the same menus are available. The most important menus are listed below, grouped by category.
Online Update-Start and configure the Online Update mechanism. In the case of the business products, a username and password is required to make this work; these are issued when you register the product.
Change source of installation-This menu allows you to enable a different source of packages apart from the CD or DVD that you installed from. This could be a network resource on your local network or it could be the SUSE FTP site or one of its mirrors. In the case of the Professional version, the packages are placed on the FTP site a few weeks after the release of the boxed version and choosing a fast mirror as your installation source is very convenient if you have a fast Internet connection.
Install and Remove software-This menu does exactly what it says-YaST will calculate all necessary dependencies and install them automatically. There is a very useful search feature that allows you to search for available packages by name or to search for words in the package descriptions.
Patch CD Update-This menu allows you to use one of the add-on or patch CDs that are issued from time to time by SUSE.
Install to directory-This menu allows you to install a new, independent SUSE system under a directory in your existing installation.
System Update-This menu allows you to update from an earlier version of SUSE.
CD-ROM drives menu and disk controller menu-Normally, you will not need to use either of these menus; the hardware will already have been correctly set up. In the case of CD-ROM drives, you can configure a newly added device here or remove or alter the mount points that have been set. Certain disk controllers have configuration options that can be controlled here.
Graphics card and monitor-This menu calls the sax2 program from within YaST to set up or change the graphics configuration. Slightly more control is possible if you call sax2 from the command line when the system is in runlevel 3 and this way you can also control the resolution in which the sax2 tool itself runs (which may be necessary in difficult cases). If you are having serious difficulty getting the graphics to work, you should almost always be able to use framebuffer graphics. There is a useful SUSE support article at http://portal.suse.com/sdb/en/2002/11/wessels_fbdev_grub.html.
Hardware information-This calls a program that scans all your hardware and reports on it. You have the option of saving the entire report to a file.
IDE DMA mode-This menu allows you to set or unset DMA (direct memory access) modes for your IDE disks. By default SUSE makes a reasonable guess and sets DMA by default on hard disks, but not CD devices.
Printer-This menu allows you to set up a local or network printer.
Scanner-This menu allows you to set up a USB or SCSI scanner.
This section describes setting up network cards, modems, DSL devices, ISDN devices, fax machines, and also setting up a phone answering machine.
The modules here will allow you to do a simple and straightforward set up of a variety of network services. The fact that these modules exist does not prevent you from configuring these services in more detail by editing the standard configuration files. You may want to use the YaST module to create a simple setup, which you modify in detail later. There are modules here for the following servers: DHCP, DNS, HTTP (using apache2), NFS, NIS, TFTP, postfix, and samba. You can also set up the machine as a samba, NFS or NIS client, and configure those network services that are started by the xinetd superserver.
Edit and Create groups and Edit and Create users-These two menus give a graphical interface to the configuration of users and groups.
Firewall-This module configures and activates the built-in firewall known as SuSEfirewall2.
Security settings-This menu offers a choice of three preset security levels and the ability to configure each security feature in detail. Among other things, it controls the requirements for passwords and the encryption method, whether the Ctrl+Alt+Del and Magic SysRQ key combinations will be honored, and the setting of system file permissions (according to the schemes in the files /etc/permissions.*).
Boot loader configuration-This menu allows you to switch between lilo and grub as boot loader and to edit the configuration files. In most cases working with the raw files will probably be preferable; if you don't understand how the boot loaders work, you probably shouldn't be trying to use this tool.
Timezone-Allows you to adjust time zone settings. Normally this will not be necessary, provided that the settings made during installation were correct. (Note: the system should adjust automatically and correctly for Daylight Savings Time.)
Choose language-You are unlikely to need to change the original setting here.
Select keyboard layout-These menus allow you to change these localization settings.
LVM-Allows you to configure and adjust logical volume settings.
Partitioner-These menus give you access to the same disk partitioning tools that were offered during the installation. Note that you cannot resize or change mounted partitions with them.
Profile manager-This is a graphical front end to SCPM (the system control profile manager), which allows you to set up and easily switch between different configuration profiles on the same machine. This is particularly useful for laptop users who are move between different networks with (for example) different network setups, printer types, and locations on each network.
Powertweak configuration-This menu allows you to configure powertweak options. Powertweak is a program that gives you control over a wide variety of low-level options that control the kernel's interaction with the hardware and low-level networking settings. These are stored in the /etc/powertweak/tweaks file and then applied to the running kernel.
Runlevel editor-This menu allows you to set the default runlevel and to set runlevels for individual services; it is thus an easy interface with the functionality of the chkconfig and insserv programs.
Editor for sysconfig files-This menu allows you directly to change certain detailed settings in the files under /etc/sysconfig.
Create a boot, module, or system floppy-This menu allows you to write out the standard boot and modules floppies from the installation media; it also allows to create a rescue boot floppy disk.
Restore system-This menu allows you to restore the system from a backup.
This menu with the delightful pineapple icon includes the following:
Load vendor driver CD-This allows the installation of third-party drivers through a standard interface.
View start up log-The log file viewer is loaded with a copy of the startup log.
View system log-The same log file viewer is loaded with a choice of log files to view, which it offers as a drop-down list.
Post a support query-This option offers an automated way to send a support message back to SUSE.
Autoinstallation-This option allows you to create an autoinstallation control file.
Autoyast is a powerful tool for controlling unattended automated installations. The principles are similar to those of the Red Hat kickstart tool, but a very high degree of control over the automatic installation is possible. The installation is controlled by an xml file; this can be generated and written out by the YaST autoyast module, but for finer control you can edit the file by hand (preferably with an editor that understands XML and DTDs, such as emacs with the psgml package). Documentation is available on the system in /usr/share/doc/packages/autoyast2/ and at www.suse.com/~nashif/autoinstall/.
The installation files can be offered across the network by NFS or HTTP. It is possible to boot the installation using PXE or a boot floppy or CD (which can be the first CD of the installation set). If you use PXE, you will also need to setup a TFTP server; the client that is being installed will get its initial kernel from this to boot the installation process.
In the case of SLES 8 and related products, the layout required on the server is complicated. This is because of the modular nature of these versions, which consist of a common set of three CDs (the UnitedLinux distribution) together with an additional CD (CD1 of SLES, Standard Server or SLOX). If you plan to use autoinstallation with SLES 8 via HTTP, you must use the SLES 8 Service Pack 3 to start the installation.
YOU is the YaST Online Updater. In the case of the SUSE business products, YOU is one way for the administrator to take advantage of the SUSE maintenance system of package updates. The default KDE desktop contains a tray icon for susewatcher, which checks whether any relevant updates are available; the icon changes its appearance if you need to do an online update.