If you have a number of users who simply need file upload access to website file system space, such as those who host their websites on your local server farm, the WebDAV protocol is an excellent alternative to more fully featured or system user-based FTPs. Setting up WebDAV on Apache and Linux securely is not the simplest of tasks, but once configured it allows users to drag and drop content into place, edit content through a browser, and-in some cases-share content directly from the server to their local PCs. Most users who work with WebDAV prefer it to dated and less friendly protocols like FTP for daily web content administrative tasks.
Unlike the other protocols described in this chapter, WebDAV is not its own daemon or service, but an extension to the HTTP 1.1 protocol itself. WebDAV on Linux is an Apache module that is installed and configured in the same way as any other Apache module is managed. The current version of WebDAV is quite reliable, and can be used to replace other FTPs that your site users may be accustomed to. WebDAV by itself is not secure, but can be made secure with other encryption technologies such as SSL/TLS. This provides a secure alternative to FTP and is both more secure and stable than Microsoft FrontPage server extensions for UNIX/Linux.
To set up access through WebDAV for a web customer, follow the following steps:
Define a DavLockDB and Directory directive, or Directory block, in the customer's VirtualHosts section of your Apache httpd.conf file.
Place AllowOverride all and DAV On directives in that VirtualHost Directory block.
Set up .htaccess and .htpassword files to allow and authenticate that customer to use WebDAV in this new WebDAV directory.
The .htaccess file is used by the AllowOverride directive, and the .htpassword file is used by the .htaccoss file.
Since WebDAV is defined on a per-directory basis, you could have a single virtual host with three separate WebDAV directories in it. Each of these directories can be managed by a different webmaster on one website, giving each person a small area under his sole control. Not only does WebDAV offer this advantage, but these are not even real system users-they are Apache authenticated users. This is a huge advantage over traditional system user and file system-wide configurations used with scp, sftp, or FTP file transfer methods; at least from a web administrator's perspective.
| Note |
Since WebDAV uses .htaccess and .htpassword files for authentication, no system account information is sent across the network when a user logs into WebDAV. This is a great boon for security on Linux/Apache web servers. The same web user can even be given different passwords for different web directories. WebDAV offers greater flexibility and better security. |
In Chapter 17 we set up a website for the user Bob, called mydomain.com. In this section, we set up a WebDAV share for this site. Bob can use his web browser to manage the content of his site without needing a separate FTP client.
| Tip |
You can use multiple URLs to point to the same directory on the server's file system. For example, you can point dav.mydomain.com and www.mydomain.com to the same IP address, but call a different VirtualHost block for each URL. In this example, however, we use the same VirtualHost block for both dav.mydomain.com and mydomain.com, and just set up a subdirectory that points to the DocumentRoot of this virtual host. |
Begin configuring the WebDAV share by opening the Apache configuration file, /etc/httpd/conf/httpd.conf. If you host many sites, you may have a number of VirtualHost entries that define each site you host. Find the virtual host section quickly by searching for Section 3. Then find the VirtualHost entry that defines the site for which you want to set up a WebDAV share and follow the numbered steps in the previous section to build the following code:
   <VirtualHost  10.1.1.1>
       DocumentRoot /home/bob/web/html/
       ServerName mydomain.com
   DavLockDB /tmp/mydomainDavLock
   <Directory /home/bob/web/html/dav>
      AllowOverride All
      Order allow,deny
      Allow from 192.168.128.
      DAV On
   </Directory>
   </VirtualHost>
As you can see, Bob's site is now configured to use .htaccess and .htpassword to manage authentication and all other security settings for that directory. We have also identified certain IP blocks that are permitted to access the WebDAV share (192.168.128.* here). You can use this line to limit the networks that can see the share, then use .htaccess to limit access even more.
| Tip |
Whenever you work on a test website that may not have a real-world DNS name, or has a name that conflicts with an existing DNS name (as does our mydomain.com site), you can place an entry in /etc/hosts on the server and client machines using it. This fools the local system into accepting this test setup. For the site mydomain.com, we added this line in /etc/hosts: 10.1.1.1 mydomain.com www.mydomain.com You can override DNS on Windows boxes like this also. Their hosts file is located in C:\winnt\system32\drivers\etc\hosts on WinNT/2000/XP, and in c:\windows\hosts for Win9x/ME clients. |
The DavLockDB, Di rectory, and DAV On directives are all in place now in httpd.conf. However, we're not finished. The Directory directive currently points to a directory that does not exist. In the next command sequence, we create a symbolic link to this nonexistent location that points back to the main directory:
   # cd /home/bob/web/html/
   [root@localhost html]# ls
   index.html pics
   [root@localhost html]# ls -la
   total 16
   drwxrwsr-x    3 bob      apache   4096 Jan 11 15:50 .
   drwxrwsr-x    4 bob      apache   4096 Jan  1 16:41 ..
   -rwxrwxr-x    1 bob      apache    114 Jan  9 17:45 index.html
   drwxr-sr-x    2 apache   apache   4096 Jan 11 15:50 pics
   #
Follow that with
   # ln  -s . dav
   # ls -la
   total 16
   drwxrwsr-x    3 bob      apache    4096 Jan 11 15:50 .
   drwxrwsr-x    4 bob      apache    4096 Jan  1 16:41 ..
   lrwxrwxrwx    1 root     apache       1 Jan 11 15:50 dav -> .
   -rwxrwxr x    1 bob      apache     114 Jan  9 17:45 index.html
   drwxr-sr-x    2 apache   apache    4096 Jan 11 15:50 pics
Voila! A symlink pointing to its own parent directory.
Now, if someone uses a WebDAV-aware browser and goes to WebDav://mydomain.com/dav/, that person will get access to the same contents that make up the website http://mydomain.com. Note that the user must append /dav/ to the URL. This is not required when setting up a WebDAV share. However, since the WebDAV directory is a different directory-even though it's virtual-the /dav/ suffix lets us differentiate between /home/bob/web/html, which has no referenced .htaccess file, and /home/bob/web/html/dav/, which does have a referenced .htaccess file. Remember that the .htaccess file is the key to nonsystem authenticated logins.
Next, create the .htaccess file that the AllowOverride directive will call when someone tries to log into the WebDAV share. Put this file in the /home/bob/web/html/ directory. Take a look inside a working .htaccess file for this site:
   order allow,deny
   allow from all
   require valid-user
   Authname "Welcome Back Webmaster Bob..."
   Authtype Basic
   AuthUserFile /home/bob/.htpasswd
| Note |
While the .htaccess file controls and externalizes the authentication control away from the main httpd.conf file, it in turn points to the .htpasswd file, where the web username and hashed password are actually stored. |
Notice where the .htpassword file is located? Outside the web directory. In fact, completely outside the reach of Bob's web space. This is good security practice, because the .htpassword file usually contains all of the site's usernames and encrypted passwords. Set up your .htpassword file with the following commands:
   # htpasswd -c /home/bob/.htpasswd bob
   New password:
   Re-type new password:
   Adding password for user bob
   #
   # cat /home/bob/.htpasswd
   bob:QfeYlAUIQVSow
   #
Now restart your apache httpd service:
   # /etc/init.d/httpd restart
   Stopping httpd:                                               [ OK ]
   Starting httpd:                                               [ OK ]
If you're using KDE's Konqueror, then you should now be able to point your browser to this share, with the correct URL (webdav://mydomain.com/dav/ in this case), and get a secured login prompt. If you see the error message
   An error occured while loading webdav://mydomain.com/dav/:

   The file or directory webdav://mydomain.com/dav/ does not exist.
then you probably have the wrong path in httpd.conf, one of the access files is missing or misconfigured, or the symlink is not set up or configured. Check the site's error log or the general error log in /var/log/httpd/error_log for more information.
Although the WebDAV share is now configured properly, the data is still flowing to the browser unencrypted and is thus as unsafe as FTP. Securing a WebDAV share is done in the same way as you would secure a web page, using SSL. Since each SSL site on an Apache server requires a unique IP address, you will need to get an IP to assign solely to Bob's WebDAV share. While you could run this setup on the site's main IP address, there are other SSL services that generally take priority over WebDAV for the main address's SSL function. Since you can have only one SSL site per IP address, you will need an additional IP address configured on your server for this purpose.
Configuring WebDAV shares over SSL is simple. In general, you can copy your old non-SSL VirtualHost block in httpd.conf, paste it just below, and change the IP/port binding to x.x.x.x:port, where x.x.x.x is the additional IP that you've configured on the system and port is the SSL port to which you're binding that IP address, as in 10.1.1.2:443. The result should look like this:
   NameVirtualHost *:443
   <VirtualHost 10.1.1.2:443>
       DocumentRoot /home/bob/web/html/
       ServerName dav.mydomain.com
     SSLEngine on
     SSLCertificateFile /etc/httpd/conf/ssl.crt/server.crt
     SSLCertificateKeyFile /etc/httpd/conf/ssl.key/server.key
   DavLockDB /tmp/mydomainDavLock
   <Directory /home/bob/web/html/>
       AllowOverride All
       Order allow,deny
       Allow from all
       DAV On
   </Directory>
   </VirtualHost>
| Note |
If you set up WebDAV as described in the previous section, we just created a totally different WebDAV share but in a different virtual host (for SSL). As such, if you're following along, you need to go back and remove the Directory block and the DavLockDB line in the main VirtualHost block. Also, remove the symbolic link /dav/ that you created in the /home/bob/web/html/ directory. |
The method used here is better than the /dav/ symbolic link trick within the main VirtualHost block described earlier. However, this method does require an additional IP address and an SSL certificate.
Once you have this all set up, you can test your configuration. Make sure that you have your DNS or /etc/hosts file set up to point dav.mydomain.com to the new IP address. Restart Apache, and then point your WebDAV-enabled browser to the correct URL. The URL varies, depending on the web client you use. For KDE's Konqueror, the correct URL is webdavs://dav.mydomain.com/. Other software just asks for the fully qualified domain name, as in dav.mydomain.com, and then asks which protocol to use: in this case, webdav-ssl. Table 18-2 shows some common WebDAV-aware clients.
|
Windows |
Internet Explorer 5.5 or newer http://www.Microsoft.com/windows/ie/default.asp WebDrive |
|
Linux |
KDE Konqueror |
|
Mac OS X |
Goliath |
| Tip |
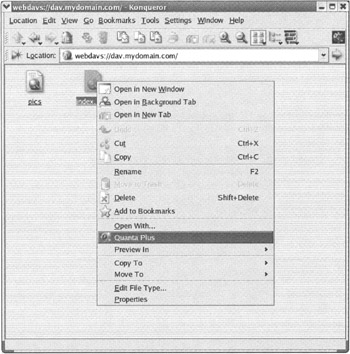
Try adding an HTML editor, like Quanta, to your desktop's toolbar. With some WebDAV-aware browsers such as Konqueror, you can drag and drop the file you want to edit onto the editor's toolbar icon and vice versa (see Figure 18-2). With Fedora Linux, if you have everything you need installed, then you can right-click on .html files and easily select the Quanta Plus HTML editor. Web editing with no uploading or downloading. |