|
|
< Day Day Up > |
|
Recipe 14.2. Installing a Printer on a Standalone Linux PC14.2.1 ProblemYou need to connect a printer to your Linux PC. 14.2.2 SolutionIf you have a USB printer, it must be connected and powered up at boot time. First, make sure that the CUPS daemon is running: $ lpstat -t
scheduler is running
...If it is not running, it says: $ lpstat -t
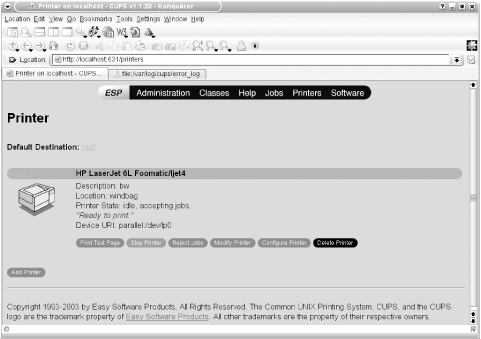
lpstat: Unable to connect to server: Connection refusedIf that is the case, start it with its init script: # /etc/init.d/cupsys startOn Red Hat and Fedora, use: # /sbin/service cups restartThe easiest way to install a new printer is with the CUPS web interface. Type the CUPS URL in any browser: http://localhost:631You'll need the root password. Click the Printers tab, then click "Add printer," which opens the Admin menu. There are three values to enter here: Name: hp6L Location: room-202 Description: bw-laser Choose the name carefully—CUPS needs this name, and changing it will cause problems. Your printer name will be used on the next few configuration pages. I've entered "hp61" for my Hewlett-Packard LaserJet6L printer. The Location and Description are optional. On the next page, define the "Device for <printername>." This means the physical connection: parallel port, USB, SCSI, serial port, or network. Select your deviceURI from the drop-down menu. In this example, that is "Parallel port #1 Hewlett-Packard HP LaserJet6L." On the "Model/Driver for <printername>" menu, scroll to the model number of your printer, and select a driver from the list. Now it should say "Printer <printername> has been added successfully." Click on the printer name to go the printer's control page, and print a test page. Your CUPS page should look like Figure 14-1. Figure 14-1. CUPS page 14.2.3 DiscussionIf you prefer the command line, this long command does the same thing as the above example: # lpadmin -p hp6L -L room-202 -D bw-laser -E -v parallel:/dev/lp0 \ -m HP-LaserJet_6-hpijs.ppd Here are some definitions:
If you have Gimp-Print and Foomatic installed (if you don't you probably should) you'll find additional PPDs in /usr/share/cups/model/gimp-print and /usr/share/cups/model/foomatic. They are compressed: HP-LaserJet_6-hpijs.ppd.gz You'll need to uncompress the file and move it to the /usr/share/cups/model directory: # gunzip HP-LaserJet_6-hpijs.ppd.gz && mv HP-LaserJet_6-hpijs.ppd \ /usr/share/cups/model/ It is not necessary to uncompress and move PPD files when you install printers using the CUPS web interface. 14.2.3.1 Generic driversThese are the generic drivers that come with the free version of CUPS: $ ls /usr/share/cups/model
epson24.ppd laserjet.ppd pxlcolor.ppd stphoto.ppd deskjet.ppd epson9.ppd
okidat24.ppd pxlmono.ppd stphoto2.ppd deskjet2.ppd okidata9.ppd stcolor.ppd
dymo.ppd pcl-6.ppd stcolor2.ppdIf you can't find a driver specific to your printer, one of these should work. (You did check your distribution's hardware compatibility list, or the database on linuxprinting.org, before purchasing the printer, right?) 14.2.4 See Also
|
|
|
< Day Day Up > |
|