| [ Team LiB ] |
|
Recipe 2.6 Deploying a Web Application on TomcatProblemYou want to deploy an entire web application on Tomcat 4.1.x. SolutionCreate a Jakarta Ant build file. Ant can automatically compile your servlet classes, create a web application archive (.war) file, then deploy the WAR to the Tomcat 4.1.x server. DiscussionThe recommended method for the compilation and deployment of web applications is to use the Jakarta Ant automation tool. If you change anything in the application (such as altering a servlet or JSP), then all it takes is a single command-line execution of ant to compile, package, and redeploy the application on Tomcat. You do not have to go to the trouble of manually recompiling a changed servlet, creating a new WAR file, starting and stopping Tomcat, and redeploying the application. Another method of deploying a web application on Tomcat is to place a directory containing a web application in the required directory structure in the Tomcat webapps folder. The name of the web application directory (such as myapp) then becomes the context path or name of the new web application. This deployment method is not guaranteed to work with other application servers, however, so it is an ineffective strategy for creating portable applications. In addition, since this manual method is not automated in any manner, it is awkward to replace and keep track of any changed servlet or JavaBean classes in these web application directories. The end of this discussion describes how to configure Tomcat's server.xml configuration file so that a context path points to an unpacked web application directory elsewhere on the server. As an alternative to creating an archived application (a WAR file), Tomcat developers can use this method of deployment during development and testing. Using Ant for deploymentUsing Ant to compile and deploy an application involves the following steps:
Figure 2-5. Web application directory structure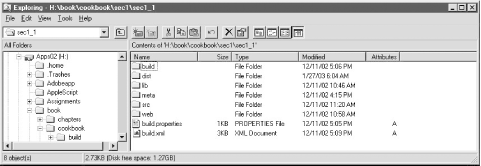
Example 2-5 is the build.properties file that is referenced in step 5.
Example 2-5. build.properties for web application deploymenttomcat.webapps=k:/jakarta-tomcat-4.1.12/webapps/
tomcat.dir=k:/jakarta-tomcat-4.1.12
url=http://localhost:8080/manager
username=tomcat
password=tomcat
manager.path=${tomcat.dir}/work/standalone/localhost/manager
Each of these properties is made available to or imported into the build.xml file by the following line within this file: <property file="build.properties" /> This line represents a property task or XML element within the build.xml XML file. For example, the value of the tomcat.dir property inside the Ant XML file is "k:/jakarta-tomcat-4.1.12." Example 2-6 is the entire build.xml file. It can be used to compile Java classes, create a WAR file, and deploy it to Tomcatjust by executing ant on the command line. The chief advantage of using Ant is that it automates an otherwise complicated process. If you have to change or add a servlet in the web application, for instance, you can recompile and redeploy the web application simply by running Ant. This build.xml file is fairly complex and introduces some advanced features of Ant. Example 2-6. An Ant build file for deploying a web application<project name="Deploy Project" default="deploy-application">
<taskdef name="deploy" classname="org.apache.catalina.ant.DeployTask" />
<taskdef name="undeploy" classname="org.apache.catalina.ant.UndeployTask" />
<property file="build.properties" />
<path id="classpath">
<fileset dir="${tomcat.dir}/common/lib">
<include name="*.jar" />
</fileset>
<fileset dir="${tomcat.dir}/common/endorsed">
<include name="*.jar" />
</fileset>
</path>
<target name="init"
description="Initializes some properties.">
<echo message="Initializing properties."/>
<property name="build" value=".\build" />
<property name="src" value=".\src" />
<property name="dist" value=".\dist" />
<property name="lib" value=".\lib" />
<property name="web" value=".\web" />
<property name="meta" value=".\meta" />
<property name="context-path" value="myapp" />
</target>
<target name="prepare" depends="init">
<echo message="Cleaning up the build and dist directories."/>
<delete dir="${build}"/>
<mkdir dir="${build}"/>
<delete dir="${dist}"/>
<mkdir dir="${dist}"/>
</target>
<target name="deploy"
description="Deploys a Web application">
<deploy url="${url}" username="${username}" password="${password}"
path="/${context-path}" war="file:${dist}/${context-path}.war"
/>
</target>
<target name="undeploy"
description="Undeploys a Web application" if="already.deployed">
<undeploy url="${url}" username="${username}" password="${password}"
path="/ ${context-path}" />
</target>
<target name="create-war" description="creates a web application archive file">
<war destfile="${dist}/${context-path}.war" webxml="${meta}/web.xml">
<classes dir="${build}"/>
<lib dir="${lib}"/>
<fileset dir="${web}"/>
</war>
</target>
<target name="deploy-application" depends="prepare"
description="Compile the web application....">
<echo message="Undeploying the application only if it's deployed..."/>
<available file="${manager.path}/${context-path}.war"
            property="already.deployed"/>
<antcall target="undeploy"/>
<echo message="Compiling the application files..."/>
<javac srcdir="${src}" destdir="${build}">
<include name="*.java" />
<classpath refid="classpath"/>
</javac>
<echo message="creating the WAR file...."/>
<antcall target="create-war"/>
<antcall target="deploy"/>
</target>
</project>
The create-war target uses the war Ant task to generate the WAR file, based on certain attribute values and nested elements. For example, the web.xml file that will be included in the WAR is specified as the value for the war task's webxml attribute. In addition, the classes that will be included in the WAR file's WEB-INF/classes directory are specified by this nested element of the war task: <classes dir="${build}"/>
The nice thing about this classes element, along with the lib and fileset nested elements, is that all of the nested directories inside the build , lib, and web directories are automatically included in the WAR. For example, the web directory includes an images directory containing the application's various GIF files. The images directory is included at the top level of the WAR file, along with any HTML or JSP files that are stored in the web directory, just by including this nested element: <fileset dir="${web}"/>
Also examine the deploy-application target, which embodies the meat of this build.xml file. As long as you properly set the PATH environment variable to point at the Ant component, the deploy-application target is called by default when you type ant at the command line. First, the target finds out whether the web application has already been deployed on Tomcat. This function is included because this build file will presumably be run over and over again, not just the first time the web application is deployed. This line uses an available task, which sets a property to the value "true" only if the file specified in its file attribute exists: <available file="${manager.path}/${context-path}.war"
property="already.deployed"/>
<antcall target="undeploy"/>
If this particular file is found, it means that the Tomcat Manager application has already deployed the WAR file, and that the already.deployed property is set to true. This allows the build.xml file to conditionally undeploy the application, before the application is redeployed after any changes. In other words, it undeploys the application only if the web application is already deployed (otherwise, running the undeploy target raises an error and halts execution of the build file). The undeploy target runs only if the already.deployed property is set to true: <target name="undeploy"
description="Undeploys a Web application"
if="already.deployed">
The handy antcall task calls another target in the file, similar to calling a method. Finally, the deploy-application target uses the javac task to compile the application's servlets into the build directory, then uses the antcall task to create the WAR file and deploy the new or changed application to Tomcat. The target echoes various messages to the console to help indicate to the developer what it is doing: <target name="deploy-application" depends="prepare"
description="Compile the web application....">
...
<echo message="Compiling the application files..."/>
<javac srcdir="${src}" destdir="${build}">
<include name="*.java" />
<classpath refid="classpath"/>
</javac>
<echo message="creating the WAR file...."/>
<antcall target="create-war"/>
<antcall target="deploy"/>
</target>
As an alternative to using the prior deployment method, you can configure Tomcat to point to an external directory that contains a valid web application. This strategy deploys the web application the next time Tomcat is restarted. It is an acceptable strategy when the application is under development, because you can configure Tomcat to automatically reload the application (Recipe 2.2) when a servlet is changed, or when a JAR file is added to WEB-INF/lib. However, developers should deploy applications as WAR files when the time comes to run the application on a production server. Create a file that contains a Context element as this element would appear in server.xml. Give this file a .xml extension. It is sensible to call this file the same name as the context path or application name (for example, myapp.xml), but not required. Your file content might look like this: <Context className="org.apache.catalina.core.StandardContext"
crossContext="false" reloadable="true"
mapperClass="org.apache.catalina.core.StandardContextMapper"
useNaming="true" debug="0" swallowOutput="false"
privileged="false"
wrapperClass="org.apache.catalina.core.StandardWrapper"
docBase="h:\book\cookbook\sec1\sec1_1\dist"
cookies="true" path="/newapp" cachingAllowed="true"
charsetMapperClass="org.apache.catalina.util.CharsetMapper">
</Context>
The reloadable attribute value of "true" configures Tomcat to monitor the classes in WEB-INF/classes and the components in WEB-INF/lib for any changes. Tomcat automatically reloads the web application if it detects any changes. The value for the docBase attribute can be an absolute path to the directory that contains the web application, or the context root. It can also be the path to a WAR file. The docBase attribute can also be a path name relative to the appBase directory of the enclosing Host element in server.xml, such as relative to the <Tomcat-installation-directory>/webapps directory. The path attribute declares the context path for the new application, as in http://localhost:8080/newapp/ (where /newapp is the context path). Place this file in the <Tomcat-installation-directory>/webapps directory (or whichever directory is configured as the appBase in the enclosing Host element in conf/server.xml) and restart Tomcat. This web application can now be invoked on Tomcat. See AlsoThe deployment sections of Tomcat: The Definitive Guide by Brittain and Darwin (O'Reilly); Recipe 2.1, Recipe 2.2, and Recipe 2.4. |
| [ Team LiB ] |
|
