| [ Team LiB ] |
|
The page DirectiveThe page directive has a number of options that bear no relation to each other except that they apply to the page. The options are of the form name=value and are separated by spaces. The following is an example page directive: <%@ page info="My first JSP Page" %> In this example, the page directive has an attribute-value pair that specifies a string that describes the page. You can have multiple page directivesin fact, it's common to have severalbut you can't have two page directives with the same option in the same page. This rule has two exceptions: the import option and the pageEncoding option. The import option, which enables you to specify Java classes to import, can appear as many times as necessary. The pageEncoding option can appear once in each file, even if the files are combined to produce a single JSP. You can also combine several options within the same page directive, but again only import may appear more than once. In Case of Trouble
The contentType OptionThe contentType option allows you to specify the kind of data that you are returning to the browser. The default content type is text/html, which is the standard content type for HTML pages. If you want to write out XML from your JSP, use the following page directive: <%@ page contentType="text/xml" %> You can also specify the character encoding for the response. For example, if you wanted to specify that the resulting page that is returned to the browser uses ISO Latin 1, you would use the following page directive: <%@ page contentType="text/html:charset=ISO-8859-1" %> The pageEncoding OptionIf you need to use a different character encoding for your JSP page, you specify the encoding using the pageEncoding attribute. For standard syntax JSP pages, the default encoding is ISO-8859-1. The language OptionThe language option enables you to specify the language you want to use for scripting in your JSP. For example, because you usually use Java as the scripting language, your language option looks like this: <%@ page language="java" %> The JavaServer Pages environment was designed to support scripting languages other than Java. You can, for example, use JavaScript as the scripting language if you have a JSP engine, such as Resin, that supports it. In that case, the language option on the page would be <%@ page language="javascript" %> Listing 9.1 shows the familiar "Hello World!" JSP with JavaScript, rather than Java, being used as the scripting language. The example works with the Resin JSP engine. Listing 9.1 Source Code for JSHello.jsp
<%@ page language="javascript" %>
<html>
<body>
<%
    var helloStr = 'Hello World!';
%>
<h1><%=helloStr%></h1>
</body>
</html>
However, in JSP 2.0, only the value java is defined and required. The isELIgnored OptionJavaServer Pages 2.0 arrives with an Expression Language (EL) that makes it possible to construct dynamic pages without scripting elements. We'll spend time discussing this in Hour 15, "The JSP Expression Language." For now, you need to know that the isELIgnored option gives you the ability to disable the evaluation of EL expressions. The import OptionOf all the options for the page directive, the import option is the one you use the most. You can't use the import keyword within scriptlets or declarations to import Java packages. Instead, you must use the import option in the page directive. The value for the import option is the name of the package you want to import. For example, to import java.sql.*, use the following page directive: <%@ page import="java.sql.*" %> By default, a container automatically imports java.lang.*, javax.servlet.*, javax.servlet.jsp.*, and javax.servlet.http.*. You can have multiple page directives, so one way to import multiple packages is to have multiple page directives: <%@ page import="java.sql.*" %> <%@ page import="java.util.*" %> Because you can also have multiple import attributes in a single page directive, you can import multiple packages by using multiple attributes: <%@ page import="java.sql.*" import="java.util.*" %> The easiest and most compact method of importing multiple packages, however, is to list them all in one import option, separated by commas: <%@ page import="java.sql.*,java.util.*" %> The JSP compiler reads through the entire JSP file before it generates a servlet, so if you put import statements later in the code, they still appear at the beginning of the generated servlet where they belong. For example, the JSP shown in Listing 9.2 compiles cleanly and runs even though the import statement is in the middle of the page. Listing 9.2 Source Code for TestImport.jsp
<HTML>
<BODY>
<PRE>
<%
    out.println("Hello!");
%>
<%@ page import="java.sql.*,java.util.*,java.math.*" %>
</PRE>
</BODY>
</HTML>
You may wonder why the JSP compiler doesn't require you to put the import statements at the top the way you would in a Java source file. When you include additional code at compile time (using another JSP directive that you will see later in this hour), that code appears later in a file, and it may contain import statements. For example, suppose you have one version of a class or function that stores information to a text file and another version that stores data in a database. You can include either one of these at compile time. Rather than importing java.sql.* in your main JSP, you can let the included file import whatever packages it needs, knowing that the JSP compiler will handle it properly. The info OptionThe info option lets you provide a description of the servlet. For example, you may want to indicate what kind of function the JSP performs: <%@ page info="JSP that receives new customer orders" %> You can access the value of this attribute through the pages implementation of Servlet.getServletInfo(). The session OptionThe session option tells the JSP compiler whether you want to use sessions: <%@ page session="true" %> The default value is true, indicating that you want to use sessions. This option makes the session implicit variable available for your use. If you absolutely can't use sessions in your application, set the session value to false. Frequently, the only reason to turn sessions off is to help in error checking. If you haven't enabled sessions, the JSP compiler will tell you whether you accidentally tried to use the session variable. Bug Catcher
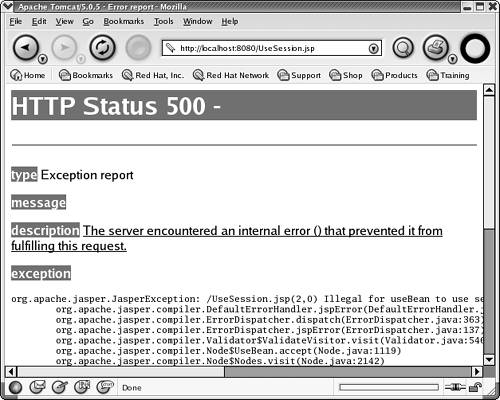
If you try to store an object in a session and you have turned sessions off for the page, you might get a compile error or a runtime error, depending on your JSP engine. For example, Listing 9.3 shows a simple JSP whose only goal is to challenge the session option to see whether it really has turned off sessions. Listing 9.3 Source Code for UseSession.jsp<%@ page session="false" %> <jsp:useBean id="item" class="usingjsp.cart.Item" scope="session"/> <html> <body> </body> </html> Figure 9.1 shows the response from the Jakarta Tomcat JSP engine, which compiles fine but generates a runtime error when you try to use the session object. Figure 9.1. Some JSP engines give you a runtime error if you try to use a session with sessions disabled.
The buffer and autoFlush OptionsThe buffer and autoFlush options let you control your JSP's buffering. To turn the buffering off completely, set the buffer option to none: <%@ page buffer="none" %> You can also specify the size of the buffer in kilobytes. For example, to set the buffer size to 16KB, you can use either of the following two page directives: <%@ page buffer="16" %> <%@ page buffer="16kb" %> The default buffer size may be no less than 8KB, according to the JSP specification. Buffer Size May Change
The autoFlush option controls whether the buffer is automatically flushed when it fills. The default value is true, meaning the buffer is automatically flushed when it is full. If you turn off autoFlush and the buffer fills up, the JSP engine throws a runtime exception when you try to write more data to the buffer. Sometimes you might want such detailed control over the buffer, but, in general, you should leave this option alone. The isThreadSafe OptionThe isThreadSafe option marks a page as being thread-safe. By default, all JSPs are considered thread-safe. If you set the isThreadSafe option to false, the JSP engine makes sure that only one thread at a time is executing your JSP. The following page directive sets the isThreadSafe option to false: <%@ page isThreadSafe="false" %> isThreadSafe Isn't Safe
isThreadSafe is a misleading name for this option. It is possible for you to encounter threading issues even if you mark the page as not being thread-safe. For instance, multiple threads can still access any objects that are shared in the session object or the application object. You must make sure that you synchronize access to any shared resources when you label the JSP as not being thread-safe. The errorPage OptionThe errorPage option tells the JSP engine which page to display if there is an error while the current page runs. For example, suppose you want to call handleError.jsp if the current page encounters an error. You would use the following page directive: <%@ page errorPage="handleError.jsp" %> Flushing May Cause Additional Errors
In Case of Trouble
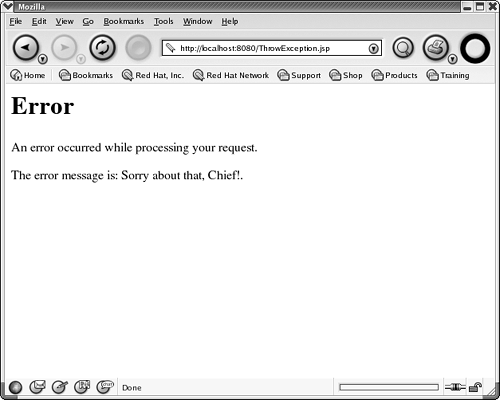
The isErrorPage OptionThe isErrorPage option indicates that the current JSP can be used as the error page for another JSP. For example, the handleError.jsp sets the isErrorPage option to true because it is supposed to handle errors: <%@ page isErrorPage="true" %> By setting the isErrorPage to true, you tell the JSP compiler to create an implicit exception object that contains the Throwable object that caused the error page to be invoked. Listing 9.4 shows an error page that prints the message from the exception that caused the error page to be invoked. Listing 9.4 Source Code for ErrorPage.jsp<%@ page isErrorPage="true" %> <html> <body> <h1>Error</h1> An error occurred while processing your request. <p> The error message is: <%= exception.getMessage() %>. </body> </html> Listing 9.5 shows a page that intentionally throws an exception just to invoke the error page shown in Listing 9.5. Listing 9.5 Source Code for ThrowException.jsp
<%@ page errorPage="ErrorPage.jsp" %>
<html>
<body>
You shouldn't see this because I plan
to throw an exception in just a second.
<%
    if (true) throw new RuntimeException("Sorry about that, Chief!");
%>
</body>
</html>
Figure 9.2 shows the results of the error page. Notice that none of the text from the original page shows up on the error page. Figure 9.2. The JSP engine clears the output buffer, if possible, before displaying an error page.
The extends OptionThe extends option enables you to specify the superclass for your JSP. Most of the time, you should stick to the superclass that the JSP compiler chooses. If you find that you want to create your own superclass, first ask yourself why you need to. If, for example, you find several utility routines that your JSPs need to call, consider implementing those routines as static methods in some utility class. Many times, the superclass for your JSP has been optimized to give you the best performance. If you decide to create your own superclass, you may be throwing away some of the benefits of the JSP engine that you are using. If you choose to implement your own superclass, there are a few things you need to be aware of. A JSP's superclass must implement the JspPage interface. If your JavaServer Pages use HTTP, as most currently do, the superclass must implement HttpJspPage, which extends JspPage. Because the JspPage interface extends the Servlet interface, a JSP's superclass must also implement all the methods in the Servlet interface. These include the init, service, and destroy methods. Also, you must declare the Servlet interface methods in your class as final, meaning the JSP can't override them. Typically, your superclass will extend HttpServlet, which does most of the work for you. From there, you only need to add two methods: public void jspInit() public void jspDestroy() You must call jspInit from within your superclass's init method and jspDestroy from its destroy method. Finally, the service method must invoke the _jspService method in the JSP. The _jspService method is already defined in the HttpJspPage interface and is declared in the following way:
public void _jspService(HttpServletRequest request,
    pttpServletResponse response)
    throws ServletException, IOException
Listing 9.6 shows an example servlet that may be used as the superclass for a JSP. Listing 9.6 Source Code for JSPSuperclass.java
package usingjsp;

import javax.servlet.*;
import javax.servlet.http.*;
import javax.servlet.jsp.*;

/** An example superclass for a JavaServer Page */

public abstract class JSPSuperclass extends HttpServlet
    implements HttpJspPage
{
// init must be declared as final for this to be a superclass for a JSP.
    public final void init(ServletConfig config)
        throws ServletException
    {
// Let the superclass do its initialization.
        super.init(config);

// Initialize the JSP
        jspInit();
    }

// destroy must be declared as final for this to be a superclass for a JSP.
    public final void destroy()
    {
        super.destroy();

        jspDestroy();
    }

// getServletConfig must be declared as final for this to
// be a superclass for a JSP.
    public final ServletConfig getServletConfig()
    {
        return super.getServletConfig();
    }

// service must be declared as final for this to be a superclass for a JSP.
    public final void service(ServletRequest request,
        ServletResponse response)
        throws ServletException, java.io.IOException
    {
        super.service(request, response);
    }

    public final void service(HttpServletRequest request,
        HttpServletResponse response)
        throws ServletException, java.io.IOException
    {
// DEMO ALERT! Put a dummy data item in here to show
// how the subclassing works.
request.setAttribute("Demo", "Hello from your superclass");

// Now call the _jspService method to run the JSP.
        _jspService(request, response);
    }

// Provide a dummy jspInit method.
    public void jspInit()
    {
    }

// Provide a dummy jspDestroy method.
    public void jspDestroy()
    {
    }
// The _jspService method is implemented by the servlet generated
// from the JSP page source.
    public abstract void _jspService(HttpServletRequest request,
        HttpServletResponse response)
        throws ServletException, java.io.IOException;
}
Listing 9.7 shows a JSP that extends the example superclass. Listing 9.7 Source Code for TestSubclassing.jsp
<%@ page extends="usingjsp.JSPSuperclass"%>
<html>
<body>
I am a subclass of a custom servlet. My parent class
left me a message. Here it is:
<%= request.getAttribute("Demo") %>
</body>
</html>
In Case of Trouble
|
| [ Team LiB ] |
|