|
|
< Day Day Up > |
|
6.1 The BasicsAt the core, JSF is a Java API built on top of the Servlet API. In addition, it defines JSP custom tag libraries that hide the API layer to make it easy for Page Authors to include JSF components in a JSP page. Figure 6-1 shows both these layers and how JSF applications can be developed on top of either one or both. Figure 6-1. JSF layers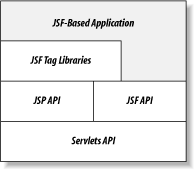 As you may recall from Chapter 4, a JSP custom tag library is a collection of custom actions, represented by XML elements in a JSP page and implemented as Java tag handler classes. If the term "custom action" sounds unfamiliar, you may be more familiar with the "custom tag" term. To make a long story short, an XML element includes an opening tag, an element body, and a closing tag, but the word "tag" is commonly used to refer to both tags and elements because it's easier to say and shorter to type. Hence, most people use the term custom tag for what formally should be called a custom action (the functional entity) as well as what formally is a custom action element (its representation in a page). Because I'm a stickler for correct terminology, I try to use the terms custom action and custom action element in this book, but if I slip, be aware that custom action, custom action element, and custom tag can all refer to the same thing. When you use JSP as the presentation layer technology for JSF, you don't use the JSF API at all for creating and rendering components. Instead, you use the custom actions from the JSF custom tag libraries to say which components you need, and the tag handlers use the JSF API to create and render the corresponding component objects for you. Even so, it helps to peek at the API to really understand what's going on. Let's start with something fairly simple, namely, the filtering criteria form from the sample expense report application, and look at both the JSP layer and what's going on behind the scenes at the API level. Figure 6-2 shows what the first incarnation of this part of the application looks like in a browser. Figure 6-2. The first version of the filter area JSP page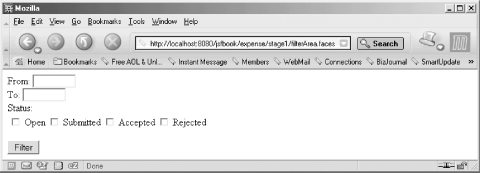 It's not pretty, but it works. We'll fix the layout and make it look nicer when we put all the pieces together into the complete user interface later. 6.1.1 Using JSF Components in a JSP PageThe JSP page for the initial version of the filtering criteria form is shown in Example 6-1. Example 6-1. Initial filtering criteria form JSP page (expense/stage1/filterArea.jsp)<%@ page contentType="text/html" %>
<%@ taglib uri="http://java.sun.com/jsf/html" prefix="h" %>
<%@ taglib uri="http://java.sun.com/jsf/core" prefix="f" %>
<f:view>
<h:form>
From: <h:inputText size="8" />
<br>
To: <h:inputText size="8" />
<br>
Status:
<h:selectManyCheckbox>
<f:selectItem itemValue="1" itemLabel="Open" />
<f:selectItem itemValue="2" itemLabel="Submitted" />
<f:selectItem itemValue="3" itemLabel="Accepted" />
<f:selectItem itemVvalue="4" itemLabel="Rejected" />
</h:selectManyCheckbox>
<p>
<h:commandButton value="Filter" />
</h:form>
</f:view>
The page starts with a JSP page directive, saying that the page generates HTML, and two taglib directives that declare the tag libraries used in the page. Each taglib directive contains two attributes: the uri attribute specifies the unique identifier for the library and the prefix attribute defines the namespace prefix used for elements from the library in this page. Note that even though the uri attribute value looks like a URL, it doesn't mean that the tag library is accessed over the Internet when you run the page. It's just a string that uniquely identifies a specific library, and a URL is typically used for public libraries because it's a pretty good guarantee that it won't clash with the identifier for other libraries. The tag libraries used in Example 6-1 are the two tag libraries defined by JSF:
The fun starts after the tag library declarations, where you find a number of JSF action elements mixed with template text. Each JSF action represents an instance of a JSF component class defined at the API level. The first action element in the page, <f:view>, is very important. The combination of the components that make up a specific user interface screen is called a view in JSF. A view contains an instance of the javax.faces.component.UIViewRoot class. This class is a nonvisual component type that acts as a container for all the other components in the view. Components representing UI widgets, such as input fields and buttons, are children of the UIViewRoot and can have children of their own. Together, the components form a tree, with the UIViewRoot at the top. The <f:view> action element represents the UIViewRoot component and you must make sure it encloses all other JSF action elements in the page; otherwise, they aren't included in the view. Note that there's a one-to-one relationship between a JSF view and an HTTP response. Hence, you must use only one <f:view> element in the JSP page. A JSP page can, as you may know, include other JSP pages dynamically. Such included pages represent subviews in JSF, and are represented by an <f:subview> element. I'll discuss different ways to compose a view from subviews in Chapter 12. The next JSF action element, <h:form>, represents a form component, acting as a container for input components that hold values that should be processed together. Within the <h:form> element in Example 6-1, you find action elements that represent the two input fields, the status choice checkboxes, and the Submit button (<h:inputText>, <h:selectManyCheckbox>, and <h:commandButton>). The element names for all these actions are composed from a component type name and renderer type name. The core JSF components represent pure behavior and know nothing about how they are represented on a screen. This task instead falls on renderers associated with each component, making it possible to represent the same type of component in different ways. Take <h:inputText>, for example. It represents an input field component, i.e., a component type that holds a value that can be changed by the user. Such a component can be rendered in different ways. The <h:inputText> action associates the input component with a text renderer, which renders the component as an HTML <input> element with the type attribute set to text. Another action element named <h:inputSecret> associates an input component with a renderer of type "secret," which renders the component as an HTML <input> element with the type attribute set to password. Table 6-1 shows some other examples, and all combinations are described in Appendix A.
The other elements that are in the form in Example 6-1 follow the same pattern. The <h:selectManyCheckbox> action element represents a "select many" component with a checkbox renderer, which renders the component as a group of HTML checkboxes. The <h:commandButton> represents a command component with a button renderer, rendering an HTML button. Most component types can be combined with more than one renderer type, and each valid combination is supported by an action element following the <h:componentTypeRendererType> naming convention. So why doesn't the <h:form> element name follow the same convention? Because the only renderer type for the form component type is the form renderer. To avoid action element names like <h:formForm>, JSF uses an abbreviated element name when the component type and the renderer type have the same name. The <h:selectManyCheckbox> element contains nested <f:selectItem> elements that define a label and a value for each choice. This makes it easy to define a number of fixed choices. Later, we'll look at other options that allow you to determine the choices at runtime instead. The components are configured through action element attributes. Some attributes are defined by the JSF specification, but all actions in the JSF HTML tag library also support most of the same attributes as their HTML element counterparts. The size attribute used for the <h:inputText> elements in Example 6-1 is one example and Appendix A describes all attributes for all JSF action elements in detail. These are called pass-through attributes, and the renderer associated with the component adds these HTML-equivalent attributes as is to the HTML element it renderers. 6.1.2 Creating JSF ComponentsExample 6-1 shows a JSP page with JSF action elements representing a combination of component types and renderer types. When the page is processed, the tag handlers create and configure the component objects. That's all you really need to know to use JSF, but if you're a programmer, you're probably saying, "Okay, that's cool, but how are the components really created?" Let's take a look, but be aware that you don't need to worry about these details unless you're creating your own custom components, and in that case, you should read Chapter 13 and Chapter 14 to get the whole story. The intention here is only to give you an idea about how the JSF custom actions use the JSF API to make things happen. If you don't care about these details, you can safely skip the next two sections. When the JSP container processes a page, it sends all template text to the browser as is, but when it encounters a custom action element it invokes the corresponding tag handler. All JSF tag handlers use the JSF API to create components and associate them with renderers the first time the user requests the page. For instance, the <h:inputText> tag handler contains code similar to this: import javax.faces.application.Application;
import javax.faces.context.FacesContext;
import javax.faces.component.UIComponent;
import javax.faces.component.UIInput;
import javax.faces.webapp.UIComponentTag;
...
public class InputTextTag extends UIComponentTag {
public int doStartTag( ) {
FacesContext context = getFacesContext( );
Application app = context.getApplication( );
UIInput comp = (UIInput) app.createComponent("javax.faces.Input");
comp.setRendererType("javax.faces.Text");
...
}
...
}
It first gets a reference to the current instance of a class named javax.faces.context.FacesContext. An instance of this class is associated with each request and contains information about the request parameters, headers, session data, and a lot more. The javax.faces.webapp.UIComponentTag class that all JSF component tag handlers must extend implements the getFacesContext() method so it's available to all component tag handlers. In other types of classes, you can use the static FacesContext getCurrentInstance() method to obtain the current FacesContext instance when it's not available through other means, as long as the code that calls it runs in the context of a JSF request. The FacesContext class provides an accessor method for an instance of the javax.faces.application.Application class. The Application class contains a number of methods for creating instances of configurable classes, such as the component type implementation classes. All JSF implementations provide default implementation classes for all component types defined in the specification, but you can replace them with specialized subclasses and register your own custom component types. The createComponent() method returns a new instance of the class registered for the component type named javax.faces.Input. Renderer classes are also registered under symbolic renderer type names; in order to associate the component with a renderer type, the setRendererType( ) is called with the renderer type name, i.e., javax.faces.Text in this example. In addition to setting the renderer type, the tag handler also configures the component based on the custom action element attribute values. For instance, the tag handler for the <h:inputText> action element gets the size attribute value entered in the page and configures the component with this value. I've omitted the code for this here, but I describe it in detail in Chapter 13 and Chapter 14. The component must also be added as a child of the component represented by the parent JSF action element. For components at the top level, the parent component is the UIViewRoot and, for nested components, it's some other component type, e.g., a form component. Here's a code snippet that shows how the tag handler deals with this: public int doStartTag( ) {
...
UIComponentTag parentTag = getParentUIComponentTag(pageContext);
UIComponent parent = parentTag.getComponent( );
parent.getChildren( ).add(comp);
...
}
}
As I mentioned earlier, all JSF tag handlers extend a class named javax.faces.webapp.UIComponentTag, which takes care of most of the grunt work. Its getParentUIComponentTag( ) method locates the tag handler for the parent JSF component action element. The component that tag handler represents can then be accessed through the getComponent() method. The return type for this method is javax.faces.component.UIComponent, which is the abstract class that all JSF component classes extend. With access to the parent component, the tag handler asks it to include the new component as one of its children. JSF defines a very simple yet powerful API for working with the children of a component: a single method named getChildren() that returns a java.util.List. All manipulation of the children list is done through the List: parent.getChildren( ).add(child); // Add a child parent.getChildren( ).add(index, child); // Add a child at an index parent.getChildren( ).remove(child); // Remove a child parent.getChildren( ).remove(index); // Remove a child at an index parent.getChildren( ).clear( ); // Remove all children parent.getChildren( ).contains(child); // Look for a child parent.getChildren( ).get(index); // Get a child parent.getChildren( ).size( ); // Count the children parent.getChildren( ).iterator( ); // Iterate through the children Because the getChildren() method is defined on the UIComponent class that all component classes extend, all JSF component types can have children. In addition to the getChildren() method, there's also a getChildCount() method which is slightly more efficient than calling getChildren( ).size() when the component doesn't have any children, because no List needs to be created. When you request the JSP page in Example 6-1, all JSF tag handlers are creating their corresponding component class instances and setting up the parent-child relationships as described in this section, resulting in the component tree shown in Figure 6-3. Figure 6-3. Component tree for the filter area components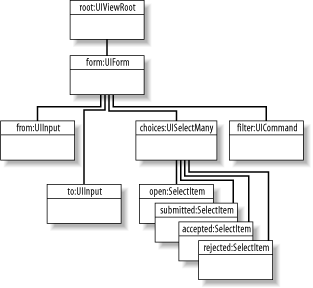 At the top of the tree, there's a UIViewRoot component with a UIForm component as its child. The UIForm component, in turn, has a UIInput, a UISelectMany, and a UICommand component as its children. The UISelectMany component has four UISelectItem components; one for each choice. 6.1.3 Rendering the ViewWhen JSP is used as the presentation layer technology, the JSP container processes the JSP page that defines the view as any JSP page so only the JSF custom action tag handlers can influence what happens. The part of the page that consists of template text and regular standard and custom actions is totally under the control of the JSP container, and JSF must play nice to render the markup for the components where it belongs relative to the other type of content. Besides creating JSF components, the tag handlers also ask each component to render itself. Two rendering methods the tag handlers call for each component are named encodeBegin() and encodeEnd(). The encodeBegin( ) method typically writes an opening tag (e.g., <form> for the form component), while encodeEnd() writes a closing tag (e.g., </form>) or a single tag for a component that doesn't require separate opening and closing tags (e.g., an input component that generates a single HTML <input> tag). As you know by now, the component classes typically don't generate output directly. Instead, they delegate this task to a renderer. This is true for all components defined by the JSF specification, and it is the recommended behavior for custom components. The component rendering methods just obtain an instance of their renderer and call methods with the same name on the renderer: package javax.faces.component;
import javax.faces.context.FacesContext;
import javax.faces.render.Renderer;
import javax.faces.webapp.UIComponentTag;
...
public class UIInput extends UIComponentBase {
public void encodeBegin(FacesContext context) throws IOException {
...
String rendererType = getRendererType( );
if (rendererType != null) {
getRenderer(context).encodeBegin(context, this);
}
}
protected Renderer getRenderer(FacesContext context) {
RenderKit rk = context.getRenderKit( );
return rk.getRenderer(getFamily( ), getRendererType( ));
}
...
}
Related renderers are grouped together in render kits, represented by instances of the javax.faces.render.RenderKit class, and a specific render kit is associated with each view as a UIViewRoot property. The default render kit contains renderers for HTML, but you can develop render kits for other markup languages. The component classes obtain the current kit through a FacesContext method, and then ask the current kit for an instance of a renderer of the type the component is configured with. Ignoring component data that should be represented by HTML element attributes, this is how the encodeBegin() and encodeEnd() methods for the default form renderer may generate the HTML elements for a form component: import java.io.IOException;
import javax.faces.component.UIComponent;
import javax.faces.context.FacesContext;
import javax.faces.context.ResponseWriter;
import javax.faces.render.Renderer;
...
public class FormRenderer extends Renderer {
...
public void encodeBegin(FacesContext context, UIComponent component)
throws IOException {
ResponseWriter out = context.getResponseWriter( );
out.startElement("form", component);
out.writeAttribute("method", "post", null);
...
}
public void encodeEnd(FacesContext context, UIComponent component)
throws IOException {
ResponseWriter out = context.getResponseWriter( );
out.endElement("form");
}
...
}
The rendering methods get a javax.faces.context.ResponseWriter from the context and use it to write their markup elements to the response. The ResponseWriter class is an extension of java.io.Writer, with methods that makes it easier to write markup language elements such as HTML and XML elements, e.g., the startElement(), writeAttribute(), and endElement( ) methods used in this example. The tag handler calls the encodeBegin() method in its doStartTag() method and the encodeEnd() method in its doEndTag( ) method. In between these two calls, the JSP container may add template text and output from other JSF component tag handlers as well as non-JSF tag handlers to the response. The third rendering method a JSF tag handler may call during rendering is named encodeChildren(). The tag handler calls this method only if a component property named rendersChilden is set to true. This feature is used by complex components that must control in detail how their children are rendered, for instance, a component that generates an HTML table and uses its child components to generate the column values for each row. For a component with rendersChildren set to true, the tag handler calls encodeBegin(), then encodeChildren(), and finally encodeEnd( ) on the component, all in its doEndTag( ) method to ensure that all child components have been created before the component is rendered. The encodeChildren() method then calls encodeBegin() and encodeEnd() on the component children as often as needed. Most component types don't need this kind of control over the layout of its children, so they set rendersChilden to false. An example is the form component. Because it doesn't layout its children, you can mix HTML elements for layout with JSF component action elements for its children that render themselves within the <h:form> element body. The result of processing the JSP page containing component action elements and template text shown in Example 6-1 is an HTML response similar to this: <form method="post" action="/jsfbook/expense/stage1/filterArea.faces"> From: <input type="text" name="_id0:_id1"> <br> To: <input type="submit" name="_id0:_id2"> <br> Status: <input type="checkbox" name="_id0:_id3" value="1">Open<br> <input type="checkbox" name="_id0:_id3" value="2">Submitted<br> <input type="checkbox" name="_id0:_id3" value="3">Accepted<br> <input type="checkbox" name="_id0:_id3" value="4">Rejected<br> <p> <input type="submit" name="_id0:_id4" value="Filter"> <input type="hidden" name="_id0"> </form> The first point of interest here is the action attribute value for the <form> element. The form renderer generates a URL for this attribute, which ensures that the view that created the response containing the form also processes the form submit request. I'll cover how the request is processed in the next chapter. Nested within the <form> element, there are <input> elements for each nested JSF component. The name attributes contain unique identifiers for all components. JSF generates component IDs automatically, unless you specify one explicitly: From: <h:inputText id="from" size="8" /> You can specify explicit IDs for components that you must access from other code, e.g., in client-side scripting code and validators that need access to another component besides the one they're attached to. In most cases you don't need an explicit ID, though, because there are other means for linking a component to code, e.g., the component binding mechanisms described in Chapter 12. Note also how the name attribute values hold values that combine the form's ID and the child components' IDs. This is because the form component is a naming container. You can read more about naming containers in Chapter 12 and Appendix C, but what this means to you is that component IDs need to be unique only within the closest parent component that is also a naming container, which simplifies application maintenance when a JSF view is created from multiple files containing shared parts (e.g., a search form that's included in every view). In addition to the <input> elements for the input fields tied to the components nested within the form, there's also an <input> element of type hidden, representing the form component itself. When the form is submitted, JSF uses the corresponding request parameter with the form component's ID to identify the form that was submitted in cases where there is more than one form in the view. 6.1.4 Saving the View StateOne of the key differences between JSF and a standalone application GUI framework like Swing is how component state is handled. In a standalone application, maintaining state is not an issue, because the user interface and the application logic is all part of the same operating system process, on the same machine—as long as the application is running, state is simply kept in memory. With JSF, on the other hand, the user interface is presented to a client (a browser) that is separated from the application logic by a network, communicating through a stateless protocol (HTTP). Unless special care is taken to handle state, the application forgets all about the client and its state as soon as it has sent the response to an individual request. There are two ways to deal with this: save the state on the server and send back a state identifier with the response that the client returns for all new requests, or send back the complete state to the client and have it return the state with each request. The Servlet and JSP specifications provide support for the first approach—passing and identifier back and forth, keeping the state on the server—and expose it as a session scope: a collection of named values on the server representing a specific client's state. The identifier is sent between the client and the server either in a cookie or encoded in the URLs. JSF hides all the details, but if you're curious, I recommend my JavaServer Pages book (O'Reilly) or Jason Hunter and William Crawford's Java Servlet Programming (O'Reilly). Saving state on the server can limit scalability due to high memory consumption for each user, while sending it back and forth between the client and server can increase the response times over a slow connection. JSF therefore supports both approaches for the component state and lets you decide which one to use per application by setting a context parameter in the application deployment descriptor (the WEB-INF/web.xml file): ...
<context-param>
<param-name>javax.faces.STATE_SAVING_METHOD</param-name>
<param-value>server</param-value>
</context-param>
...
The javax.faces.STATE_SAVING_METHOD init parameter can be set to either server or client. When saving state in the client, JSF collects the state that needs to be saved by calling a method named saveState() on all components in the view at some point during response rendering. In addition to saving the components' internal state (property values, etc.), the actual component tree structure is also saved, so that the tree can be rebuilt when the user sends a new request for the view. JSF gets this information by traversing the component tree and saving information about all top-level components and all parent/child relationships. How the state information is saved in the response depends on the response markup language and the JSF implementation. For HTML, it's saved typically in an encoded format in a hidden form field.
For most applications, saving state on the server should be your first choice for production use, because it cuts down on the bandwidth requirements. During development, client-side saving has the benefit that it makes it easier to create a new view for a modified JSP page, as explained in Chapter 12. Whether you pick server or client state initially, you can always switch to the other mode at any time because the application behaves in a similar manner either way. 6.1.5 Installing and Configuring a JSF Web ApplicationSo far, we've looked at a very simple JSP page and how the tag handlers represented in the page use the JSF API to create JSF components behind the scene. Before we look at examples of other features, let's walk through how to install and run the simple page from Example 6-1. The JSP page is part of a Java web application. As you may recall from Chapter 4, a Java web application consists of all the application files (JSP files, images, class files, and so on) plus a deployment descriptor (the web.xml file), arranged in a directory structure. A part of the directory structure for the book example application looks like this: /index.html /cover.gif /expense/stage1/filterArea.jsp ... /WEB-INF/web.xml /WEB-INF/faces-config.xml /WEB-INF/lib/jsf-api.jar /WEB-INF/lib/jsf-impl.jar ... At the top level, there's an index.html page with links to all examples in the book. The /expense/stage1/filterArea.jsp file is one of them, containing the code for Example 6-1. So, a JSP page with JSF components is included in a web application just the same as a regular JSP page: as a file in the public part of the directory structure. You must put at least these two declarations in the WEB-INF/web.xml file for a JSF application: ...
<servlet>
<servlet-name>FacesServlet</servlet-name>
<servlet-class>javax.faces.webapp.FacesServlet</servlet-class>
</servlet>
<servlet-mapping>
<servlet-name>FacesServlet</servlet-name>
<url-pattern>*.faces</url-pattern>
</servlet-mapping>
...
The <servlet> element declares a name for the servlet that processes all JSF requests and the <servlet-mapping> element maps requests with a path that ends with a .faces extension to this servlet. This is the recommended extension mapping. For each request, the FacesServlet replaces the .faces extension with a .jsp extension and uses the modified path to locate the JSP page that defines the corresponding view. If you have a very good reason for using another mapping, perhaps because you already use the .faces extension for other application resources, you can use any extension you want, or even a prefix mapping such as /faces/*, instead. See Appendix F for details about additional configuration needed for such alternative mappings. If you have a JSF development tool and are using a JSP 2.0 web container, you may want to use a .jsf extension for your JSP pages instead of the standard .jsp extension. The JSF specification reserves the .jsf extension so JSF development tools can take advantage of it and provide special support for JSP pages that contains JSF custom actions. Again, Appendix F describes what you must do to make this work. All JSP pages for the sample application use a .jsp extension, though. The deployment descriptor may optionally include the context parameter described earlier to indicate whether to save state on the server or in the response and, of course, any other declarations your application needs. Appendix F contains a complete deployment descriptor reference. JSF also uses a separate configuration file named WEB-INF/faces-config.xml, briefly introduced in Chapter 2. We'll look at the contents of this file when it's needed, but we'll ignore it for now. The WEB-INF/lib directory for the example application contains the JSF reference implementation JAR files. Because JSF is such a new technology, few web containers provide native support for it, so the class files for a JSF implementation must be bundled with the application (along with any other class files the application need). Soon, all major web containers will likely offer native support for JSF, making it unnecessary for the application to bundle the JSF classes. 6.1.6 Running a JSP Page Containing JSF ComponentsIf you have installed the example web application as described in Chapter 3, you've copied the whole directory structure to Tomcat's webapps directory as a subdirectory named jsfbook. If so, you can run the JSP page in Example 6-1 by typing the URL http://localhost:8080/jsfbook/expense/stage1/filterArea.faces in a browser. The result is shown in Figure 6-2. There are a couple of things to note about the URL used to run the page. First, the path starts with a /jspbook prefix. This is the application's context path. A Java web application is always associated with a context path when it's deployed to a web container, as you may recall from Chapter 4. When you use Tomcat, the context path is, by default, the name of the webapps subdirectory that holds the application. For other containers, you may be prompted for a name when you install the application. The second thing to note is that the URL ends with .faces. This is the extension we mapped to the JSF servlet in the deployment descriptor, so you must use this extension for all JSF page requests to have them processed by the JSF implementation. As I mentioned earlier, JSF replaces the extension with .jsp to get the context-relative path to the JSP page that creates the JSF components. When you request this page the first time, JSF processes it as a regular JSP page. The tag handlers for the JSF actions in the page create their corresponding JSF components, configure them using the action element attributes, add them to the view, and ask them to render themselves, as illustrated in Figure 6-4. Figure 6-4. Processing a JSP page with JSF components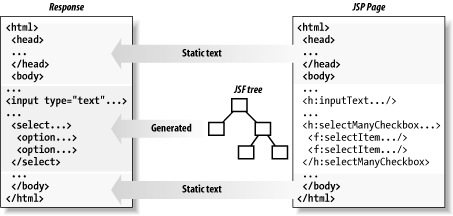 Template text and content generated by non-JSF actions ends up in the response as a result of the regular JSP processing intermixed with the content rendered by the JSF components. Go ahead and fill out some values, check off a checkbox or two, and click the button. Note how the values are sticky—whatever you enter is redisplayed when the page is reloaded. The JSF components take care of all the details so you don't have to, which is one of the main advantages of JSF over, say, plain JSP. Instead of typing the URL for the example in a browser, you can use the book index.html page, shown in Figure 6-5, and simply click the links for each example. Figure 6-5. JSF book examples index page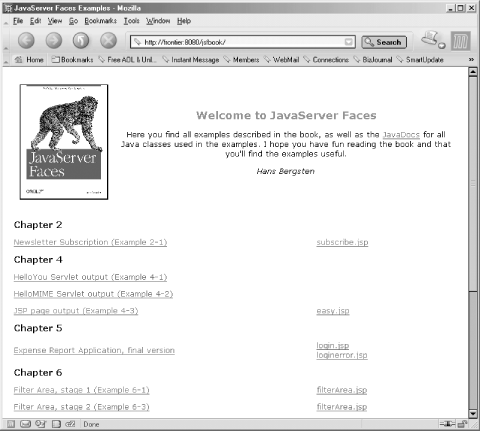 The index page also contains links to the source for all JSP pages, so it's easy to look at as you experiment with the examples. |
|
|
< Day Day Up > |
|