| [ Team LiB ] |
|
10.10 Creating Expandable MenusNN 6, IE 5 10.10.1 ProblemYou want to present a navigation menu that looks and operates like the expandable/collapsible hierarchy shown in the lefthand frame of many popular products (Windows Explorer, Outlook Express, Adobe Acrobat PDF bookmarks, and so on). 10.10.2 SolutionUse the expandableMenu.js library shown in Example 10-6 in the Discussion to populate an HTML container on your page with a collapsible menu like the one shown in Figure 10-4. A simple, empty div element is all you need in the HTML portion of the solution: <div id="content"></div> In the body, assign the menu initialization function, initExpMenu( ), to the onload event handler: onload="initExpMenu( )" Other pieces that you need to provide or customize, as described in the Discussion, are the following:
This recipe works with Internet Explorer 5 or later and Netscape 6 or later. It does not operate as-is in Opera, but see the Discussion section for more information. Figure 10-4. The expandable navigation menu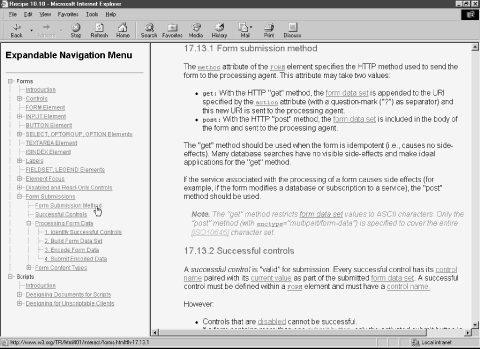 10.10.3 DiscussionParticipating in this recipe are a few style sheet rules that control the appearance and layout of elements that scripts create on the fly. You may include them in the HTML page or import them: <style type="text/css">
.row {vertical-align:middle; font-size:12px; font-family:Arial,sans-serif}
.OLBlock {display:none}
img.widgetArt {vertical-align:text-top}
</style>
The expandableMenu.js library is shown in Example 10-6. It is a fairly large library divided into several labeled sections. The version shown here contains an abbreviated set of sample data for a menu that displays portions of the W3C HTML 4.01 specification. Example 10-6. The expandableMenu.js library/**********************************
Global Variables
***********************************/
// precache art files and sizes for widget styles and spacers
// (all images must have same height/width)
var collapsedWidget = new Image(20, 16);
collapsedWidget.src="oplus.gif";
var collapsedWidgetStart = new Image(20, 16);
collapsedWidgetStart.src="oplusStart.gif";
var collapsedWidgetEnd = new Image(20, 16);
collapsedWidgetEnd.src="oplusEnd.gif";
var expandedWidget = new Image(20, 16);
expandedWidget.src="ominus.gif";
var expandedWidgetStart = new Image(20, 16);
expandedWidgetStart.src="ominusStart.gif";
var expandedWidgetEnd = new Image(20, 16);
expandedWidgetEnd.src="ominusEnd.gif";
var nodeWidget = new Image(20, 16);
nodeWidget.src="onode.gif";
var nodeWidgetEnd = new Image(20, 16);
nodeWidgetEnd.src="onodeEnd.gif";
var emptySpace = new Image(20, 16);
emptySpace.src="oempty.gif";
var chainSpace = new Image(20, 16);
chainSpace.src="ochain.gif";
// miscellaneous globals
var widgetWidth = "20";
var widgetHeight = "16";
var currState = "";
var displayTarget = "contentFrame";
/**********************************
Data Collections
***********************************/
var expansionState = "";
// constructor for outline item objects
function outlineItem(text, uri) {
this.text = text;
this.uri = uri;
}
var olData = {childNodes:
[{item:new outlineItem("Forms"),
childNodes:
[{item:new outlineItem("Introduction",
"http://w3.org/.../forms.html#h-17.1")},
...
{item:new outlineItem("INPUT Element",
"http://w3.org/.../forms.html#h-17.4"),
childNodes:
[{item:new outlineItem("INPUT Control Types",
"http://w3.org/.../forms.html#h-17.4.1")},
{item:new outlineItem("Examples",
"http://w3.org/.../forms.html#h-17.4.2")}
]},
...
]
},
{item:new outlineItem("Scripts"),
childNodes:
[{item:new outlineItem("Introduction",
"http://w3.org/.../scripts.html#h-18.1")},
{item:new outlineItem("Designing Documents for Scripts",
"http://w3.org/.../scripts.html#h-18.2"),
childNodes:
[{item:new outlineItem("SCRIPT Element",
"http://w3.org/.../scripts.html#h-18.2.1")},
{item:new outlineItem("Specifying the Scripting Language",
"http://w3.org/.../scripts.html#h-18.2.2"),
childNodes:
[{item:new outlineItem("Default Language",
"http://w3.org/.../scripts.html#h-18.2.2.1")},
{item:new outlineItem("Local Language Declaration",
"http://w3.org/.../scripts.html#h-18.2.2.2")},
{item:new outlineItem("References to HTML Elements",
"http://w3.org/.../scripts.html#h-18.2.2.3")}
]
},
]
...
}
]}
]
};
/**********************************
Toggle Display and Icons
***********************************/
// invert item state (expanded to/from collapsed)
function swapState(currState, currVal, n) {
var newState = currState.substring(0,n);
newState += currVal ^ 1 // Bitwise XOR item n;
newState += currState.substring(n+1,currState.length);
return newState;
}
// retrieve matching version of 'minus' images
function getExpandedWidgetState(imgURL) {
if (imgURL.indexOf("Start") != -1) {
return expandedWidgetStart.src;
}
if (imgURL.indexOf("End") != -1) {
return expandedWidgetEnd.src;
}
return expandedWidget.src;
}
// retrieve matching version of 'plus' images
function getCollapsedWidgetState(imgURL) {
if (imgURL.indexOf("Start") != -1) {
return collapsedWidgetStart.src;
}
if (imgURL.indexOf("End") != -1) {
return collapsedWidgetEnd.src;
}
return collapsedWidget.src;
}
// toggle an outline mother entry, storing new state value;
// invoked by onclick event handlers of widget image elements
function toggle(img, blockNum) {
var newString = "";
var expanded, n;
// modify state string based on parameters from IMG
expanded = currState.charAt(blockNum);
currState = swapState(currState, expanded, blockNum);
// dynamically change display style
if (expanded = = "0") {
document.getElementById("OLBlock" + blockNum).style.display = "block";
img.src = getExpandedWidgetState(img.src);
} else {
document.getElementById("OLBlock" + blockNum).style.display = "none";
img.src = getCollapsedWidgetState(img.src);
}
}
function expandAll( ) {
var newState = "";
while (newState.length < currState.length) {
newState += "1";
}
currState = newState;
initExpand( );
}
function collapseAll( ) {
var newState = "";
while (newState.length < currState.length) {
newState += "0";
}
currState = newState;
initExpand( );
}
/*********************************
Outline HTML Generation
**********************************/
// apply default expansion state from outline's header
// info to the expanded state for one element to help
// initialize currState variable
function calcBlockState(n) {
// get default expansionState data
var expandedData = (expansionState.length > 0) ? expansionState.split(",") : null;
if (expandedData) {
for (var j = 0; j < expandedData.length; j++) {
if (n = = expandedData[j] - 1) {
return "1";
}
}
}
return "0";
}
// counters for reflexive calls to drawOutline( )
var currID = 0;
var blockID = 0;
// generate HTML for outline
function drawOutline(ol, prefix) {
var output = "";
var nestCount, link, nestPrefix, lastInnerNode;
prefix = (prefix) ? prefix : "";
for (var i = 0; i < ol.childNodes.length ; i++) {
nestCount =(ol.childNodes[i].childNodes) ? ol.childNodes[i].childNodes.length : 0;
output += "<div class='OLRow' id='line" + currID++ + "'>\n";
if (nestCount > 0) {
output += prefix;
output += "<img id='widget" + (currID-1) + "' src='" +
((i = = ol.childNodes.length-1 && blockID != 0) ? collapsedWidgetEnd.src :
(blockID = = 0) ? collapsedWidgetStart.src : collapsedWidget.src);
output += "' height=" + widgetHeight + " width=" + widgetWidth;
output += " title='Click to expand/collapse nested items.' onClick = " +
"'toggle(this," + blockID + ")'> ";
link = (ol.childNodes[i].item.uri) ? ol.childNodes[i].item.uri : "";
if (link) {
output += "<a href='" + link + "' class='itemTitle' title='" +
link + "' target='" + displayTarget + "'>" ;
} else {
output += "<a class='itemTitle' title='" + link + "'>";
}
output += "<span style='position:relative; top:-3px; height:11px'>" +
ol.childNodes[i].item.text + "</span></a>";
currState += calcBlockState(currID-1);
output += "<span class='OLBlock' blocknum='" + blockID + "' id='OLBlock" +
blockID++ + "'>";
nestPrefix = prefix;
nestPrefix += (i = = ol.childNodes.length - 1) ?
"<img src='" + emptySpace.src + "' height=" + widgetHeight +
" width=" + widgetWidth + ">" :
"<img src='" + chainSpace.src + "' height=" + widgetHeight +
" width=" + widgetWidth + ">"
output += drawOutline(ol.childNodes[i], nestPrefix);
output += "</span></div>\n";
} else {
output += prefix;
output += "<img id='widget" + (currID-1) + "' src='" +
((i = = ol.childNodes.length - 1) ? nodeWidgetEnd.src : nodeWidget.src);
output += "' height=" + widgetHeight + " width=" + widgetWidth + ">";
link = (ol.childNodes[i].item.uri) ? ol.childNodes[i].item.uri : "";
if (link) {
output += " <a href='" + link + "' class='itemTitle' title='" +
link + "' target='" + displayTarget + "'>";
} else {
output += " <a class='itemTitle' title='" + link + "'>";
}
output += "<span style='position:relative; top:-3px; height:11px'>" +
ol.childNodes[i].item.text + "</span></a>";
output += "</div>\n";
}
}
return output;
}
/*********************************
Outline Initializations
**********************************/
// expand items set in expansionState var, if any
function initExpand( ) {
for (var i = 0; i < currState.length; i++) {
if (currState.charAt(i) = = 1) {
document.getElementById("OLBlock" + i).style.display = "block";
} else {
document.getElementById("OLBlock" + i).style.display = "none";
}
}
}
// initialize first time -- invoked onload
function initExpMenu(xFile) {
// wrap whole outline HTML in a span
var olHTML = "<span id='renderedOL'>" + drawOutline(olData) + "</span>";
// throw HTML into 'content' div for display
document.getElementById("content").innerHTML = olHTML;
initExpand( );
}
This script begins by defining and precaching the small images that become components of the finished outline display (called widgets in this example). Images created for this solution are shown in Figure 10-5. All images are the same size. Figure 10-5. Images used to assemble the hierarchical path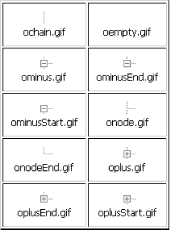 Each image object is assigned to a global variable, as are some other default values that get used repeatedly during outline assembly and user interaction. The currState variable, for example, preserves a representation of the expanded and collapsed state of various items in the outline. The next code block contains the outline data and some supporting values. One global variable, expansionState, contains a list of line numbers (each entry of the outline is in its own line) of those entries that are to be displayed in their expanded state when first displayed. If only the top-level items are to be visible (i.e., the menus are fully collapsed), assign an empty string to this variable. The outlineItem( ) constructor function is invoked repeatedly when the custom JavaScript object code executes during page loading. Each outline entry has displayable text and an optional link URL. Next is the definition of the object (named olData) containing the outline data. For this recipe, I chose a structure that ultimately simulates the kind of node structure that an XML data source provides. Thus, a sequence of nested objects and arrays define the outline. Only a portion of the example outline (links to sections of the W3C HTML 4.01 recommendation) is shown here. I'll have more to say about the formatting later. The section marked "Toggle Display and Icons" includes functions that control the change of state between expanded and collapsed. A pair of functions named getExpandedWidgetState( ) and getCollapsedWidgetState( ) (both invoked by the toggle( ) function discussed later), retrieve one of three expanded or collapsed images depending on the name (specifically, a portion of the name) of the current widget image. The swapState( ) helper function (also invoked from toggle( )) performs binary arithmetic on the value of the currState variable to change a specific character from zero to one or vice versa (these characters represent the state of each branch node). At the center of user interaction is the toggle( ) function, which is activated by onclick event handlers assigned to the each clickable widget. Because the event handlers are assigned while a script builds the outline, the event handlers can include parameters that indicate which item is being clicked. Thus, toggle( ) receives the widget's current image URL (used to determine which image should take its place) and a numeric ID associated with the span containing nested items. Although the function is small, it uses some helper functions to do the job. The two basic tasks of this function are to change the clicked widget image and display style sheet setting of the element containing nested items below it. Two more functions, expandAll( ) and collapseAll( ), stand ready to fully expand and collapse the entire outline, if your user interface design provides user control of that feature. The next-to-last block of code devotes itself to the creation of the HTML for the outline menu content. One helper function, calcBlockState( ), is invoked repeatedly during the HTML construction, and looks to see if the particular line number of the outline is supposed to be expanded by default. The data for these settings consists of a comma-delimited list of line numbers for expanded items (assigned to global variable expansionState). Assembly of the outline's HTML in the drawOutline( ) function iterates through the olData object. But a major part of that iteration entails recursive calls to the same drawOutline( ) function to build the nested items. Therefore, a pair of counting variables (used to compose unique IDs for elements) are declared in the global space as currID and blockID. Now we reach the drawOutline( ) function, which acts like a whirling dervish to accumulate the HTML for the rendered outline. The content is assembled just once, while all subsequent adjustments to the expanded or collapsed states are controlled by style sheet settings. Layout of the various widget images is governed by the structure of the olData objects. Among the more complex tasks that the drawOutline( ) recursive code needs to keep track of is whether an image column position requires a vertical line to signify a later connection with an earlier item or just a blank space. The regularity of all widget image sizes lets the script build the widget image parts of each line as if the images were mosaic tiles. The final code block performs all initializations and gets the ball rolling. First is a function (initExpand( )) that iterates through the currState variable to establish the expand/collapse state of each nested block. This function is invoked not only by the following initExpMenu( ) function, but also by the expandAll( ) and collapseAll( ) functions. At last we reach the initExpMenu( ) function, invoked by the onload event handler for the page. This is the driving force behind the creation of the rendered HTML, embedding it inside a dedicated span element, and then tucking it all into a pre-existing div element, as shown in the body's HTML. To deploy this menu system successfully, you need to create your set of widget images, like the ones shown in Figure 10-5. All images must be the same size, and you may have to tweak the style sheet values for the text fonts to achieve a proportioned look with sizes other than those shown in the recipe. Most code customizations take place at the top of the script area. Start by assigning URLs for the widget images, image sizes, and target frames for menu links. (This menuing system works best in framesets or with content iframes so that the outline remains unchanged during navigation.) Perhaps the most complicated part of customizing this collapsible navigation menu is creating the olData object. Before you begin to plug in your own data, you need to have a solid hierarchy to map. It doesn't hurt to literally write it down so you can visualize the nesting of subjects. For example, the start of the outline shown in the recipe looks like the following when fully expanded: Forms
Introduction
Controls
Control Types
FORM Element
INPUT Element
INPUT Types
Examples
BUTTON Element
Each line of the outline contains an item. Each item must have text associated with it, as well as an optional URL for a clickable link associated with the text. If you omit the URL, the text still appears in the outline, but its content does not link to any other destination. To convert the written outline into an olData data set, you recreate the parent-child-sibling relationships among the entries. Schematically, the above outline fragment in olData form looks like the following: olData =
{childNodes:[{item:"Forms",
childNodes:[{item:"Introduction"},
{item:"Controls", childNodes:[{item:"Control Types"}]},
{item:"FORM Element"},
{item:"INPUT Element", childNodes[{item:"INPUT Types"},
{item"Examples"}]},
{item:"BUTTON Element"}]
}]
};
The hard part is keeping all of the array and object containment (the open and close pairs of braces and square brackets) straight as the outline grows. The use of the childNodes property name for the nested entries has its roots in the XML version of this menu, shown in Recipe 10.11. You can use another name if you prefer. Also, the indented formatting shown in the recipe may be helpful in aligning the nestings correctly. The line numbers of the fully expanded outline are significant if you wish the outline to be partially expanded when it first appears. You can convey a comma-delimited list of expanded lines in the expansionState global variable. The only line numbers you need to include here are those that act as branch nodes�items that contain further nested items. If you leave the variable an empty string (as shown in this recipe), only the top-level items appear by default. Operating slightly differently is the currState variable. This value consists of ones and zeros in string form; it tracks the expansion state of branch nodes in the outline only. Thus, an outline consisting of five branch nodes and dozens of leaf nodes (items containing no further nested items) carries only a five-digit currState value. A numeric value of zero at any digit means that the corresponding branch node is collapsed, while a one means the branch is expanded. This mechanism makes it easy to switch the value of an individual branch node (in the swapState( ) function) in response to the click of its widget icon. It also means that the currState variable remembers when more deeply nested branches were expanded previously. If a branch closer to the top level collapses, any expanded nodes inside it remain expanded for the next time they're seen. Also, if you wish to preserve the expansion state between user visits to the page, the currState value (in string form) is what you'd preserve in a cookie and read during initialization to restore the previous settings. For first-time visitors, you need to supply a default currState value with the requisite number of zeros corresponding to branch nodes in your outline. This recipe shows only text hyperlinks as visible nodes in the outline, but you are not limited to text. You can reconfigure the olData object's properties and the drawOutline( ) function to accumulate any HTML content you like in place of the text labels. Iteration through olData object is still the governing loop control of drawOutline( ). You may be wondering why the first call to drawOutline( ) from the initExpMenu( ) function passes a reference to the olData global variable. Due to the recursive nature of the drawOutline( ) function, which calls itself repeatedly, passing nested portions of olData where needed, it is convenient to let the function assume it will always receive a parameter containing a valid object from olData. At the start of the process, the object is the complete olData object. But as nested nodes are assembled in recursive calls, only groups of child nodes are passed. No other first-time flags or other loop-degrading tests get in the way. If you prefer to deploy this outline so the outline is not dynamically generated but consists of hardcoded HTML (perhaps to allow search engines to see and follow its links), you can still perform your development with the olData object and its form of structuring the outline data. Then, load the page into a browser and capture the HTML for the entire outline. The quickest way to accomplish this is through a bookmarklet: a bookmark consisting of a javascript: URL that executes some JavaScript code. Or, you can simply enter the bookmarklet text into the Address/Location field of the browser: javascript: "<textarea cols='120' rows='40'>" +
document.getElementById("content").innerHTML + "</textarea>"
You will then see a textarea element containing the entire outline HTML. Copy and paste this HTML into the outline page's div element whose ID is content. This technique is also a helpful way to examine the HTML generated by drawOutline( ), either for study or debugging. In the global variables, assign an initial zero-filled string value to the currState variable. You can delete the "Data collections" and "Outline HTML generation" code blocks, as well as all but the initExpand( ) function call from the initExpMenu( ) function. If your outline consists of hundreds of items (which may indicate a too large outline), the hardwired HTML will render faster than the dynamically generated version. 10.10.4 See AlsoRecipe 1.1 for building large strings from smaller segments; Recipe 10.11 for an XML-based outline data source; Recipe 12.1 for precaching images; Recipe 12.7 for hiding and showing elements. |
| [ Team LiB ] |
|