| [ Team LiB ] |
|
11.3 Layout ManagementOnce you have created your components and added them to containers, the next step is to arrange those components within the container. This is called layout management and is almost always performed by a special object known as a layout manager. Layout managers are implementations of the java.awt.LayoutManager interface or its LayoutManager2 subinterface. Each particular LayoutManager implementation enforces a specific layout policy and automatically arranges the components within a container according to that policy. The sections that follow demonstrate the use of each of the AWT and Swing layout managers. Note that BoxLayout is the only layout manager defined by Swing. Although Swing defines many new components, Swing GUIs typically rely on AWT layout managers. You create a layout manager as you would any other object. Different layout manager classes take different constructor arguments to specify the parameters of their layout policy. Once you create a layout manager, you do not usually invoke its methods. Instead, you pass the layout manager object to the setLayout( ) method of the container that is to be managed; the container invokes the various LayoutManager methods when necessary. Once you have set the layout manager, you can usually forget about it. As you'll see in the following sections, most of the predefined AWT layout managers have fairly simple layout policies that may not seem like much use on their own. Their power becomes apparent when combined, however. For example, you can use a GridLayout to arrange 10 buttons into two columns within a container, and then use a BorderLayout to position those two columns against the left edge of another container. The following sections demonstrate all the important layout managers, using a short example and a screen shot of the layout produced by the example. The figures are produced using the ShowBean class from Example 11-30; you can use this program to experiment with the examples yourself. Pay particular attention to the way the layouts change when you resize the window. 11.3.1 FlowLayoutThe FlowLayout layout manager arranges its children like words on a page: from left to right in a row and top to bottom. When there is not enough space remaining in the current row for the next component, the FlowLayout "wraps" and places the component in a new row. When you create a FlowLayout, you can specify whether the rows should be left-justified, centered, or right-justified. You can also specify the amount of horizontal and vertical space the layout manager leaves between components. FlowLayout makes no attempt to fit its components into the container; it leaves each component at its preferred size. If there is extra space, FlowLayout leaves it blank. If there is not enough room in the container, some components simply do not appear. Note that FlowLayout is the default layout manager for JPanel containers. If you do not specify a different layout manager, a panel uses a FlowLayout that centers its rows and leaves five pixels between components, both horizontally and vertically. Example 11-2 is a short program that arranges buttons using a FlowLayout layout manager; Figure 11-3 shows the resulting output. Figure 11-3. Components laid out with a FlowLayout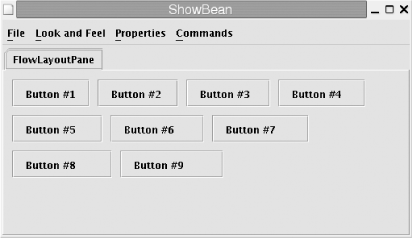 Example 11-2. FlowLayoutPane.javapackage je3.gui;
import java.awt.*;
import javax.swing.*;
public class FlowLayoutPane extends JPanel {
public FlowLayoutPane( ) {
// Use a FlowLayout layout manager. Left justify rows.
// Leave 10 pixels of horizontal and vertical space between components.
this.setLayout(new FlowLayout(FlowLayout.LEFT, 10, 10));
// Add some buttons to demonstrate the layout.
String spaces = ""; // Used to make the buttons different
for(int i = 1; i <= 9; i++) {
this.add(new JButton("Button #" + i + spaces));
spaces += " ";
}
// Give ourselves a default size
this.setPreferredSize(new Dimension(500, 200));
}
}
11.3.2 GridLayoutGridLayout is a heavy-handed layout manager that arranges components left to right and top to bottom in an evenly spaced grid of specified dimensions. When you create a GridLayout, you can specify the number of rows and columns in the grid, as well as the horizontal and vertical space the GridLayout should leave between the components. Typically, you specify only the desired number of rows or columns, leaving the other dimension set to 0. This allows the GridLayout to pick the appropriate number of rows or columns based on the number of components. GridLayout does not honor the preferred sizes of its components. Instead, it divides the size of the container into the specified number of equally sized rows and columns and makes all the components the same size. Example 11-3 shows a short program that arranges buttons in a grid using a GridLayout layout manager. Figure 11-4 shows the resulting output. Figure 11-4. Components laid out with a GridLayout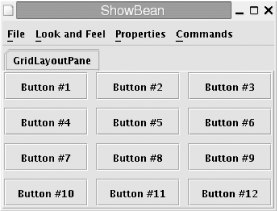 Example 11-3. GridLayoutPane.javapackage je3.gui;
import java.awt.*;
import javax.swing.*;
public class GridLayoutPane extends JPanel {
public GridLayoutPane( ) {
// Lay out components into a grid three columns wide, with the number
// of rows depending on the number of components. Leave 10 pixels
// of horizontal and vertical space between components
this.setLayout(new GridLayout(0, 3, 10, 10));
// Add some components
for(int i = 1; i <= 12; i++) this.add(new JButton("Button #" + i));
}
}
11.3.3 BorderLayoutThe BorderLayout layout manager arranges up to five components within a container. Four of the components are laid out against specific edges of the container, and one is placed in the center. When you add a component to a container that is managed by BorderLayout, you must specify where you want the component placed. You do this with the two-argument version of add( ), passing one of the constants NORTH, EAST, SOUTH, WEST, or CENTER defined by BorderLayout as the second argument. These constants are called layout constraints; you use them with code like the following: this.add(b, BorderLayout.SOUTH); Remember that BorderLayout can lay out only one component in each of these positions. BorderLayout does not honor the preferred sizes of the components it manages. Components specified as NORTH or SOUTH are made as wide as the container and retain their preferred height. EAST and WEST components are made as high as the container (minus the heights of the top and bottom components, if any) and retain their preferred width. The CENTER component is made as large as the remaining space in the center of the container, after the specified number of pixels of horizontal and vertical space are allocated. You do not have to specify the full five children. For example, the BorderLayout class is often used to place a fixed-size child (such as a JToolBar) against one edge of a container, with a variable-sized child (such as a JTextArea) in whatever space remains in the center. BorderLayout is the default layout manager for the content panes of JFrame and JDialog containers. If you do not explicitly specify a layout manager for these content panes, they use a BorderLayout configured to leave no horizontal or vertical space between components. Example 11-4 lists a program that arranges five buttons using a BorderLayout layout manager; Figure 11-5 shows the resulting output. Figure 11-5. Components laid out with a BorderLayout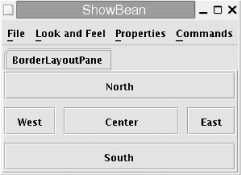 Example 11-4. BorderLayoutPane.javapackage je3.gui;
import java.awt.*;
import javax.swing.*;
public class BorderLayoutPane extends JPanel {
String[ ] borders = {
BorderLayout.NORTH, BorderLayout.EAST, BorderLayout.SOUTH,
BorderLayout.WEST, BorderLayout.CENTER
};
public BorderLayoutPane( ) {
// Use a BorderLayout with 10-pixel margins between components
this.setLayout(new BorderLayout(10, 10));
for(int i = 0; i < 5; i++) { // Add children to the pane
this.add(new JButton(borders[i]), // Add this component
borders[i]); // Using this constraint
}
}
}
11.3.4 Box and BoxLayoutjavax.swing.BoxLayout is a simple but versatile layout manager that arranges its children into a row or a column. The javax.swing.Box container uses BoxLayout; it is much more common to work with the Box class than to use BoxLayout directly. What gives Box containers their versatility is the ability to add stretchy space (glue) and rigid space (struts) to the layout. The Box class defines static methods that make it particularly easy to create rows, columns, glue, and struts. Example 11-5 creates several Box containers that demonstrate the capabilities of BoxLayout. The various boxes are themselves laid out using a BorderLayout. The program output is shown in Figure 11-6. To keep you on your toes, Example 11-5 also demonstrates the use of Swing borders to add margins and decorations around the outside of certain containers. Note that these borders can be added around any Swing component or container; they are part of the javax.swing.border package and have nothing to do with the BorderLayout layout manager. See javax.swing.border.Border and the setBorder( ) method of JComponent. Figure 11-6. Components laid out with a BoxLayout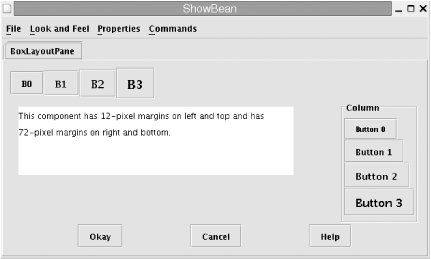 Example 11-5. BoxLayoutPane.javapackage je3.gui;
import java.awt.*;
import javax.swing.*;
import javax.swing.border.*;
public class BoxLayoutPane extends JPanel {
public BoxLayoutPane( ) {
// Use a BorderLayout layout manager to arrange various Box components
this.setLayout(new BorderLayout( ));
// Give the entire panel a margin by adding an empty border
// We could also do this by overriding getInsets( )
this.setBorder(new EmptyBorder(10,10,10,10));
// Add a plain row of buttons along the top of the pane
Box row = Box.createHorizontalBox( );
for(int i = 0; i < 4; i++) {
JButton b = new JButton("B" + i);
b.setFont(new Font("serif", Font.BOLD, 12+i*2));
row.add(b);
}
this.add(row, BorderLayout.NORTH);
// Add a plain column of buttons along the right edge
// Use BoxLayout with a different kind of Swing container
// Give the column a border: can't do this with the Box class
JPanel col = new JPanel( );
col.setLayout(new BoxLayout(col, BoxLayout.Y_AXIS));
col.setBorder(new TitledBorder(new EtchedBorder( ), "Column"));
for(int i = 0; i < 4; i++) {
JButton b = new JButton("Button " + i);
b.setFont(new Font("sanserif", Font.BOLD, 10+i*2));
col.add(b);
}
this.add(col, BorderLayout.EAST); // Add column to right of panel
// Add a button box along the bottom of the panel.
// Use "Glue" to space the buttons evenly
Box buttonbox = Box.createHorizontalBox( );
buttonbox.add(Box.createHorizontalGlue( )); // stretchy space
buttonbox.add(new JButton("Okay"));
buttonbox.add(Box.createHorizontalGlue( )); // stretchy space
buttonbox.add(new JButton("Cancel"));
buttonbox.add(Box.createHorizontalGlue( )); // stretchy space
buttonbox.add(new JButton("Help"));
buttonbox.add(Box.createHorizontalGlue( )); // stretchy space
this.add(buttonbox, BorderLayout.SOUTH);
// Create a component to display in the center of the panel
JTextArea textarea = new JTextArea( );
textarea.setText("This component has 12-pixel margins on left and top"+
" and has 72-pixel margins on right and bottom.");
textarea.setLineWrap(true);
textarea.setWrapStyleWord(true);
// Use Box objects to give the JTextArea an unusual spacing
// First, create a column with 3 kids. The first and last kids
// are rigid spaces. The middle kid is the text area
Box fixedcol = Box.createVerticalBox( );
fixedcol.add(Box.createVerticalStrut(12)); // 12 rigid pixels
fixedcol.add(textarea); // Component fills in the rest
fixedcol.add(Box.createVerticalStrut(72)); // 72 rigid pixels
// Now create a row. Give it rigid spaces on the left and right,
// and put the column from above in the middle.
Box fixedrow = Box.createHorizontalBox( );
fixedrow.add(Box.createHorizontalStrut(12));
fixedrow.add(fixedcol);
fixedrow.add(Box.createHorizontalStrut(72));
// Now add the JTextArea in the column in the row to the panel
this.add(fixedrow, BorderLayout.CENTER);
}
}
11.3.5 GridBagLayoutGridBagLayout is the most flexible and powerful of the AWT layout managers but is also the most complicated, and sometimes the most frustrating. It arranges components according to a number of constraints, which are stored in a GridBagConstraints object. BorderLayout is also a constraint-based layout manager, but in that case, the constraint is a simple constant, like BorderLayout.CENTER. GridBagLayout is more complex: it uses a GridBagConstraints object to hold a variety of constraints for each component you add to the container. As with BorderLayout, you pass the GridBagConstraints constraint object as the second argument to the add( ) method of the container, along with the component to be added. The basic GridBagLayout layout policy is to arrange components at specified positions in a grid. The grid may be of arbitrary size, and the rows and columns of the grid may be of arbitrary heights and widths. A component laid out in this grid may occupy more than one row or column. The gridx and gridy fields of GridBagConstraints specify the position of the component in the grid, and the gridwidth and gridheight fields specify the number of columns and rows, respectively, that the component occupies in the grid. The insets field specifies the margins that should be left around each individual component, while fill specifies whether and how a component should grow when there is more space available for it than it needs for its default size. The anchor field specifies how a component should be positioned when there is more space available than it uses. GridBagConstraints defines a number of constants that are legal values for these last two fields. Finally, weightx and weighty specify how extra horizontal and vertical space should be distributed among the components when the container is resized. Consult reference material on GridBagConstraints for more details. Example 11-6 shows a short program that uses a GridBagLayout layout manager to produce the layout pictured in Figure 11-7. Note that the program reuses a single GridBagConstraints object, which is perfectly legal. Figure 11-7. Components laid out with a GridBagLayout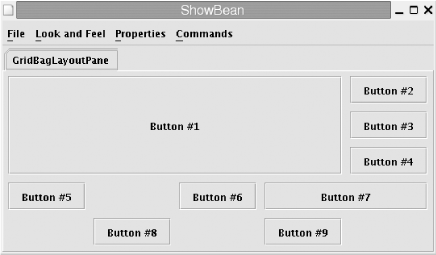 Example 11-6. GridBagLayoutPane.javapackage je3.gui;
import java.awt.*;
import javax.swing.*;
public class GridBagLayoutPane extends JPanel {
public GridBagLayoutPane( ) {
// Create and specify a layout manager
this.setLayout(new GridBagLayout( ));
// Create a constraints object, and specify some default values
GridBagConstraints c = new GridBagConstraints( );
c.fill = GridBagConstraints.BOTH; // components grow in both dimensions
c.insets = new Insets(5,5,5,5); // 5-pixel margins on all sides
// Create and add a bunch of buttons, specifying different grid
// position and size for each.
// Give the first button a resize weight of 1.0 and all others
// a weight of 0.0. The first button will get all extra space.
c.gridx = 0; c.gridy = 0; c.gridwidth = 4; c.gridheight=4;
c.weightx = c.weighty = 1.0;
this.add(new JButton("Button #1"), c);
c.gridx = 4; c.gridy = 0; c.gridwidth = 1; c.gridheight=1;
c.weightx = c.weighty = 0.0;
this.add(new JButton("Button #2"), c);
c.gridx = 4; c.gridy = 1; c.gridwidth = 1; c.gridheight=1;
this.add(new JButton("Button #3"), c);
c.gridx = 4; c.gridy = 2; c.gridwidth = 1; c.gridheight=2;
this.add(new JButton("Button #4"), c);
c.gridx = 0; c.gridy = 4; c.gridwidth = 1; c.gridheight=1;
this.add(new JButton("Button #5"), c);
c.gridx = 2; c.gridy = 4; c.gridwidth = 1; c.gridheight=1;
this.add(new JButton("Button #6"), c);
c.gridx = 3; c.gridy = 4; c.gridwidth = 2; c.gridheight=1;
this.add(new JButton("Button #7"), c);
c.gridx = 1; c.gridy = 5; c.gridwidth = 1; c.gridheight=1;
this.add(new JButton("Button #8"), c);
c.gridx = 3; c.gridy = 5; c.gridwidth = 1; c.gridheight=1;
this.add(new JButton("Button #9"), c);
}
}
11.3.6 Hardcoded LayoutAll AWT and Swing containers have a default layout manager. If you set this manager to null, however, you can arrange components within a container however you like. You do this by calling the setBounds( ) method of each component. Note that this technique does not work if any layout manager is specified because the layout manager resizes and repositions all the components in a container. Before using this technique, you should understand that there are a number of good reasons not to hardcode component sizes and positions. First, since components can have a platform-dependent look-and-feel, they may have different sizes on different platforms. Similarly, fonts differ somewhat from platform to platform, and this can affect the sizes of components. And finally, hardcoding component sizes and positions doesn't allow for customization (using the user's preferred font, for example) or internationalization (translating text in your GUI into other languages). Nevertheless, there may be times when layout management becomes frustrating enough that you resort to hardcoded component sizes and positions. Example 11-7 is a simple program that does this; the layout it produces is shown in Figure 11-8. Note that this example overrides the getPreferredSize( ) method to report the preferred size of the container. This functionality is usually provided by the layout manager, but in the absence of a manager, you must determine the preferred size of the container yourself. Since a Swing container is being used, overriding getPreferredSize( ) isn't strictly necessary; try calling setPreferredSize( ) instead. Figure 11-8. Hardcoded component positions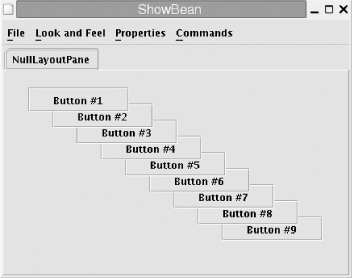 Example 11-7. NullLayoutPane.javapackage je3.gui;
import java.awt.*;
import javax.swing.*;
public class NullLayoutPane extends JPanel {
public NullLayoutPane( ) {
// Get rid of the default layout manager.
// We'll arrange the components ourselves.
this.setLayout(null);
// Create some buttons and set their sizes and positions explicitly
for(int i = 1; i <= 9; i++) {
JButton b = new JButton("Button #" + i);
b.setBounds(i*30, i*20, 125, 30); // use reshape( ) in Java 1.0
this.add(b);
}
}
// Specify how big the panel should be.
public Dimension getPreferredSize( ) { return new Dimension(425, 250); }
}
11.3.7 Creating Custom Layout ManagersWhen none of the predefined AWT layout managers is appropriate for the GUI you want to implement, you have the option of writing your own custom layout manager by implementing LayoutManager or LayoutManager2. This is actually easier to do that it might seem. The primary method of interest is layoutContainer( ), which the container calls when it wants the components it contains to be laid out. This method should loop through the components contained in that container and set the size and position of each one, using setBounds( ). layoutContainer( ) can call preferredSize( ) on each component to determine the size it would like to be. The other important method is preferredLayoutSize( ). This method should return the preferred size of the container. Typically this is the size required to arrange all the components at their preferred sizes. The minimumLayoutSize( ) method is similar, in that it should return the minimum allowable size for the container. Finally, if your layout manager is interested in constraints specified when the add( ) method is called to add a component to a container, it can define the addLayoutComponent( ) method. Example 11-8 shows a listing of ColumnLayout.java, an implementation of the LayoutManager2 interface that arranges components in a column. ColumnLayout differs from BoxLayout in that it allows a horizontal alignment to be specified for the components in the column. Example 11-9 is a simple program that uses ColumnLayout to produce the output shown in Figure 11-9. Figure 11-9. Component laid out with a custom layout manager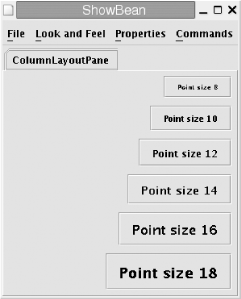 Example 11-8. ColumnLayout.javapackage je3.gui;
import java.awt.*;
/**
* This LayoutManager arranges the components into a column.
* Components are always given their preferred size.
*
* When you create a ColumnLayout, you may specify four values:
* margin_height -- how much space to leave on top and bottom
* margin_width -- how much space to leave on left and right
* spacing -- how much vertical space to leave between items
* alignment -- the horizontal position of the components:
* ColumnLayout.LEFT -- left-justify the components
* ColumnLayout.CENTER -- horizontally center the components
* ColumnLayout.RIGHT -- right-justify the components
*
* You never call the methods of a ColumnLayout object. Just create one
* and make it the layout manager for your container by passing it to
* the addLayout( ) method of the Container object.
*/
public class ColumnLayout implements LayoutManager2 {
protected int margin_height;
protected int margin_width;
protected int spacing;
protected int alignment;
// Constants for the alignment argument to the constructor.
public static final int LEFT = 0;
public static final int CENTER = 1;
public static final int RIGHT = 2;
/** The constructor. See comment above for meanings of these arguments */
public ColumnLayout(int margin_height, int margin_width,
int spacing, int alignment) {
this.margin_height = margin_height;
this.margin_width = margin_width;
this.spacing = spacing;
this.alignment = alignment;
}
/**
* A default constructor that creates a ColumnLayout using 5-pixel
* margin width and height, 5-pixel spacing, and left alignment
**/
public ColumnLayout( ) { this(5, 5, 5, LEFT); }
/**
* The method that actually performs the layout.
* Called by the Container
**/
public void layoutContainer(Container parent) {
Insets insets = parent.getInsets( );
Dimension parent_size = parent.getSize( );
Component kid;
int nkids = parent.getComponentCount( );
int x0 = insets.left + margin_width; // The base X position
int x;
int y = insets.top + margin_height; // Start at the top of the column
for(int i = 0; i < nkids; i++) { // Loop through the kids
kid = parent.getComponent(i); // Get the kid
if (!kid.isVisible( )) continue; // Skip hidden ones
Dimension pref = kid.getPreferredSize( ); // How big is it?
switch(alignment) { // Compute X coordinate
default:
case LEFT: x = x0; break;
case CENTER: x = (parent_size.width - pref.width)/2; break;
case RIGHT:
x = parent_size.width-insets.right-margin_width-pref.width;
break;
}
// Set the size and position of this kid
kid.setBounds(x, y, pref.width, pref.height);
y += pref.height + spacing; // Get Y position of the next one
}
}
/** The Container calls this to find out how big the layout should be */
public Dimension preferredLayoutSize(Container parent) {
return layoutSize(parent, 1);
}
/** The Container calls this to find out how big the layout must be */
public Dimension minimumLayoutSize(Container parent) {
return layoutSize(parent, 2);
}
/** The Container calls this to find out how big the layout can be */
public Dimension maximumLayoutSize(Container parent) {
return layoutSize(parent, 3);
}
// Compute min, max, or preferred size of all the visible children
protected Dimension layoutSize(Container parent, int sizetype) {
int nkids = parent.getComponentCount( );
Dimension size = new Dimension(0,0);
Insets insets = parent.getInsets( );
int num_visible_kids = 0;
// Compute maximum width and total height of all visible kids
for(int i = 0; i < nkids; i++) {
Component kid = parent.getComponent(i);
Dimension d;
if (!kid.isVisible( )) continue;
num_visible_kids++;
if (sizetype == 1) d = kid.getPreferredSize( );
else if (sizetype == 2) d = kid.getMinimumSize( );
else d = kid.getMaximumSize( );
if (d.width > size.width) size.width = d.width;
size.height += d.height;
}
// Now add in margins and stuff
size.width += insets.left + insets.right + 2*margin_width;
size.height += insets.top + insets.bottom + 2*margin_height;
if (num_visible_kids > 1)
size.height += (num_visible_kids - 1) * spacing;
return size;
}
// Other LayoutManager(2) methods that are unused by this class
public void addLayoutComponent(String constraint, Component comp) { }
public void addLayoutComponent(Component comp, Object constraint) { }
public void removeLayoutComponent(Component comp) { }
public void invalidateLayout(Container parent) { }
public float getLayoutAlignmentX(Container parent) { return 0.5f; }
public float getLayoutAlignmentY(Container parent) { return 0.5f; }
}
Example 11-9. ColumnLayoutPane.javapackage je3.gui;
import java.awt.*;
import javax.swing.*;
public class ColumnLayoutPane extends JPanel {
public ColumnLayoutPane( ) {
// Specify a ColumnLayout LayoutManager, with right alignment
this.setLayout(new ColumnLayout(5, 5, 10, ColumnLayout.RIGHT));
// Create some buttons and set their sizes and positions explicitly
for(int i = 0; i < 6; i++) {
int pointsize = 8 + i*2;
JButton b = new JButton("Point size " + pointsize);
b.setFont(new Font("helvetica", Font.BOLD, pointsize));
this.add(b);
}
}
}
|
| [ Team LiB ] |
|