Hack 87. Make a Bottom-Up Overlay
Bottom-up (RDF-driven) overlays allow existing Firefox GUIs to be enhanced. In the context of Mozilla, an overlay is a hunk of user-interface (UI) data, most commonly XUL, that is extracted to separate files and pulled in at runtime to parts of the UI that include it. Think of it as a reusable widget or set of widgets. In general, there are two types of overlays. One is a directly specified overlay that you put in your extension. These are used to keep your code modular or to reuse in multiple places in the extension. The second type is something that you want to appear in the Firefox default application, perhaps to carry out a particular function of your extension. For example, you might want to add a menu item to the Tools menu to launch your extension. In a sense, in that case, you are adding to the default UI for Firefox. This hack focuses on the latter approach, with instructions on which type of overlays you can have, how to make them, and some general insight into how Firefox handles the overlays. 8.5.1. Adding an ItemFor the overlay puzzle to fall into place, you need three parts of the puzzle:
The best way to understand each piece is by walking through an example. Here, we are going to add a menu item to the Firefox Tools menu to launch the chromeEdit application. 8.5.1.1 Register the overlay[Hack #86] explained contents.rdf files for the purpose of registering extensions. Lets add to the sample contents.rdf file in that hack to show how to register overlays: <?xml version="1.0"?>
<RDF:RDF xmlns:RDF="http://www.w3.org/1999/02/22-rdf-syntax-ns#"
xmlns:chrome="http://www.mozilla.org/rdf/chrome#">
...<!-- extension information omitted -->
<!-- overlay information -->
<RDF:Seq about="urn:mozilla:overlays">
<RDF:li resource="chrome://browser/content/browser.xul"/>
</RDF:Seq>
<RDF:Seq about="chrome://browser/content/browser.xul">
<RDF:li>chrome://chromedit/content/chromeditBrowserOverlay.xul</RDF:li>
</RDF:Seq>
</RDF:RDF>This time, we skip over the extension information and move on to overlay information. This information tells Firefox to take some extra chrome from the chromeditBrowserOverlay.xul file. The first bolded sequence says that this extension has overlays that it wants registered and lists the files in Firefox that will be overlaid. In this instance, it is the main browser window file, browser.xul. The second highlighted sequence lists all the extension overlay files that will be pulled into the overlaid Firefox file. So, at this point, all we have is a correlation between Firefox files and an extension file, defining their connection from a high level. The low-level detail of what widget goes where is done in the overlay file. 8.5.1.2 The overlay fileNow that we've registered the chromeditBrowserOverlay.xul, let's look inside the overlay file to create the menu item and place it in the Tools menu. The structure of an overlay file is the same as any XUL file, with the main difference being that the root element is <overlay>. This tag needs a namespace attribute only, though an ID is also recommended: <?xml version="1.0"?> <!DOCTYPE overlay SYSTEM "chrome://chromedit/locale/chromeditMenuOverlay.dtd"> <?xml-stylesheet href="chrome://chromedit/skin/chromedit.css" type="text/css"?> <overlay id="ceTasksOverlay" xmlns="http://www.mozilla.org/keymaster/gatekeeper/there.is.only.xul"> <script type="application/x-javascript"> <![CDATA[ // functions go here ]]> </script> <menupopup id="taskPopup"> <menuitem oncommand="showChromEdit( )" label="Edit User Files" id="chromedit-aviary" insertbefore="menu_preferences" class="menuitem-iconic menu-iconic icon-chromedit16"/> </menupopup> </overlay> The overlay has a name: ceTasksOverlay. The chunk to be placed in the browser UI is a menu-item widget. It is to be placed in an existing, identified container tag. In this case, this is the Tools <menupopup>, which has an id of taskPopup. The id is the bit of the overlay that is matched up with an identical id in the Firefox target file, so this must not be left out. Everything contained within that id tag in the overlay will be placed in the <menupopup> in the target file. The new <menuitem> has a label, and a command to call a function to launch the extension. Separate from the detail that coordinates the overlay fragment with the rest of Firefox, the class attribute is used by the chromedit package to apply icon-laden styles to the menu item, for a pleasing effect. At runtime, Firefox looks up the list of overlay files, scans then, find matches for widget IDs, and merges the new XUL into the UI. Figure 8-4 shows how the new Edit User Files menu item looks for chromEdit. Note the styled-in icon. Figure 8-4. Overlaid Tools menu in Firefox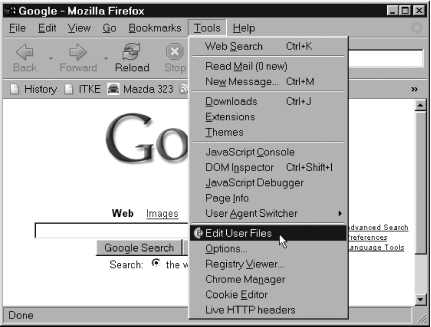 8.5.2. Other Places to OverlaySo far, our example has concerned adding a menu item to the Firefox Tools menu, but there are other areas of the Firefox UI into which you can overlay. It's possible to overlay into any area of the visible UI, once you know the id of the widget to which you want to add. For example, the Download Manager Tweak extension (http://dmextension.mozdev.org) adds a button to the Downloads panel in Firefox's Options window. The ForecastFox extension (http://forecastfox.mozdev.org) gives the option of showing temperatures and conditions in either the menu bar, the main toolbar, or the status bar. Here is a list of the most-used areas where extensions put overlays, but it is by no means definitive:
8.5.3. Adding a SidebarFirefox has a sidebar that can be accessed via the
View <menupopup id="viewSidebarMenu"> <menuitem observes="viewChromEditSidebar" class="icon-chromedit16"/> </menupopup> <broadcasterset id="mainBroadcasterSet"> <broadcaster id="viewChromEditSidebar" autoCheck="false" label="ChromEdit" type="checkbox" group="sidebar" sidebarurl="chrome://chromedit/content/" sidebartitle="ChromEdit" oncommand="toggleSidebar('viewChromEditSidebar');"/> </broadcasterset> The first thing to note in this example is that a sidebar needs two
XUL blocks. Similar to the Tools menu overlay, we have a menu item.
In this case, it is attached to the View
8.5.4. Under the CoversJust for debugging purposes, there is a place to look to see if your overlays are being pulled into Firefoxa section of chrome called overlayinfo. You will find it in two places on disk. The first is in the install area under chrome/overlayinfo, and the second is in the profile area under chrome/overlayinfo. Because Firefox extensions are installed in the user profile directory, you will find your overlay information in the latter. Under the overlayinfo folder you will find multiple subfolders, but the relevant one for Firefox is browser. Enter the content folder and locate the file overlays.rdf. If the completed chromedit contents.rdf file registered correctly when Firefox was restarted, you should see the following entry in that overlay file: <?xml version="1.0"?>
<RDF:RDF xmlns:c="http://www.mozilla.org/rdf/chrome#"
xmlns:NC="http://home.netscape.com/NC-rdf#"
xmlns:RDF="http://www.w3.org/1999/02/22-rdf-syntax-ns#">
<RDF:Seq RDF:about="chrome://browser/content/browser.xul">
<RDF:li>chrome://chromedit/content/chromeditBrowserOverlay.xul</RDF:li>
</RDF:Seq>
</RDF:RDF>If your overlay file is not listed here, there was a problem with registration and you should go back and double-check your contents.rdf file. You should not manually add entries to this file. 8.5.5. Skin OverlaysWhen you overlay the browser, the widgets you add are now in that scope. You might also want to add styles to those widgets. For example, you might want to add an icon to the menu item via a class attribute. The best way to do this is via a skin overlay. The first step is to add entries to the skin contents.rdf manifest with target and stylesheet information. Start with the standard skin registration contents.rdf manifest [Hack #86] . Then, add the following entries: <RDF:Seq about="urn:mozilla:stylesheets"> <RDF:li resource="chrome://global/content/customizeToolbar.xul"/> <RDF:li resource="chrome://browser/content/browser.xul"/> </RDF:Seq> <RDF:Seq about="chrome://global/content/customizeToolbar.xul"> <RDF:li>chrome://chromedit/skin/chromedit.css</RDF:li> </RDF:Seq> <RDF:Seq about="chrome://browser/content/browser.xul"> <RDF:li>chrome://chromedit/skin/chromedit.css</RDF:li> </RDF:Seq> The stylesheet sequence (urn:mozilla:stylesheets) lists the Firefox files to be overlaid. The chromedit.css file is added to each one. This is the same system that is used to develop a theme [Hack #89] . Inside overlayinfo, the location to search for the stylesheet overlay listing is in a file called stylesheets.rdf in the profile area under chrome/overlayinfo/browser/skin. Brian King |
 Sidebar menu item. The default features that are
available as sidebar panels are Bookmarks, History, and Downloads.
You can add a sidebar panel for your
Sidebar menu item. The default features that are
available as sidebar panels are Bookmarks, History, and Downloads.
You can add a sidebar panel for your 