15.2. Implementing HelpEclipse provides the infrastructure necessary to plug your own help documentation into the environment. Eclipse doesn't care how the help files are created and will happily uses content created in HTML or PDF format (you can even create dynamic, "active," help using XHTML if you want to). Your help can either be integrated into main plug-in or it can be placed into its own standalone plug-in (this is the common practice in the base Eclipse plug-ins). After you have created your help content, assuming simple Hypertext Markup Language (HTML) files for the moment, integrating them into Eclipse involves four simple steps:
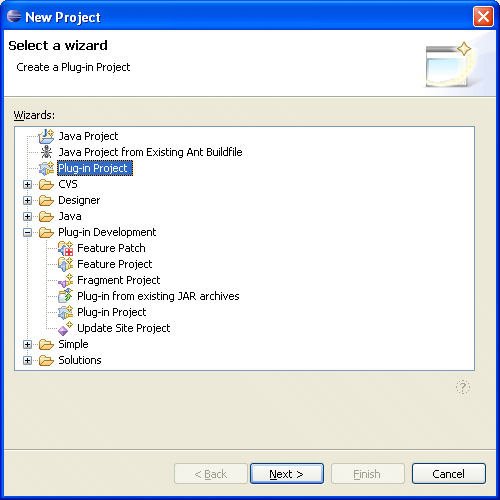
15.2.1. Creating a new help projectBecause of the power of the Eclipse project creation wizards, most of the files needed to set up your help project can be generated automatically. You will begin by using the New Project wizard to create a new Plug-in Project (see Figure 15-6). There are quite a few steps involved in creating a project, but they are worth the time given how much of the project structure will be created automatically. Figure 15-6. The New Project wizard.
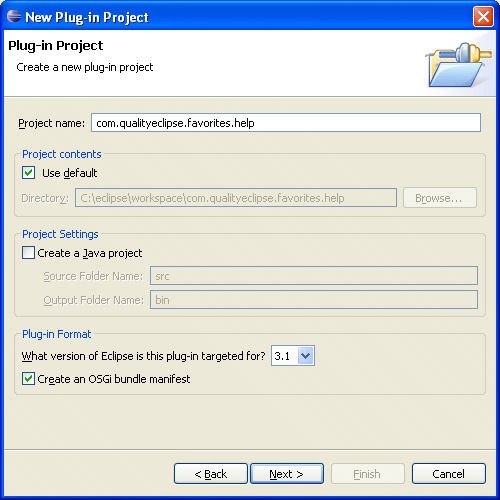
On the first page of the New Plug-in Project wizard (see Figure 15-7), enter "com.qualityeclipse.favorites.help" as the project name. Leave the Use default checkbox checked so that the project is created within the default workspace. Finally, uncheck the Create a Java project option since you don't want any Java files to be created. Figure 15-7. The New Plug-in Project wizard.
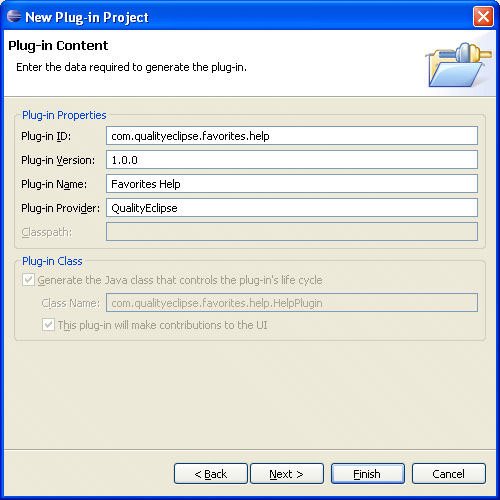
On the second page of the wizard (see Figure 15-8), leave the plug-in ID as "com.qualityeclipse.favorites.help", and change the name to "Favorites Help." Since you disabled the Java project option and don't plan to execute any Java code, there is no need for a plug-in startup class. Figure 15-8. The Plug-in Content page.
Click the Finish button to create the project. The initial project configuration will contain a number of files including the initial project manifest file, MANIFEST.MF, which is automatically opened in the manifest file editor (see Figure 15-9). If you switch to the MANIFEST.MF page of the editor, you should see the following content: Manifest-Version: 1.0 Bundle-ManifestVersion: 2 Bundle-Name: Favorites Help Bundle-SymbolicName: com.qualityeclipse.favorites.help Bundle-Version: 1.0.0 Bundle-Vendor: QualityEclipse Bundle-Localization: plugin Figure 15-9. The Plug-in manifest file Overview page.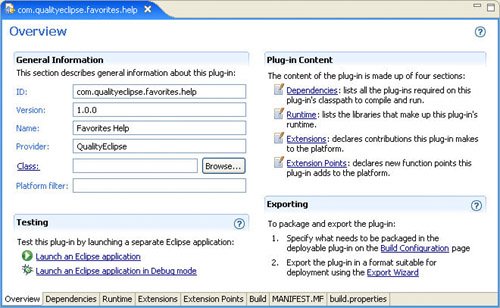
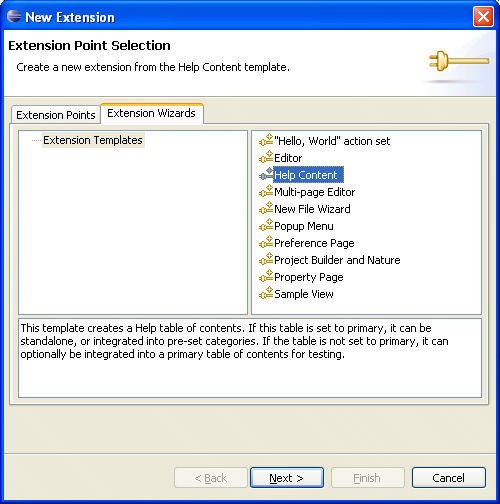
At this point, you have an empty project without any help content. Switch to the Extensions page of the manifest editor and click the Add... button to open the New Extension wizard. Switch to the Extensions Wizards tab and select Help Content in the right-hand list (see Figure 15-10). Figure 15-10. The Extension Wizard page.
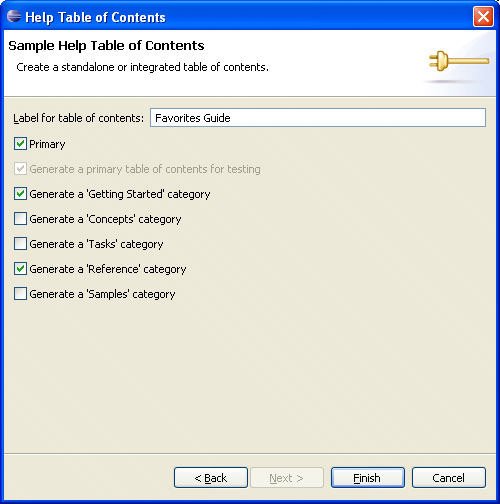
On the next page of the wizard (see Figure 15-11), set the Label for table of contents field to "Favorites Guide". This is the name of the book that will show up as a top-level item in the Help window's contents pane. Next, select the Primary option. This will create a primary toc file. Primary toc files represent the top-level items in the Help window. Any number of toc files can exist in the project, but they will all be subordinate to one or more primary toc files. Figure 15-11. The Help Table of Contents page.
Finally, you are given the choice of creating one or more of several predefined secondary toc files covering major topic areas within the help documentation. Creating secondary toc files is optional. All your help files may be easily referenced from your main toc file. Partitioning help using multiple secondary toc files provides more granularity and makes it easier for several people to update different parts of the documentation without colliding. Here, select the options for creating Getting Started and Reference categories to illustrate how the various files are structured. Click Finish to complete the process and generate all the files. 15.2.2. Plug-in manifest filesGiven the options selected earlier, a variety of files will be created (see Figure 15-12), including several dummy HTML files and the following XML files: plugin.xml, toc.xml, tocgettingstarted.xml, and tocreference.xml. Figure 15-12. The Extensions page of the manifest editor.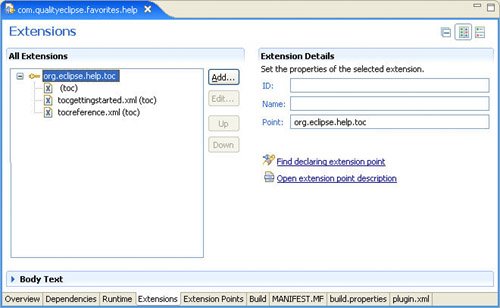
If you switch to the plugin.xml page of the editor, you should see the following content. <?xml version="1.0" encoding="UTF-8"?>
<?eclipse version="3.0"?>
<plugin>
<extension
point="org.eclipse.help.toc">
<toc
file="toc.xml"
primary="true"/>
<toc file="tocgettingstarted.xml"/>
<toc file="tocreference.xml"/>
</extension>
</plugin>
The most important thing here is the extension of the org.eclipse.help.toc extension point. This extension point is used to specify the primary and secondary toc files. The file attribute is used to specify the names of the toc files that will be used, while the primary attribute indicates whether an individual toc file should appear as a top-level book in the help topics list in the Help window. Any toc files without the primary attribute set to true will not show up unless they are linked to from one or more of the primary toc files. The org.eclipse.help.toc extension point also defines an additional, rarely used exTRadir attribute that specifies the name of a directory that contains additional documentation files. Unless they are referenced by a specific topic element in one of the toc files, these files won't be accessible via the topics list, but they will be indexed and accessible via the help search facility. 15.2.3. Table of contents (toc) filesNext, let's take a look at a couple of the generated toc files. The toc.xml file represents the primary help topic entry for the plug-in and looks like this: <?xml version="1.0" encoding="UTF-8"?>
<?NLS TYPE="org.eclipse.help.toc"?>
<toc label="Favorites Guide" topic="html/toc.html">
<topic label="Getting Started">
<anchor id="gettingstarted"/>
</topic>
<topic label="Reference">
<anchor id="reference"/>
</topic>
</toc>
Within the toc file, the label attributes specify the text that is displayed in the topic list, while the topic attribute specifies a link to a single documentation page that should be displayed when that topic is selected. The structure of this toc file illustrates how the help topic tree can be built out of multiple, nested toc files. Eclipse supports two different approaches to building the help topic tree: top-down nesting and bottom-up composition. The aforementioned toc file illustrates the latter. In bottom-up composition, the toc file will define various anchor points to which other toc files can contribute additional topics. Here, two subtopics have been defined for the documentation"Getting Started" and "Reference"each of which defines an anchor point (essentially an empty container for other toc files to fill). Note that each of these subtopics could have also defined its own hard-coded documentation links (you will see an example of this in the next toc file you examine). Next, examine one of the two remaining toc files (both follow the same pattern, so you only need to look at one of them). The tocgettingstarted.xml file looks like this: <?xml version="1.0" encoding="UTF-8"?>
<?NLS TYPE="org.eclipse.help.toc"?>
<toc label="Getting Started" link_to="toc.xml#gettingstarted">
<topic label="Main Topic"
href="html/gettingstarted/maintopic.html">
<topic label="Sub Topic"
href="html/gettingstarted/subtopic.html" />
</topic>
<topic label="Main Topic 2">
<topic label="Sub Topic 2"
href="html/gettingstarted/subtopic2.html" />
</topic>
</toc>
This toc file provides topic links to the actual HTML files representing the plug-in's documentation using the HRef attributes (you will replace the default boilerplate generated by the wizard with links to the documentation files later). The most interesting aspect of this toc file is the use of the link_to attribute to link this file to the gettingstarted anchor in the main toc file. Tip Note that your plug-in help pages are not limited to only linking in to your own anchor points. The core Eclipse documentation provides numerous anchor points to which you can attach help files. If your plug-in augments one of the basic Eclipse functions, linking your help pages to the appropriate section of the Eclipse docs is a nice touch. Both of the toc files just reviewed provide an example of bottom-up composition with the secondary toc files linking to the primary toc file while the primary toc file has no knowledge of the secondary toc files. This approach closely mirrors the extension point concept used within Eclipse. The opposite approach of top-down nesting switches this around such that the main toc file will directly link to the secondary toc files. Converting these two toc files to use the top-down approach is simple. First, replace the anchor attributes in the primary toc file with link attributes pointing to the secondary toc files. The toc.xml file will now look like this: <?xml version="1.0" encoding="UTF-8"?>
<?NLS TYPE="org.eclipse.help.toc"?>
<toc label="Favorites Guide" topic="html/toc.html">
<topic label="Getting Started">
<link toc="tocgettingstarted.xml"/>
</topic>
<topic label="Reference">
<link toc="tocreference.xml"/>
</topic>
</toc>
Next, you can remove the link_to attribute from the secondary toc files as it is no longer needed. Tip The top-down approach provides better control over the visibility of which files are included in the help documentation and does not provide any opportunities for other entities to augment the help provided by the plug-in. Conversely, the bottom-up approach provides a great deal of flexibility in structuring the help documentation and organically growing it over time with additional contributions both from within and outside the plug-in. If your application needs to support multiple languages, your toc files and documentation files may be translated into multiple languages and placed into specially named subdirectories of your plug-in's root directory (for more information, see Chapter 16, Internationalization). The translated files should be placed into the nl/<language> or nl/ <language>/<country> directory, where <language> and <country> represent the two-letter codes used to signify the target language and country. For example, Brazilian translations would be placed into the nl/pt/br directory, while standard Portuguese translations would be placed into the nl/pt directory. The help system will first look in the nl/<language>/<country> directory. If nothing is found there, the nl/<language> will be used instead. If no translation for the target language is found, it will default to using the files found in the root of the plug-in directory. 15.2.4. Creating HTML contentIn addition to the XML files, the wizard creates several dummy HTML files. html/
gettingstarted/
maintopic.html
subtopic.html
subtopic2.html
reference/
maintopic.html
subtopic.html
subtopic2.html
toc.html
Assume that you create your own documentation files for the Favorites view with the following structure: html/
gettingstarted/
installation.html
favorites_view.html
adding_favorites.html
removing_favorites.html
reference/
view.html
actions.html
preferences.html
toc.html
The, you would need to update the two secondary toc files. For example, the tocgettingstarted.xml file, would end up looking like this: <?xml version="1.0" encoding="UTF-8"?>
<?NLS TYPE="org.eclipse.help.toc"?>
<toc label="Getting Started">
<topic label="Installation"
href="html/gettingstarted/installation.html"/>
<topic label="Favorites View"
href="html/gettingstarted/favorites_view.html">
<topic label="Adding Favorites"
href="html/gettingstarted/adding_favorites.html" />
<topic label="Removing Favorites"
href="html/gettingstarted/removing_favorites.html" />
</topic>
</toc>
Tip If your application needs more than a handful of help files, you might consider placing all of them into a single ZIP file. If you package your help files into a file called doc.zip (preserving the same directory structure), Eclipse will be able to find them. Eclipse will look for help files in the doc.zip file before looking for them in the plug-in directory. With these changes, the help plug-in is functionally complete! Launching Eclipse with this new help plug-in in place will add the Favorites Guide to the list of books in the Help window (see Figure 15-13). Figure 15-13. The Help window showing the Favorites Guide.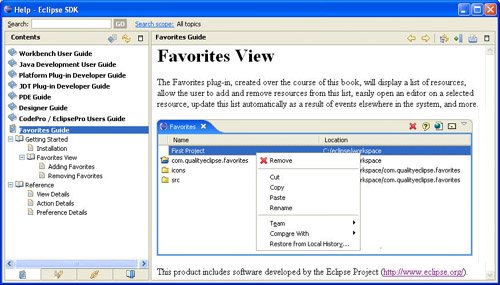
Dynamic Help Content in Eclipse 3.2 The Eclipse 3.2 help system supports dynamic help composition using XHTML. Help pages can use Eclipse-specific markup to provide filtering based on os/ws/arch values, enabled capabilities, existence of plug-ins, etc. Content may also be reused in multiple documents by using a new <include> tag. These features allow the help content to adapt to the context at the time of viewing. For more information on using XHTML in Eclipse, see: www.eclipse.org/eclipse/platform-ua/proposals/xhtml/HelpDynamicContent.html. |