|
|
< Day Day Up > |
|
Recipe 3.6 Creating Nongraphical Menus with RolloversProblemYou have a list of links, but want to build an elegant menu as in Figure 3-5. Figure 3-5. Set of stylized links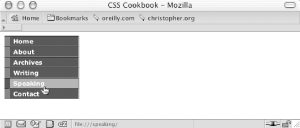 SolutionFirst, mark up the list of links in an unordered list so that they wrap around a div element with an id attribute: <div id="navsite"> <p>Site navigation:</p> <ul> <li><a href="/">Home</a></li> <li><a href="/about/">About</a></li> <li><a href="/archives/">Archives</a></li> <li><a href="/writing/">Writing</a></li> <li><a href="/speaking/">Speaking</a></li> <li><a href="/contact/">Contact</a></li> </ul> </div> Next, use the border property on the anchor elements to create the bulk of the design: #navsite p {
display: none;
}
#navsite {
font-family: Verdana, Helvetica, Arial, sans-serif;
font-size: 0.7em;
font-weight: bold;
width: 12em;
border-right: 1px solid #666;
padding: 0;
margin-bottom: 1em;
background-color: #9cc;
color: #333;
}
#navsite ul {

 list-style: none;

 margin: 0;

 padding: 0;

}
#navsite ul li {

 margin: 0;

 border-top: 1px solid #003;

}
#navsite ul li a {

 display: block;

 padding: 2px 2px 2px 0.5em;

 border-left: 10px solid #369;

 border-right: 1px solid #69c;

 border-bottom: 1px solid #369;

 background-color: #036;

 color: #fff;

 text-decoration: none;

 width: 100%;

}
html>body #navsite ul li a {

 width: auto;

}
#navsite ul li a:hover {

 border-left: 10px solid #036;

 border-right: 1px solid #69c;

 border-bottom: 1px solid #369;

 background-color: #69f;

 color: #fff;

}DiscussionA menu makes it easier for visitors to navigate your site. To help the user find the navigation menu, stylize the links so they stand out from the regular text. Do this by using the id selector when writing the CSS rules. As the solution shows, successfully creating the menu requires some browser bug workarounds as well as straightforward CSS design implementation. In the division marked with the div, a line of text labels the set of links as navigational links: <p>Site navigation:</p> If the user's browser doesn't have CSS support, the line of text is visible. To hide the text from CSS-enabled browsers, set the display to none: #navsite p {
display: none;
}The next step is to stylize the div element that encapsulates the set of menu links. In this CSS rule, styles are set for the links to inherit properties set on the div element. Also, set the values of the width, border-right, padding, and margin-bottom properties to keep the menu from bunching up: #navsite {
font-family: Verdana, Helvetica, Arial, sans-serif;
font-size: 0.7em;
font-weight: bold;
width: 12em;
border-right: 1px solid #666;
padding: 0;
margin-bottom: 1em;
}The next CSS rule eliminates any potential problems with the indentation of lists (see Recipe 4.2) by setting the margin and padding to 0 as well as by eliminating any list markers: #navsite ul {
list-style: none;
margin: 0;
padding: 0;
}In the following rule you're making sure margins aren't applied to each list item. This CSS rule also places a one-pixel border at the bottom of the list item. This design element helps reinforce the separation of the list items: #navsite ul li {
margin: 0;
border-top: 1px solid #003;
}The next rule sets the styles for the links. By default, links are inline elements. The links need to be rendered as block-level elements so that the entire part of the "link design" becomes clickable, and not just the text. Setting the display property to block accomplishes this transformation. Use the following declarations to stylize the appearance of the borders, text color, text decoration, and width: #navsite ul li a {
display: block;
padding: 2px 2px 2px 0.5em;
border-left: 10px solid #369;
border-right: 1px solid #69c;
border-bottom: 1px solid #369;
background-color: #036;
color: #fff;
text-decoration: none;
width: 100%;
}The final declaration for the links sets the width at 100%. This rule was set to make sure Internet Explorer for Windows makes the entire area clickable. The drawback with this rule is that it causes problems in Internet Explorer 5 for Macintosh and in Netscape Navigator 6+. To work around this problem, use the child selector, which Internet Explorer for Windows can't process (see Recipe 10.2), to reset the width of the link: html>body #navsite ul li a {
width: auto;
}The last CSS rule states the styles for the rollover effect of the links: #navsite ul li a:hover {
border-left: 10px solid #036;
border-right: 1px solid #69c;
border-bottom: 1px solid #369;
background-color: #69f;
color: #fff;
}An unordered list is a perfect way to structure a menu of links in both theory and practical application. On the one hand, a set of links is a set of unordered items. And using unordered lists for navigation creates a solid structure for your web document based on both logic and semantically correct markup. On the other hand, with the links set in an unordered list, it's easier to style the links into a menu presentation than it is to style a series of div elements: <div id="navsite"> <p>Site navigation:</p> <div><a href="/">Home</a></div> <div><a href="/about/">About</a></div> <div><a href="/archives/">Archives</a></div> <div><a href="/writing/">Writing</a></div> <div><a href="/speaking/">Speaking</a></div> <div><a href="/contact/">Contact</a></div> </div> See AlsoThe article "CSS Design: Taming Lists" by Mark Newhouse at http://www.alistapart.com/articles/taminglists/; the article/tutorial "Semantics, HTML, XHTML, and Structure" by Shirley E. Kaiser at http://brainstormsandraves.com/articles/semantics/structure/. |
|
|
< Day Day Up > |
|