| [ Team LiB ] |
|
Creating Web Services with WebLogic WorkshopWebLogic Workshop offers a compelling alternative to creating Web Services with pure Java code. WebLogic Workshop has a very user-friendly GUI that makes creating Web Services and all the tasks associated with it as painless as possible. WebLogic Workshop enables application developers to write code that deals with business logic and to utilize existing J2EE components, such as JDBC data sources, EJBs, and JMS destinations. Application developers also can call other Web Services quite easily. NOTE It is important to note that with the 8.1 release, WebLogic Workshop has matured from being purely a Web Services tool to a tool that allows complete J2EE application development. Workshop is now the single UI/IDE for the BEA WebLogic Platform. To learn more about Workshop's features, refer to http://dev2dev.bea.com/articles/Sjogreen_02.jsp. WebLogic Workshop ArchitectureWebLogic Workshop relies on the runtime framework of WebLogic Server 8.1. Web Services written in WebLogic Workshop are represented by Java files with a JWS extension. These files have a special meaning to WebLogic Server 8.1, as shown in Figure 30.11. Figure 30.11. JWS files are generated with WebLogic Workshop and converted to a J2EE application when requested by a client.
Although WebLogic Workshop is an excellent IDE for creating and modifying JWS files, any IDE can be used. After the JWS file has been created and copied to WebLogic Server, a client request will invoke the WebLogic Workshop runtime framework to create an entire J2EE application from the JWS file. The client request will then be handed off to this application, which will respond to the client request. JWS Files and JSR 181Although the J2EE specification offers an enormous amount of functionality across many technologies, it can be quite difficult to use due to the sheer number of APIs available. Although enterprise developers appreciate the flexibility and power offered by J2EE, the Java community has recognized that an easier method of creating J2EE applications would help developers and increase the usability and popularity of J2EE. Java Specification Request (JSR) 181, titled Web Services Metadata for the Java Platform, attempts to do just that. This JSR defines a set of Javadoc-style comments that can be added to standard Java source files. The goal of this JSR is to develop a simpler model for creating Web Services that can be used for Rapid Application Design. This JSR is sponsored by representatives from BEA, IBM, Cisco, Oracle, SAP AG, Sun Microsystems and others. It is based on the JSR 175, regarding code metadata. However, at the time of this writing, WebLogic Server and Apache AXIS are the only J2EE Application Servers to support JWS files. More information about JSR 181 can be found at http://www.jcp.org/jsr/detail/181.jsp. JWS files are regular Java source files with metadata added in the form of Javadoc-style comments. These comments specify information such as
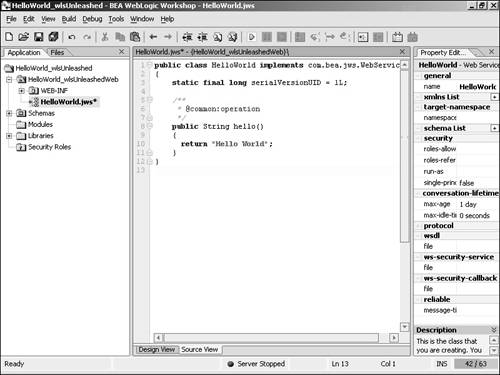
Listing 30.16 shows a sample JWS file named HelloWorld.jws. The name of the class, the name of the file, and the name of the corresponding Web Service are all the same: HelloWorld. Listing 30.16 A Sample JWS File
public class HelloWorld {
  /* @jws:operation */
  public String getGreeting() {
    return "Hello, World!";
  }
}
Only one operation is defined: getGreeting(). The comment immediately preceding getGreeting(), @jws:operation, informs the code generation engine that this isn't an internal class method, but is a Web Service operation. Copying this file to a Workshop-enabled WebLogic Server domain and then requesting it from a Web Service client will generate the supporting code for the Web Service based on this JWS file. The WebLogic Workshop GUITo see WebLogic Workshop in action, from the Start menu, choose BEA WebLogic Platform 8.1 Figure 30.12. The beautiful WebLogic Workshop GUI.
The GUI is broken up into several areas, or panes. The following list describes each pane:
The Design View represents the Web Service client on the left, the Web Service in the middle, and the associated database, EJB, and other controls on the right. The Source View displays the actual source code of the JWS file for the Web Service, as shown in Figure 30.13. WebLogic Workshop always keeps the information displayed by these two views in sync. If a property is changed in the Design View, switching to the Source View will reveal that the property has changed there as well, and vice versa. Figure 30.13. The Source View.
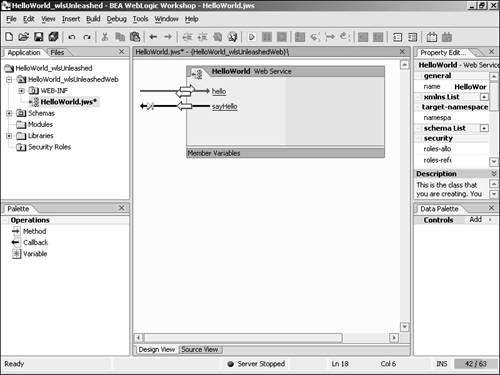
Creating a Web Service in WebLogic WorkshopThe simplest way to create a new Web Service is to add one to the default sample application that WebLogic Workshop starts in. After starting WebLogic Workshop, from the File menu, choose New and then Web Service. The Create New File window will appear. Choose Web Service and type greetings.jws for the filename. After you click the OK button, you are placed in the Design View. Now we'll add a method named greetings to our Web Service. Adding a MethodNotice that you see the Web Service client interface on the left side of the Design View. We're going to add an operation for it to this interface. Right-click on Design view and choose Add Method. You'll now see a new method added with the default name of newMethod1. The name will be selected. Type in a new name of sayHello and press the Enter key. Your Design View should look like Figure 30.14. Figure 30.14. The Design View with a new method.
We now need to write the code that will become the business logic of this method. Click on the method name (sayHello) in the canvas. You will be placed in Source View. sayHello currently returns a void and accepts no parameters. We're going to change sayHello to return a String and to take a String parameter called name. sayHello will use the passed-in name to return its String. Change sayHello so that it matches the method shown in Figure 30.15. Figure 30.15. The sayHello method has been changed.
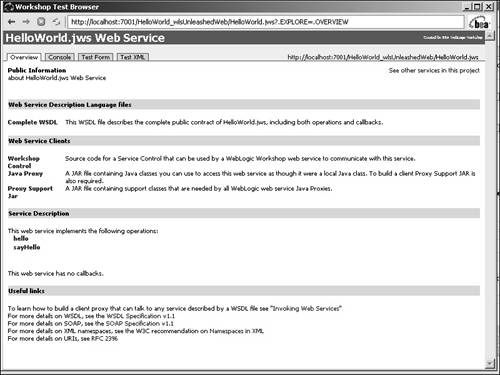
Running Our Web ServiceNow that we've defined a method with a little business logic, we can invoke our Web Service. At the top of the WebLogic Workshop GUI is a toolbar containing a blue arrow. This button is for debugging; click it. You should see a window explaining that WebLogic Server is not running. The red light and the Server Stopped message in the status bar can also confirm this. Click the OK button to start WebLogic Server. WebLogic Server will execute in the Workshop samples domain. This is a domain that ships with WebLogic Server and WebLogic Workshop, and is found in the WL_HOME\weblogic81\samples\workshop directory. This domain is a WebLogic Workshop domain and contains special files that are not normally found in a standard domain. After WebLogic Server starts, a special browser window will open as well. If the browser window does not open, you might have to tell WebLogic Workshop where your Internet browser's executable file is located. Select Tools menu The browser window will display the Web Service's Test View, as shown in Figure 30.16. This is the home page for Web Services created with JWS files. There are four tabs at the top of the Test View that will display different Web pages when clicked. Figure 30.16. The overview page provides access to the WSDL and client JAR files.
The Overview page allows access to the WSDL files and client JARs, as shown in Figure 30.16. There is also a link here to convert this Web Service to a WebLogic Workshop control so that it can be invoked from other WebLogic Workshop Web Services. The WebLogic Workshop runtime framework will log SOAP messages associated with our Web Services. We can use those logged messages to verify that our Web Services are executing correctly. The console page enables us to set the configuration of this logging mechanism. Workshop Web Services are implemented using various resources, such as EJBs and JMS queues. You see this as a link in Figure 30.17. Figure 30.17. The console page provides access to log and conversation information.
The Test Form page allows Web Service operations to be executed, as shown in Figure 30.18. An input field is present for each input parameter. You can enter values for these parameters and click the accompanying execute button, named after the Web Service operation. Figure 30.18. The Test Form page enables us to verify Web Service operations.
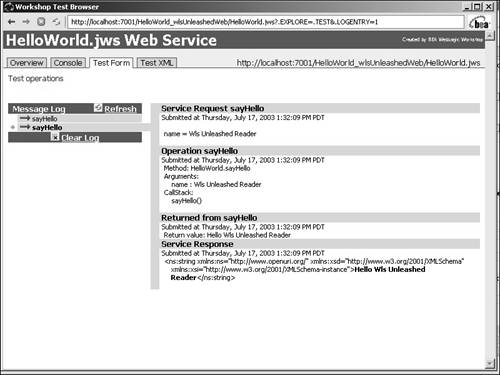
The operation results will be displayed as shown in Figure 30.19. Web Service operations that call on other resources will have multiple entries in the message log for each external resource invocation. Clicking the Refresh link will show each of these entries. Figure 30.19. The Test Form page displays the operation results.
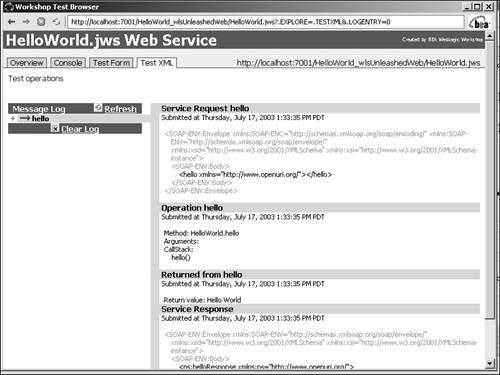
The Test XML page works similar to the Test Form page, except that it displays the full SOAP request and response messages, as shown in Figures 30.20 and 30.21. For each operation input parameter, substitute the parameter name with an actual value. Then click the button named after the Web Service operation. Figure 30.20. The Test XML page enables us to modify the SOAP request XML.
Figure 30.21. The Test XML page enables us to inspect the SOAP request and response messages.
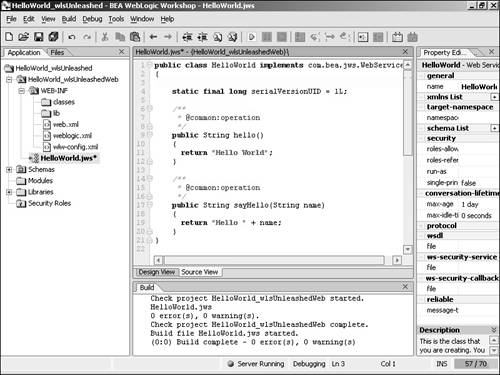
Modifying Our Web ServiceWhile you're running the test, you're free to change both the business logic and the input and output parameters of Web Service operations. Switch to WebLogic Workshop and change the sayHello method to match Listing 30.17. Then click the Save button or choose File, Save. Listing 30.17 sayHello Now Takes Two Parameters
public String sayHello(String name, int age)
{
  return "Hello " + name + " greetings from WebLogic Workshop.\n" +
      "You are " + age + " years old.";
}
Return to the test view and click on the Test Form tab. Click on the Test Operations link at the top of the page. WebLogic Server will now regenerate our Web Service. When it finishes, you'll see two input fields where you can enter a name and an age. Enter values in these fields and click the sayHello button. The results of the new business logic will be displayed. You can certainly appreciate how easy WebLogic Workshop and its runtime framework make creating and debugging Web Services. When you finish testing the Web Service, either close the browser window containing the test view or switch to WebLogic Workshop and select Debug, Stop. You can shut down WebLogic Server by right-clicking on the Server Running message at the bottom on the GUI and choosing Stop WebLogic Server. (WebLogic Server can be started from this menu as well.) Creating a WebLogic Workshop DomainSo far, we've been working in the WebLogic Workshop samples domain. Now let's create our own domain to work in. The easiest way to create a new WebLogic Workshop domain is by using the Configuration Wizard (which is started from the Start menu). We need to create a basic WebLogic Workshop domain. For more information about how to create a domain, please see Appendix A, "Quick Reference for Creating New Domains for WebLogic Development." Listing 30.18 shows the basic settings you need to use when creating the new Workshop domain using the Configuration Wizard as described in Appendix A. Listing 30.18 Settings for MyWorkshopDomainDomain Name: MyWorkshopDomain Server Type: Single Server (Standalone Server) Domain Template Name: WebLogic Workshop Server Name: myServer Install Directory: d:\bea\user_projects\domains\MyWorkshopDomain Listen Address: localhost and primary IP address Listen Port: 7001 SSL Listen Port: 7002 Windows Start Menu: yes User Name: weblogic Password: ******** Setting Up Our EnvironmentIn addition to creating a WebLogic domain, we're also going to create a database, a JDBC connection pool, and a JDBC data source for this domain. We're going to use the PointBase engine that ships with WebLogic Server. We'll also create a database for our use.
This will create a new database called books in the WL_HOME\weblogic81\common\eval\pointbase\databases\directory. Let's now copy the SQL found in the bookddl.txt file on the accompanying CD, and enter it into the PointBase console, as shown in Figure 30.23. Then execute the SQL by pressing F5 or selecting SQL Figure 30.23. Place the SQL in the PointBase Console and execute it.
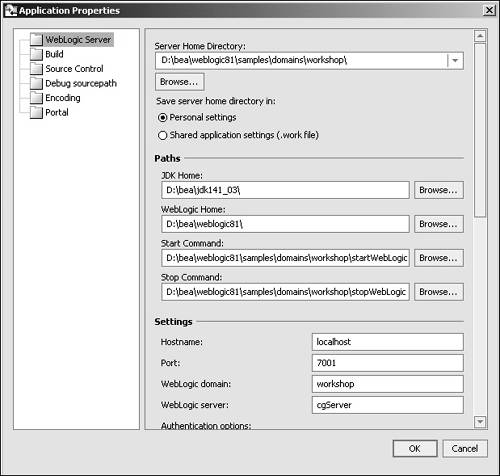
Now we need to create a JDBC connection pool and data source. Start WebLogic in the MyWorkshopDomain domain. There should be a menu item on the Start menu for this under BEA WebLogic Platform 8.1 You could also do this through the Configuration Wizard. If you choose to do it this way, please see Appendix A. Listing 30.19 Attributes for the Books Connection PoolName: Books Connection Pool URL: jdbc:pointbase:server://localhost/servicesdb Driver Classname: com.pointbase.jdbc.jdbcUniversalDriver Properties (Line 1): user=PBPUBLIC Properties (Line 2): password=PBPUBLIC Now create a Tx data source with the information in Listing 30.20. For both the connection pool and the data source, make sure that you target myServer. Listing 30.20 Attributes for the Books Data SourceName: Books Data Source JNDI Name: BooksDS Pool Name: Books Connection Pool Configuring WebLogic Workshop for Our DomainOut of the box, WebLogic Workshop is configured to work with its sample domain. To change this, choose Tools, Application Properties. The Preferences window will open. Click on the WebLogic Server tab. You'll see the current values for connecting to WebLogic Server. To point WebLogic Workshop to MyWorkshopDomain, change the Server Home directory setting to WL_HOME\user_projects\domains\MyWOrkshopDomain or wherever the parent directory of MyWorkshopDomain is located. Set the other settings to match Figure 30.24. You're now ready to create a new application. Figure 30.24. Application properties.
Creating a New WebLogic Workshop ApplicationNow that we've configured WebLogic Workshop to work with our new domain. To create a new application, do:
Working with WebLogic Workshop ControlsWebLogic Workshop introduces the concept of Web Service controls. Controls allow access to external resources, such as databases and EJBs, and take care of most of the implementation details. In this way, we can access those resources without needing intimate knowledge of J2EE, such as JDBC, JMS, and EJB APIs. WebLogic Workshop currently ships with dozens of controls, including the following:
Working with the Database ControlThe BookInfo Web Service will have a method called getBookForSubject that returns all books in the previously created Books data source that match a given subject. First, let's add a database control.
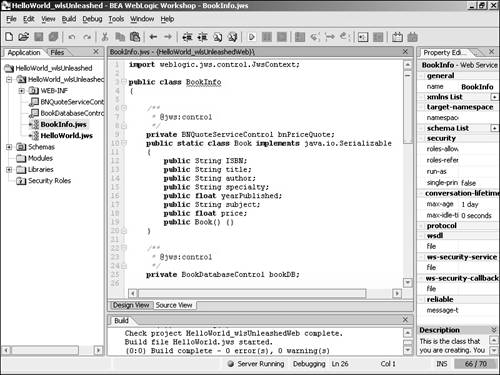
You've just created a bookDB database control, as shown in the Design View. You've also created a new class, called BookDatabaseControl, and a variable called bookDB of that type. Click on the Source View tab to confirm this. Also notice that the Project Tree now includes the BookDatabaseControl.jcx file. This file holds the control's available operations. This control also can be used with other Web Services. You can double-click on the filename to edit the control's source code. You can also edit the control's properties with the Properties Editor in the Design View. The database control will return book information to us. We would like to have this information available in a Java class called Book. Creating the Inner Book ClassOne step toward accomplishing this is by creating an inner class called Book. This class must extend Serializable and have a no-argument constructor. The members' names are important and must match the database fields. Enter the code as shown in Figure 30.26. Figure 30.26. Inner Book class.
Adding the getBooksForSubject MethodNow that we have defined the Book class, we can create a method on bookDB that returns a set of books that match our criteria. From the Design View, right-click on the bookDB control and choose Add Method from the menu. Call the method getBooksForSubject and press Enter. The arrow to the right of the getBooksForSubject method represents the SQL query of the method. Right-click on the arrow and choose Edit SQL. Enter the information as shown in Figure 30.27. Figure 30.27. Enter this information for the SQL and the Java fields.
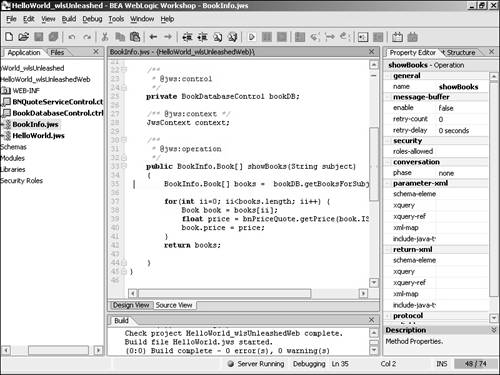
The method signature has been changed to accept a parameter named subject and to return an array of BookInfo.Books. Because Book is an inner class, we refer to it in this way. The WebLogic Workshop runtime will match column names in the Book table with field names in the Book class by default. A custom XML mapper can be used to alter this behavior. The SQL will return books where the SUBJECT column is equal to the subject parameter. Notice that the WHERE clause contains {subject}. The curly braces specify that the subject parameter value will be placed in the WHERE clause when constructing the SQL to send to the data source. This gives us a dynamic way of generating SQL. Connecting to the Database ControlWe now need to add a Web Service operation that will invoke the getBooksForSubject database method. Go back to the BookInfo document. From the Design View, right-click and choose Add Method. Name this method showBooks. Click on the showBooks link and you will be transferred to Source View with the cursor in the showBooks method. Change the showBooks method to match the code in Listing 30.21. Here we accept a subject and return an array of Book objects. We pass the subject on to the bookDB control and then return the array of books. Listing 30.21 The New Look of showBooks()
/**
 * @jws:operation
 */
public BookInfo.Book[] showBooks(String subject)
{
  return bookDB.getBooksForSubject(subject);
}
Save the project and test it by selecting Debug, Start. This will bring up the Test View. Go to the Test Form page and test the showBooks method. Enter a subject with the value INSPIRATIONAL, BUSINESS, or FANTASY to retrieve an actual book. You will notice that the price is always zero. Working with the Service ControlAnother very useful control is the service control. This control allows our Web Service to invoke another Web Service. Notice that our Book class contains a price field, but that we do not have a price column in the database. Instead, we're going to use a Web Service to get the current book price from Barnes & Noble (see http://www.barnesandnoble.com). One way to do this is to utilize an existing Web Service found in a UDDI registry. XMethods is a UDDI registry found at http://www.xmethods.com. It contains a plethora of active Web Services that can be used. One of these is the Barnes and Noble Price Quote. The WSDL for this Web Service is located at http://www.xmethods.com/sd/2001/BNQuoteService.wsdl. In the Design View of WebLogic Workshop, right-click and select Add Control Figure 30.28. Enter this information for the Web Service.
You'll now see the bnPriceQuote service control on the Design View with a getPrice method on the left of it. The WebLogic Workshop runtime retrieved the WSDL file, made a local copy, parsed it, and created a method for every operation found in it. Click on getPrice and the document structure will display information about this method. Select bnPriceQuote and you should see getPrice(java.lang.String isbn). This indicates that the method expects an ISBN number for the book whose price we are looking for. Let's call the getPrice method from our Web Service operation. Click on the showBooks link and edit the showBooks method to match Listing 30.22. After we get our list of books from the database control, we go through each one and get the price from the Barnes and Noble Price Quote service. We place this information back in the book object. Now, when you test this Web Service, you'll see actual price information from the Barnes & Noble book catalog. In practice, if we were dealing with many books, we would like to get price information in a bulk method rather than one by one. This design is useful for learning about service controls, but it should not be used in production where many Web Service requests would be generated and the performance of the operation would suffer. Listing 30.22 Change showBooks to Utilize the Barnes & Noble Price Information
public BookInfo.Book[] showBooks(String subject)
{
  BookInfo.Book[] books = bookDB.getBooksForSubject(subject);

  for(int ii=0; ii<books.length; ii++) {
   Book book = books[ii];
   float price = bnPriceQuote.getPrice(book.ISBN);
   book.price = price;
  }

  return books;
}
Using the DebuggerWebLogic Workshop has a built-in debugger and gives the developer the ability to set breakpoints, inspect variables, and change source code on the fly.
You can now inspect and modify variables in the debugging windows at the bottom of the screen. The Debug menu shows the options for continuing execution, and stepping into, over, and out of lines of code. Being able to inspect and modify server-side source code and its variables is very powerful and should make the Web Service development process less painful. Other WebLogic Workshop FeaturesIn addition to the capabilities discussed in this chapter, WebLogic Workshop and the runtime framework offers additional features. Following is a list of some of these:
For more information about WebLogic Workshop, please visit http://e-docs.bea.com/workshop/docs81/index.html. |
| [ Team LiB ] |
|
 WebLogic Workshop