| [ Team LiB ] |
|
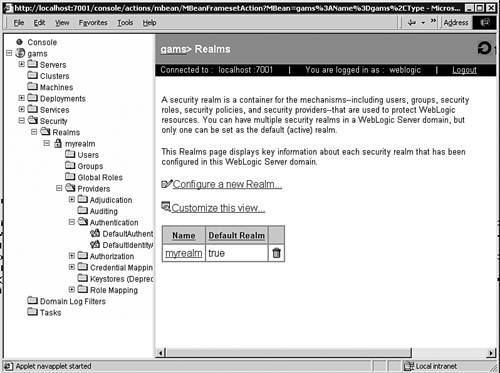
Protecting WebLogic Server ApplicationsIn this section, we start with how to secure applications using the default WebLogic Server security providers. We see how these providers work with the J2EE security model and demonstrate how to manage and configure these providers. Selecting a RealmTo start off, we will use the default realm named myrealm. This realm is configured with WebLogic Serversupplied security providers. When a new domain is created, myrealm is the only realm in that domain and it's the default realm for the new domain as well, as shown in Figure 28.1. Applications running in this domain use myrealm for their security unless another realm is created and set as the default. Figure 28.1. A domain starts with myrealm as the default realm.
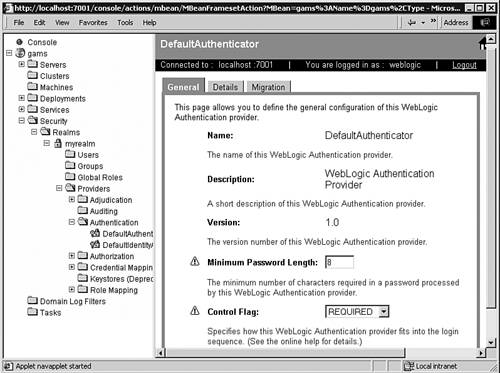
Defining Users and GroupThe way users, groups, roles, and security policies are configured in this section is particular to the WebLogic default security providers. When using a different provider, please refer to that provider's manual. The first step in securing applications is to define WebLogic Server users and groups. To define user and groups in a realm, it must have a configured authentication provider. Our default realm starts off configured with the WebLogic authentication provider named DefaultAuthenticator, as shown in Figure 28.2. This provider enables us to set the minimum password required for users. Figure 28.2. DefaultAuthenticator is the preconfigured authentication provider for myrealm.
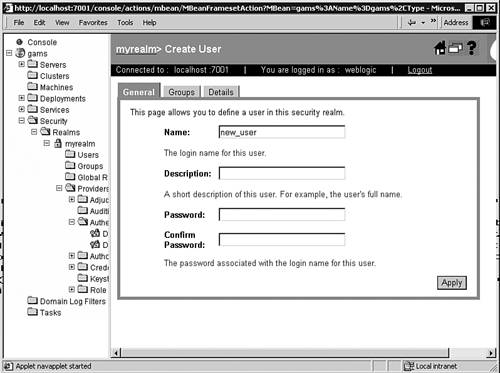
This provider uses an embedded LDAP server to store user and group information. Together with the WebLogic authorization provider, DefaultAuthenticator introduced in WebLogic 7.x replaces the File realm that was available in WebLogic Server 6.x. Defining UsersIf you already have users and groups defined externally, you won't want to enter them by hand. Please refer to the sections later in this chapter concerning configuring other authentication providers, specifically the section "Using External LDAP Servers."If you're migrating from an older version of WebLogic Server, refer to the section "Migrating Security from Previous WebLogic Server Versions." Also note that if you're migrating, there's no predefined user named guest in WebLogic Server. To display registered WebLogic Server users, open the Console and click on the Users tab in the left panel. The right panel will display the current users. Although you haven't created any users yet, you'll see a default user is already present. This is the administrator user that boots up WebLogic Server in this domainit was set up when the domain was created. This user must be part of the Administrators group in order for it to be able to boot WebLogic Server. New users are created by clicking the Users tab in the left panel and then clicking on the Configure a New User link in the right panel. This will display the Create User form shown in Figure 28.3. Enter the user information and click the Apply button. The username must be unique for the realm. Be sure to enter at least the minimum number of characters for the password. Figure 28.3. Create new users by entering their WebLogic Server name and password.
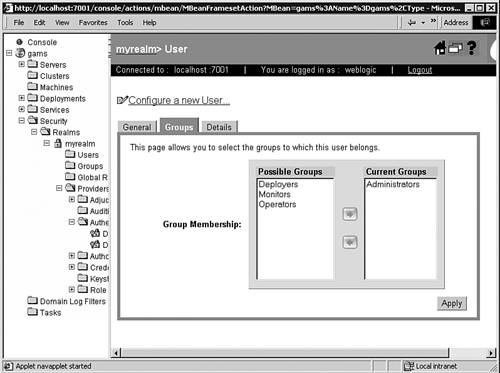
CAUTION Also make certain that the passwords match. After a user has been created, the username cannot be changed but the password can. A description is optional. Users can be added to a group by selecting the user and then clicking on the Groups tag in the right panel. This will display the Groups form as shown in Figure 28.4. To add a user to one or more groups, select the groups in the Possible Groups column and click the highlighted right arrow. To remove a user from one or more groups, select those groups from the Current Groups list and click the highlighted left arrow. Figure 28.4. Users can be members of one or more groups.
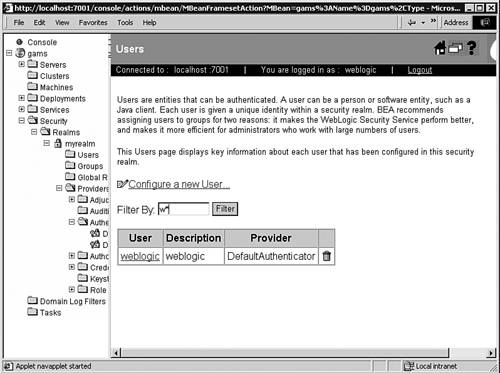
When there are many users, you can display only users whose names meet a filter condition. Type a username in the Filter By: text box and click the Filter button. Only that user will be displayed. You can use the asterisk (*) only as a wildcard character, as shown in Figure 28.5. Figure 28.5. Large numbers of users can be filtered.
A user can be deleted by clicking on the trashcan icon next to his name, as shown in Figure 28.6. Before the user is deleted, you'll have a chance to confirm this action. Figure 28.6. Users are deleted by clicking the trashcan icon.
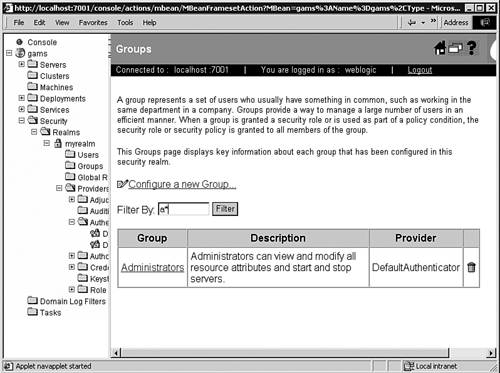
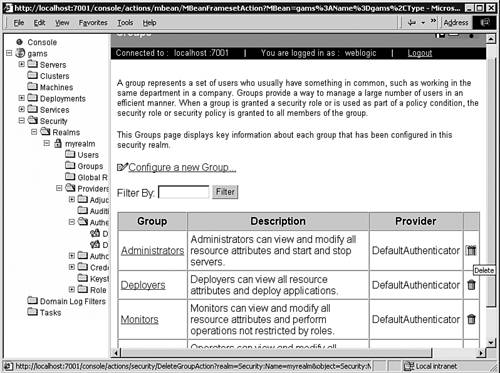
Defining GroupsGroups allow collections of users to be categorized according to some common characteristics such as job title, department, and physical location. The choice of groupings should be based on security requirements of applications that will use this realm. When assigning security roles and policies to groups to determine resource access, every member of the group will be assigned the same role and policy. This makes assigning security to large numbers of users a manageable task. You're strongly encouraged to use groups and to choose correct groupings according to your application's security needs. Groups can contain other groups in a hierarchical fashion. To display registered WebLogic Server groups, click the Groups tab in the left panelthe right panel will display the current groups. WebLogic Server starts with a number of default groups as shown in Table 28.1.
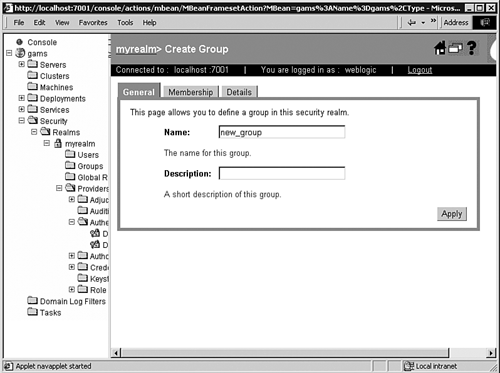
To crate a new group, click on the Groups tab in the left panel and then click on the Configure a New Group link in the right panel. This displays the Create Group form shown in Figure 28.7. Enter a group name and (optionally) a description, and click the Apply button. Group names must be unique within a realm. Figure 28.7. Create a new group by entering its name.
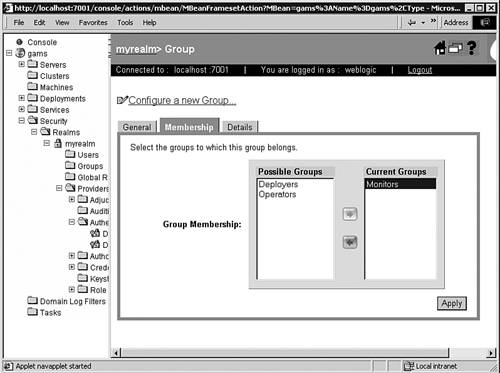
After a group has been created, it can be included in other groups. Groups can be added to other groups by selecting the group and then clicking on the Membership tag in the right panel. This displays the Membership form shown in Figure 28.8. To add a group to one or more groups, select one or more groups in the Possible Groups column and click the highlighted right arrow. To remove a group from one of more groups, select the group from the Current Groups list and click the highlighted left arrow. Creating a group hierarchy allows for easier management of security policies, but only if the hierarchy lends itself to the security requirements of the application the users will be accessing. Figure 28.8. Groups can be members of other groups.
When there are many groups, you can display only groups whose names meet a filter condition. Type the group name in the Filter By: text box and click the Filter button. Only that group will be displayed. You can also use the asterisk (*) as a wildcard character as shown in Figure 28.9. Figure 28.9. Large number of groups can be filtered down.
A group can be deleted by clicking on the trashcan icon next to its name, as shown in Figure 28.10. Before the group is deleted, you have a chance to confirm this action. Figure 28.10. Groups are deleted by clicking the trashcan icon.
Granting Global RolesA role represents a collection of users who share permissions to access restricted resources. Although WebLogic Server groups are static collections whose membership is defined by system administrators, the membership of a role is determined dynamically based on information such as username, group membership, or time of the day. Roles can be assigned to both WebLogic Server users and groups. Security policies are then assigned to roles to determine access to restricted resources. For efficient management, it's recommended to assign roles to groups rather than individual users. WebLogic Server has two different types of roles:
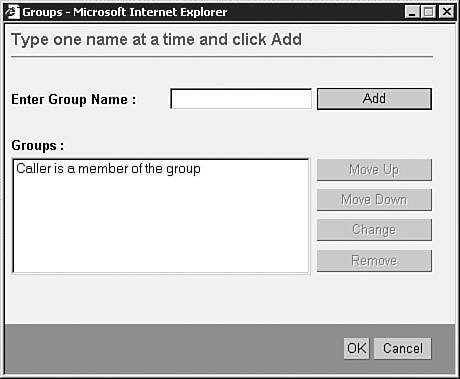
Creating Global RolesIn the administrator console, click on the Globals Roles tab in the left panel and the Configure a New Global Role link in the right panel. Enter the name of a role and click the Apply button. Names of global roles must be unique. The role statement for a role is a set of conditions that determines membership for that role. To set the role statement for a role, select the role and then click the Conditions tab in the right panel. A role statement is composed of one or more role conditions. Each role condition can be based on username, group membership, and time of the day. Although a role can be based on individual username, it's a much better practice to base it on group membership. NOTE Global roles take precedence over local roles specified in the weblogic.xml and weblogic-ejb-jar.xml files. To add a role condition to the role statement, select the role condition in the right panel and click the Add button. A window will open to enable you to further specify the condition. If you base the new condition on group membership, you can select one or more groups, as shown in Figure 28.11. Type the name of each group and click the Add button. These groups must be defined with the new authentication provider of the realm. Figure 28.11. Adding a role condition based on group membership.
If more than one group is added, you can decide whether a user needs to be in all the groups or at least one of them, as shown in Figure 28.12. Select the word or in the Groups list and click the Change button; doing so changes the word or to the word and. Figure 28.12. Creating a complex group membership condition.
The connecting word between group names can be one of the following:
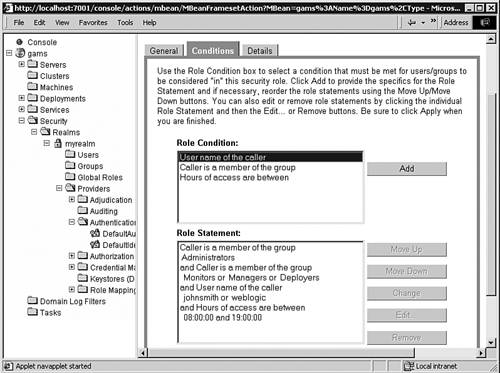
For more complex conditions, ors and ands can be mixed together. If this is done, WebLogic Server evaluates the expression from top to bottom. More restrictive statements should be toward the bottom. Selecting a statement and then clicking the Move Up or the Move Down button changes the order of that statement. Adding a new condition based on username is essentially the same process as adding a condition based on group membership. A new condition based on time enables you to set the starting and ending times that users are granted this role. Combining ConditionsAs was the case with complex group conditions, a role statement can consist of many individual conditions that are connected with ands and ors, as shown in Figure 28.13. Each and can be changed to an or and vice versa. Click on the line that starts with this word and press the Change button. When creating complex role statements, more restrictive conditions should come later because WebLogic will evaluate these conditions from top to bottom and left to right. Figure 28.13. A role statement can end up being complex.
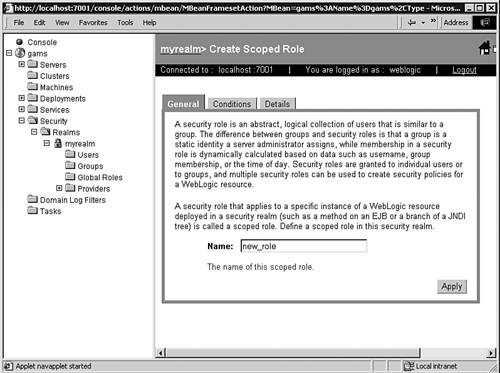
Role information is stored with that user and group information. In the case of the WebLogic authentication and authorization providers, this information is stored in an embedded LDAP server. Granting Scoped RolesScoped roles apply to only a single resource, such as a branch of the server JNDI tree. To grant a scoped role to a resource, highlight the resource in the administrator console, press the right mouse button, and select the Define Scoped Role link, and then click on the Configure a New Scoped Role link. The Create Role form will then be displayed as shown in Figure 28.14. Enter the name of the role and click the Apply button. Then create a role statement in the same way you created a global role. Scoped roles can be applied to many resources, including the JNDI tree, EJB methods, Web services, and Web application components. Figure 28.14. Create scoped roles by selecting a resource and pressing the right mouse button.
Creating Security PoliciesAfter an application client has been successfully authenticated, the process of determining access levels for restricted resources is referred to as authorization. WebLogic Server uses security policies to answer the question of "Who has access?" Instead of using the access control lists (ACLs) employed in previous versions, WebLogic Server now utilizes security policies. Security policies specify access rights for a user, group, or role with a specific resource or type of resource. Out of the box, security policies can also be based on the time of the day. Because the WebLogic Server security framework is very flexible, custom security policies could be based on virtually any data and business logic. Security policies are used to answer the question of who has access to a restricted resource. A security policy enables us to define a link between a WebLogic Server resource and a user, group, role, or time constraint. Policies can be associated with a type of resource or an individual resource. If assigned to a type, new instances of that type will inherit the same security policy. WebLogic Server comes with predefined security policies for its resources, as shown in Table 28.3. The policies are based on groups and roles. Although policies can be based on individual users, basing them on roles and groups is highly recommended for efficient management.
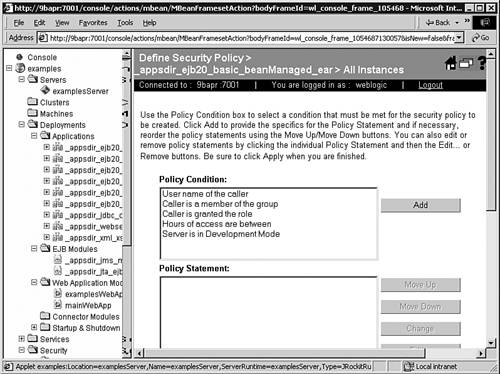
Creating a security policy is like creating a scoped role. First highlight the resource you're interested in. This can be either an individual resource such as a specific EJB or a type of resource such as all EJB deployments. Press the right mouse button and select the Define Security Policy link. Figure 28.15 shows what the security policy screen looks like. Figure 28.15. Create a security policy by selecting a resource and pressing the right mouse button.
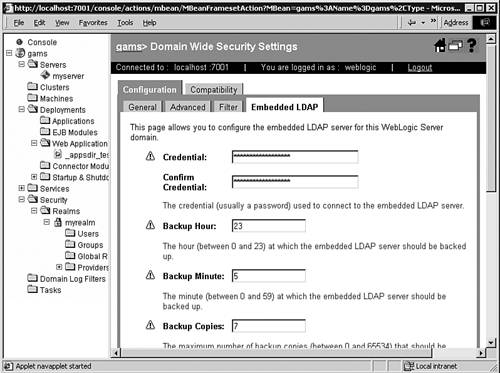
Now create the policy statement based on policy conditions. The instructions for doing this are the same as for roles, with the exception that security policies can be based on username, group membership, role membership, and time of the day. Security policies can be applied to many resources, including the JNDI tree, EJB methods, Web services, and Web application components. Security policies specified in J2EE deployment descriptors can be viewed and modified in the admin console. The Lightweight Directory Access ProtocolThe Lightweight Directory Access Protocol (LDAP) is a universal mechanism for storing virtually any type of information, including information required for ACLs. LDAP provides for a hierarchy of information. Examples of this are that users can be grouped by department, and ZIP Codes can be grouped by county and then by state. There is virtually no limit to the levels of information that can be stored in LDAP. Many software vendors have adopted LDAP for storing user and group information in their products. Configuring the Embedded LDAP ServerThe WebLogic authentication, authorization, role mapping, and credential mapping providers use an embedded LDAP server to store user, group, role, and security policies. Information from these providers is stored in the admin server and replicated to all managed servers in the domain. At the present time, this LDAP server can only be used internally by WebLogic Server. In the future, BEA might open up the LDAP subsystem that would allow applications to store their information there as well. To change attributes for the embedded LDAP server, click the domain name in the left panel of the admin console. Click on the View Domain Wide Security Settings link at the bottom of the screen, and then click the Embedded LDAP tab. You will then see the Embedded LDAP configuration form, as shown in Figure 28.16. From here, you can change backup, cache, and cluster information. Figure 28.16. Configuring embedded LDAP server settings.
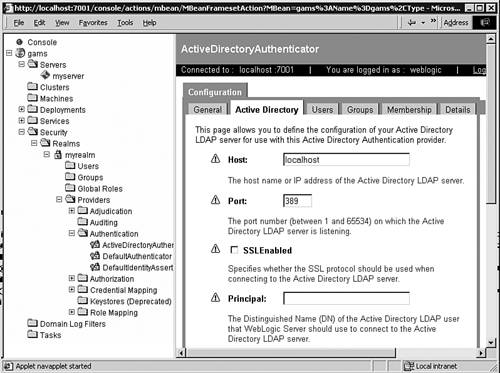
Using External LDAP ServersIn addition to the default authentication provider, WebLogic Server comes with several other authentication providers that can use Novell's LDAP server, Sun's iPlanet LDAP server, Microsoft's Active Directory LDAP server, and the Open LDAP server. Each of these security providers requires configuration information including the following:
To use an external LDAP server, click on the Authentication tab, found under Providers in the appropriate realm in the left pane of the administration console, and select the appropriate LDAP vendor you want to connect with. You then have an opportunity to enter configuration information. An example of this is shown in Figure 28.17. Figure 28.17. External LDAP servers can be accessed from WebLogic Server.
Migrating Security from Previous WebLogic Server VersionsIn the current version of WebLogic Server, the File, Caching, LDAP, Windows NT, Unix, RDBMS, and custom security realms have been deprecated. WebLogic Server now ships with compatibility security to enable you to continue to use your 6.x security realms. The only security realm available in compatibility security is the Compatible realm. The Compatible realm comes with realm adapter providers that allow 6.x security realms to be used. It's important to remember that the realm adapter providers have been deprecated and should not be relied upon for future security. They should be used only until your applications have been upgraded to work with the latest version. NOTE Information about using compatibility security can be found at http://e-docs.bea.com/wls/docs81/secmanage/security6.html. For more information about migration issues, please refer to Appendix C, "Migration from Previous Versions." Customizing the Default RealmSo far, we've been using the default realm, myrealm, with all the default WebLogic Server security providers. However, there are many cases in which this configuration will not be sufficient:
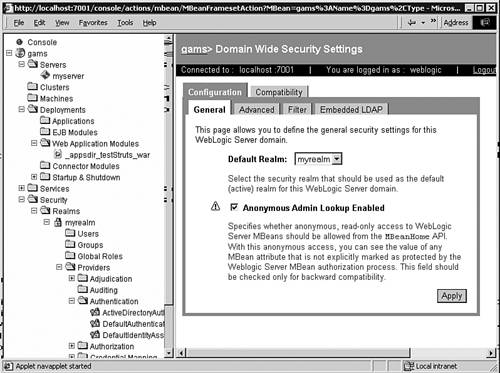
Choosing a Default RealmEvery WebLogic Server domain can have one or more security realms. However, only one can be the default realm. To set a realm as the default, click on the domain name in the left panel of the admin console. Click on the View Domain-wide Security Settings link on the bottom right and then click on the General tab underneath. This will display the General Security form shown in Figure 28.18. Select the default realm and click the Apply button. Figure 28.18. Setting a default security realm.
|
| [ Team LiB ] |
|