| [ Team LiB ] |
|
Finding Problems Early: Unit TestingUnit testing is one of those essential components of software development that's often not practiced at all or is done in an ad hoc fashion. The idea is that when a system component or unit is written, a set of simple tests is also written to verify that the component works as expected. The tests for all the components in a system should be run on a regular basis, such as after a nightly build, to verify that changes in one part of a system have not broken the expected behavior of another part of the system. Although that seems like a lot of work, and at first glance it might be, thankfully there is a tool called JUnit that speeds the process of writing the tests and automates running them. JUnit is freely available from http://www.junit.org. Installing and Running JUnitIt's relatively simple to get up and running with JUnit. Here are the installation steps:
JUnit runs as a simple command-line Java program. For example, java -cp testCaseClassPath junit.awtui.TestRunner test.case.class.name runs the given test case using JUnit's AWT TestRunner. A TestRunner is a tool that shows you the progress of the JUnit tests that are running. JUnit comes with three TestRunners: junit.awtui.TestRunner, junit.swingui.TestRunner, and junit.textui.TestRunner. The first two TestRunners provide a graphical interface to the tool, and the last one is a command-line text interface. A Simple JUnit ExampleLet's take a look at a simple class that we would like to unit test. The class we use in this example is a very simple implementation of a shopping cart, and is shown in Listing 24.1. Listing 24.1 Sample Class for Unit Testing (ShoppingCart.java)
package wls8unleashed;
import java.io.Serializable;
import java.util.Vector;

public class ShoppingCart implements Serializable {
  private Vector items;
  public ShoppingCart() {
    items = new Vector();
  }

  public void addItem(CartItem item) {
    items.add(item);
  }

  public Vector getItems() {
    return items;
  }

  public int getNumItems() {
    return items.size();
  }

  public void emptyCart() {
    items.clear();
  }

  public double getTotalCost() {
    double cost = 0.0;
    for (int i=0; i<items.size(); i++) {
      CartItem item = (CartItem)items.get(i);
      cost += item.getUnitPrice() * item.getQuantity();
    }

    return cost;
  }
}
This class relies on another class, CartItem, which is shown in Listing 24.2. Listing 24.2 CartItem Class Listing (CartItem.java)
package wls8unleashed;
import java.io.Serializable;
public class CartItem implements Serializable {
  private double unitPrice;
  private int quantity;
  private String name;

  public CartItem(String itemName, int itemQuant, double price) {
    name = itemName;
    quantity = itemQuant;
    unitPrice = price;
  }

  public String getName() {
    return name;
  }

  public int getQuantity() {
    return quantity;
  }

  public double getUnitPrice() {
    return unitPrice;
  }
}
To write a proper unit test of the ShoppingCart class, we have to write a test case for each method in the class. With JUnit, all test cases are implemented within a class derived from junit.framework.TestCase. With that in mind, we'll create a ShoppingCartTestCase class as shown in Listing 24.3. Listing 24.3 ShoppingCartTestCase Class Listing (ShoppingCartTestCase.java)
package wls8unleashed.testing;
import java.util.Vector;
import junit.framework.Assert;
import junit.framework.Test;
import junit.framework.TestCase;
import junit.framework.TestSuite;

public class ShoppingCartTestCase extends TestCase {
  private ShoppingCart cart;
  private CartItem item1;
  private CartItem item2;
  private CartItem item3;

  public ShoppingCartTestCase() {
  }

  protected void setUp() {
    cart = new ShoppingCart();
    item1 = new CartItem("Video Card", 1, 149.99);
    item2 = new CartItem("Monitor", 1, 459.99);
    item3 = new CartItem("Camera", 1, 289.99);
  }

  public void testAddItem() {
    cart.addItem(item1);
    Vector items = cart.getItems();
    CartItem tmpItem = (CartItem)items.get(0);
    Assert.assertEquals(tmpItem.getName(), item1.getName());
    Assert.assertEquals(tmpItem.getQuantity(), item1.getQuantity());
    Assert.assertEquals(tmpItem.getUnitPrice(), item1.getUnitPrice(), 0.0);
  }

  public void testNumItems() {
    cart.addItem(item1);
    cart.addItem(item2);
    cart.addItem(item3);
    Assert.assertTrue(cart.getNumItems() == 3);
  }

  public void testTotalCost() {
    cart.addItem(item1);
    cart.addItem(item2);
    cart.addItem(item3);
    Assert.assertEquals(cart.getTotalCost(), 899.97, 0.0);
  }

  public void testEmptyCart() {
    cart.addItem(item1);
    cart.emptyCart();
    Assert.assertTrue(cart.getNumItems() == 0);
  }

  public static Test suite() {
    TestSuite suite = new TestSuite(ShoppingCartTestCase.class);
    return suite;
  }
}
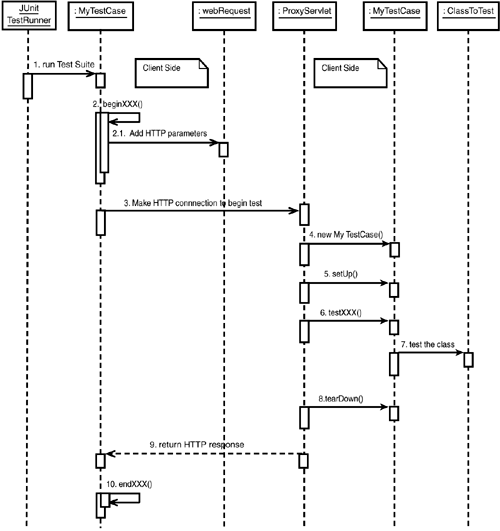
Let's take a moment to examine how this test class works. When JUnit runs, it requires the name of a class that has implemented the static suite() method. This method is akin to a main() method in an ordinary Java program, and serves as the entry point where JUnit begins the testing process. In our implementation of suite(), we create an instance of junit.framework.TestSuite and pass in a reference to the ShoppingCartTestCase class. When this constructor is used, JUnit automatically finds any public testXXX() methods in the given class, and calls each one as its own test case. In this case, we've defined four test methods: testAddItem(), testNumItems(), testTotalCost(), and testEmptyCart(). We also defined a setUp() method, which JUnit calls before running each test. A tearDown() method may also be defined, which can be called after each test. In the first test case, testAddItem(), we're essentially testing to verify that the item we retrieve from the cart is the same as the item we initially added. The method uses the assertEquals() method of the Assert class to verify that each attribute of the retrieved CartItem object is equal to that of the original CartItem that was added to the cart. If any of the assertions were false, JUnit would display a message and fail that particular test case. Unit Testing Inside WebLogicIn the previous example, we demonstrated how to create and run unit tests for existing software components using JUnit. In that situation, the tests were actually run from within the same JVM as JUnit itself. But there are many software components, such as servlets, EJBs, JSPs, and tag libraries, that must be deployed and running inside of WebLogic in order to be tested. So, how do we go about unit testing those types of modules? There are a couple different answers to that question. The first answer starts at the design phase of the component. It's typically good practice to isolate key logic components in such a way as to make them as free from external dependencies as possible. In addition to promoting testability, such a design promotes greater code reuse. For example, take our earlier ShoppingCart example. That was a very simple implementation of a core business object. However, within the context of the design of a particular system, the architect might have viewed the shopping cart as being implemented as a stateful session bean. In that situation, we could respond by taking our existing ShoppingCart class, making it implement the javax.ejb.SessionBean interface, and essentially turning it into a session bean. Another approach would be creating a subclass of ShoppingCart that implements the necessary EJB methods, called ShoppingCartEJBImpl, for example. This would allow the very same ShoppingCart code to be deployed as a session bean or not, without changing or copying any code. And the unit tests that we applied to ShoppingCart would be valid for ShoppingCartEJBImpl as well. Although designing and implementing your code to be more reusable and more easily testable is always a good thing, it does not completely solve the unit testing problem. There will still be components of the system that must be tested while running inside the WebLogic Server environment. Thankfully, there is another freely available tool called Cactus, which allows JUnit to run tests on any J2EE application server, including WebLogic. Cactus is part of the Jakarta project, and is available at http://jakarta.apache.org/cactus. Using Cactus to Unit Test Inside WebLogicCactus is essentially an extension to JUnit, and leverages many of JUnit's features. What it adds is the capability to run unit tests inside the container. It does so by using a proxy servlet: The proxy servlet instantiates and runs your test case class inside the container. In this way, you can write a test case to check any server-side component, such as a servlet, JSP, JSP custom tag, or EJB, in place. The sequence diagram shown in Figure 24.1 illustrates the flow of execution in a Cactus test case. Figure 24.1. Cactus unit test sequence diagram.
As Figure 24.1 shows, the process of unit testing with Cactus begins with a JUnit test suite, which is started on the client side. In addition to the setUp() and tearDown() methods, the test case can implement a beginXXX() method and an endXXX() method for each testXXX() method. The beginXXX() and endXXX() methods are run on the client side. The beginXXX() method can be used to add headers or parameters to the HTTP request that will be sent to the test case. The actual test begins when the HTTP request is sent to the proxy servlet. It instantiates a copy of the test case class on the server side, passes it the information in the request, and calls the setUp(), testXXX(), and tearDown() methods. The response is collected by the proxy servlet and sent back to the client. In the endXXX() method, the client can perform validation on the contents of the response. An Example Using CactusTo continue our shopping cart example, let's suppose that we have a JSP tag library, which contains a <cart_items> tag that is used to display the contents of the shopping cart on the JSP page. To properly unit test the tag library, it must be tested inside the container, with access to all the implicit variables that the container provides, such as request, response, pageContext, and so on. Listing 24.4 shows how a test case can be written to test a JSP custom tag by invoking the tag directly and calling a test JSP page that uses the tag. Listing 24.4 In-Server Unit Test Case (CartItemsTagTestCase.java)
package wls8unleashed.testing;
import java.util.Vector;
import junit.framework.*;
import org.apache.cactus.*;
import javax.servlet.jsp.tagext.BodyContent;

public class CartItemsTagTestCase extends JspTestCase {
  private ShoppingCart cart;
  private CartItem item1;
  private CartItem item2;
  private CartItem item3;

  public CartItemsTagTestCase(String name) {
    super(name);
  }

  protected void setUp() {
    cart = new ShoppingCart();
    item1 = new CartItem("Video Card", 1, 149.99);
    item2 = new CartItem("Monitor", 1, 459.99);
    item3 = new CartItem("Camera", 1, 289.99);

    cart.addItem(item1);
    cart.addItem(item2);
    cart.addItem(item3);
    session.setAttribute(ShoppingCart.class.getName(), cart);
  }

  public void testCartItemsTag() throws Exception {
    CartItemsTag tag = new CartItemsTag();
    tag.setPageContext(pageContext);
    int returnCode;
    returnCode = tag.doStartTag();
    assertEquals(tag.EVAL_BODY_BUFFERED, returnCode);

    BodyContent bodyContent = pageContext.pushBody();
    tag.setBodyContent(bodyContent);
    tag.doInitBody();
    int count = 0;
    do {
      count++;
      returnCode = tag.doAfterBody();
    } while (returnCode == tag.EVAL_BODY_AGAIN);

    // should have been 3 iterations
    assertEquals(3, count);

    returnCode = tag.doEndTag();
    assertEquals(tag.EVAL_PAGE, returnCode);

    pageContext.popBody();
    tag.release();
  }

  public void testTagOnPage() throws Exception {
    pageContext.forward("/testTag.jsp");
  }

  public void endTagOnPage(WebResponse webResponse) {
    String output = webResponse.getText();
    int index1 = output.indexOf("Video Card 149.99 1");
    assertTrue(index1 > 0);
    int index2 = output.indexOf("Monitor 459.99 1");
    assertTrue(index2 > 0 && index2 > index1);
    int index3 = output.indexOf("Camera 289.99 1");
    assertTrue(index3 > 0 && index3 > index2);
  }

  public static Test suite() {
    return new TestSuite(CartItemsTagTestCase.class);
  }
}
Looking at the example, we start our test case by extending org.apache.cactus.JspTestCase. This is the class that Cactus provides specifically for testing JSP pages and custom tags. It also provides a ServletTestCase for testing servlets and a FilterTestCase for testing servlet filters. The JspTestCase class makes the JSP implicit objects request, response, pageContext, and session available to the test case class. The setUp() method of the test case is run on the server before each test method. In this case, we create a ShoppingCart object, add a few CartItem objects to it, and then add it to the session. The tag will be looking for the ShoppingCart in the session scope. In the testCartItemsTag() method, we want to call our tag directly. To do so, we need to emulate the tag lifecycle that the tag would undergo if it were being called from a JSP page. Thus, we perform the following operations:
The preceding procedure is a good example of unit testing practice in that it exercises every method in the class that needs to be tested. However, such a practice could become somewhat cumbersome with a large number of custom tags to test. Also, this particular tag creates its own scripting variables that a calling JSP can use to display information. The method just discussed does not have any way to inspect the contents of those variables. To address these concerns, we'll create a simple JSP page that calls the tag and a test case that calls that JSP. The relevant code from the JSP file is as follows: <test:cart_items> <%= item_name %> <%= item_unit_price %> <%= item_quantity %> </test:cart_items> This code simply prints out the item name, unit price, and quantity, separated by spaces. Referring back to Listing 24.4, the testTagOnPage() method simply forwards the request to our test JSP, testTag.jsp. The endTagOnPage() method is called outside the container, back on the client side, with a WebResponse parameter that encapsulates the output generated by the server from the request. The method obtains the output string and asserts that all the expected values are contained in the string, in the proper order. A failure of any of these assertions would cause the unit test to fail. Installing and Running CactusGetting Cactus installed and running correctly is a slightly more involved task than configuring JUnit. After the Cactus archive file has been downloaded and extracted, there is a lib\directory in the extracted directory structure. Within that directory are five JAR files of interest: aspectjrt.jar, cactus.jar, commons-httpclient.jar, commons-logging.jar, and junit.jar. Note that the actual filenames might have version numbers included with them, which are being omitted for clarity. For example, aspectjrt.jar might really be named aspectjrt-1.0.6.jar. These files have to be on the compiler's classpath when you build your test cases, and on the JVM's classpath when you launch the test from the client side. These files, minus commons-httpclient.jar, also must be available to your application on the server side. With a Web application, placing the JARs into the WEB-INF\lib directory of the WAR file takes care of that requirement. The next step is to configure the proxy servlet within the Web application, which is done by adding an additional servlet and servlet mapping to web.xml. In our example, we are testing a JSP custom tag, so we use the JspRedirector servlet. Add the following lines to the application's web.xml file: <servlet> <servlet-name>JspRedirector</servlet-name> <jsp-file>/jspRedirector.jsp</jsp-file> </servlet> <servlet-mapping> <servlet-name>JspRedirector</servlet-name> <url-pattern>/JspRedirector</url-pattern> </servlet-mapping> In addition, the jspRedirector.jsp file must be copied from the web\directory of the Cactus distribution into the root directory of the Web application. Finally, the client side must be configured so that it knows how to send messages to the server. That is done by defining the cactus.contextURL property in a cactus.properties file. The cactus.properties file has to be located on the client's classpath. The cactus.contextURL property defines the URL where the application to be tested is located. For example, if our application were deployed as test.war, the cactus.properties file would contain the line: cactus.contextURL=http://localhost:7001/test To run the test, build the application WAR file, deploy it to WebLogic Server, and start the server. Then launch the client from the command line as follows: java -cp %CLASSPATH% junit.textui.TestRunner wls8unleashed.testing.CartItemsTagTestCase NOTE Notice that we use junit.textui.TestRunner when running Cactus test cases. With the AWT and Swing TestRunners, JUnit uses a special classloader that enables it to reload the test case classes without restarting the TestRunner. Although this is a convenient feature, it causes some problems with some of the classes Cactus uses internally. Using the text-based TestRunner avoids those problems. |
| [ Team LiB ] |
|