| [ Team LiB ] |
|
Configuring and Deploying WebLogic JSPBefore JSP pages can be executed within WebLogic Server, the target JSP must be deployed within a Web application, and the Web application's JSP parameters must be configured. The JSP examples used previously relied on the default Web application provided by the WebLogic installation. The following sections detail how to accomplish these tasks within your own user-developed applications. Configuring WebLogic for JSPTo execute JSP pages within WebLogic Server, you must set the server's JSP configuration parameters. These parameters are defined within your specific application's weblogic.xml file. (See Chapter 7, “Deploying Web Applications,” for details about the weblogic.xml file.) NOTE WebLogic JSPs may be configured and executed only within the context of a Web application. The WebLogic Server distribution will includes a default Web application. You can use this default application for development and troubleshooting convenience. However, any JSP developed is assumed to be developed within the context of a greater user-defined Web application. Refer to Chapter 7 for more information. JSP parameters are value settings that manage the behavior of JSP pages executed on WebLogic Server. These parameters are set using XML tags as such: <jsp-param><param-name>PARAMETER</param-name><param-value>VALUE</param-value></jsp-param> Commonly used server configuration parameters are detailed in Table 15.8. NOTE For more details on JSP configuration parameters, refer to the BEA documentation site at http://edocs.beasys.com/wls/docs81/webapp/weblogic_xml.html. To configure these JSP parameters, modify applicable tags within the weblogic.xml file, located in your application's WEB-INF directory (refer to Chapter 7). There are two ways of modifying this file, the WebLogic Admin Console and direct text editing. Configuring JSP Parameters Using WebLogic BuilderTo configure JSP parameters for newly developed applications using WebLogic Builder, start the GUI as detailed in Chapter 7. Locate the target application containing your JSPs as shown in Figure 15.6. Figure 15.6. Selecting target application.
Open the target module, and you'll be prompted to create deployment descriptors as shown in Figure 15.7. Figure 15.7. Creating deployment descriptors.
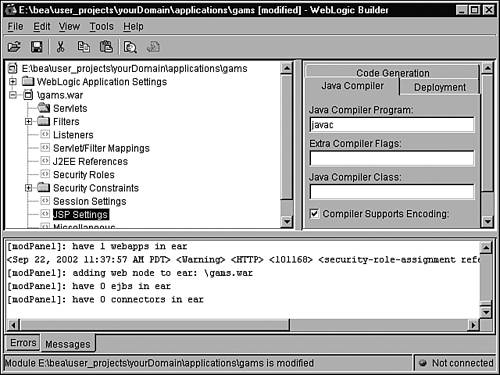
Selecting Yes will generate default deployment descriptor XML files, including the weblogic.xml file that will host the JSP parameters. To edit JSP parameters, select JSP Settings under the application's archive as shown in Figure 15.8. Figure 15.8. Setting JSP parameters.
Edit the JSP parameter values as needed and save. You may further deploy the application as detailed in Chapter 7. Configuring JSP Parameters Using the WebLogic Admin ConsoleTIP There are various methods in which you may modify configurations parameters. Configuration parameters may be different in development, test, and production environments, but in theory should not be. Development and test environments should mimic the production environment as closely as possible; otherwise, problems might be introduced when migrating applications. Determine the methodology, including the tool employed, that best suits your enterprise. To set JSP configuration parameters within a preexisting weblogic.xml file, start the server and enter your admin server's console at http://yourURL:port/console. At the prompt screen, enter your username and password, navigate to the specific Web application, using this sequence: yourDomain→Deployments→Web Application Modules→applicationName, as shown in Figure 15.9. Figure 15.9. Editing a Web app deployment descriptor.
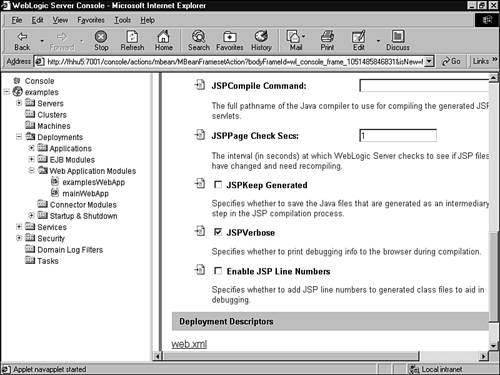
CAUTION When configuring JSP parameters using the WebLogic admin console, the weblogic.xml file must exist in your application's WEB-INF directory prior to starting your WebLogic Server. TIP The generic WebLogic installation will install a default application, which includes a default weblogic.xml. You can use this default application for JSP development or testing. TIP If encountering errors when persisting JSP configuration parameters using the Admin console, manually edit the application's weblogic.xml and restart your server. Select the Descriptor tab, as shown in Figure 15.10. Modify the JSP parameters as detailed in Table 15.7 earlier in this chapter. Figure 15.10. Editing the JSP descriptor.
Configuring JSP Parameters via Direct Text EditingTo edit the weblogic.xml file (refer to Chapter 7) manually, open it (the file is found within the WEB-INF directory under the application's root directory) within a text editor, and modify JSP parameters as detailed in Table 15.7. A sample weblogic.xml containing JSP specific parameters is presented in Listing 15.7. Notice how the pageCheck parameter is set at lines 8–14 and the verbose parameter is set at lines 15–22. CAUTION Take special care when editing the weblogic.xml or any WebLogic deployment descriptor. Any errant or incorrect additions can crash or otherwise impede server performance. It's prudent to maintain a backup copy of any manually edited XML file. Listing 15.7 weblogic.xml—JSP-Specific Code1<!DOCTYPE weblogic-web-app PUBLIC "-//BEA 2 Systems, Inc.//DTD Web Application 8.1//EN" 3 "http://www.bea.com/servers/wls810/dtd/weblogic810-web-jar.dtd"> 4 <weblogic-web-app> 5... 6 <jsp-descriptor> 7 <jsp-param> 8 <param-name> 9 pageCheckSeconds 10 </param-name> 11 <param-value> 12 1 13 </param-value> 14 </jsp-param> 15 <jsp-param> 16 <param-name> 17 verbose 18 </param-name> 19 <param-value> 20 true 21 </param-value> 22 </jsp-param> 23 </jsp-descriptor> 24... 25</weblogic-web-app> TIP After you've established a workable set of JSP parameters, copying and pasting the parameters within your application's weblogic.xml file is a time-saving strategy. You should establish a set of JSP parameters for development, testing, and production environments. For example, within a production environment, pageCheckSeconds should be set to –1 (no checks), as opposed to the default setting of 1 (check for new version of JSP every second) or the development setting of 0 (check at each request). Within a testing or development environment, you might opt for verbose output, but verbose output might not be desirable for a production environment. |
| [ Team LiB ] |
|