The first version of ASP.NET established a useful set of data-bound controls. Visualizing and editing data became a lot easier with the support of such controls, one of the most important of which was the DataGrid control. Unfortunately, this control had its drawbacks, too. Although the DataGrid offered some built-in hooks for sorting, paging, and editing of data, you had to implement these features manually.
The new version of ASP.NET, version 2.0, follows a different approach. It solves many of the problems you may have had previously with ASP.NET and offers standard functionalities completely out of the box. Now you can sort, page, and edit any data source (and much more)—in most cases without typing a single line of code. That's fun!
The new features of ASP.NET 2.0 are based on a set of so-called Data Source controls. They handle the communication between data sources and controls, which is used for presentation in an abstract and generic way. Because the Data Source controls themselves don't have any visualization of their own, they are displayed as a gray box in the IDE.
If required, every Data Source control provides a view of the data. A view makes it possible to display and sort data. Depending on the data source, you can even edit the data. Other advantages of Data Source controls are automatic data binding (no call of the DataBind() method required), dramatic reduction of the amount of source code needed, and extended support at design time. Nevertheless, ASP.NET still has the flexibility that you know from version 1.x.
The following six Data Source controls are currently shipped with ASP.NET 2.0:
SqlDataSource: Accesses SQL Server, OLE DB, ODBC, Oracle, and other database systems for which a custom .NET Data Provider exists (possible providers: MySQL, Firebird, etc.)
AccessDataSource: Enables you to work easily with Microsoft Access databases by specifying a filename
DataSetDataSource: Used with data sets
ObjectDataSource: Lets you visualize classes/objects directly
XmlDataSource: Used for XML files and documents
SiteMapDataSource: Recalls the new site map data structure
Although the first four sources can handle flat data structures with one layer only, the latter two are able to process hierarchies of any depth.
Because of their open structure, you can easily implement your own Data Source controls and visualize them by using existing controls. Microsoft came up with the following potential controls:
WebServiceDataSource
IndexServerDataSource
SharePointDataSource
SqlXmlDataSource
ExcelDataSource
FileSystemDataSource (Dave Sussman implemented such a data source)
And there's many more.
Data Source Controls can be used with all Data Controls, the new ones and those you may know already from ASP.NET 1.x:
AdRotator
BulletedList
DropDownList
ListBox
CheckBoxList
RadioButtonList
Repeater
DataList
DataGrid (still included for compatibility reasons)
GridView (aka SmartGrid)
DetailsView
TreeView
Except for the last one, all controls are designed for flat data structures. The new TreeView control, however, accepts hierarchical sources, too. Makes sense for a TreeView, doesn't it?
Display data using the new Data Source controls is mere child's play. The development environment will support you step by step:
Place a GridView control on a new web page. Choose the Connect To DataSource command in the Task List of the control.
In the dialog box that appears, first select <New DataSource>, select SqlDataSource below that, and click the Create button.
An assistant appears that allows you to choose either an existing connection to your local SQL Server (or MSDE) or to create a new one. Please select your nearest Northwind database sample.
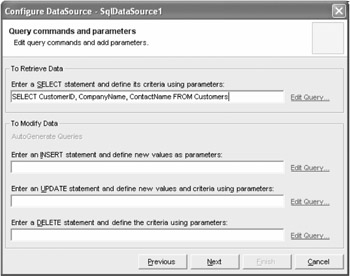
Confirm your choice and enter the following SQL statement in the field shown in Figure 3-1:
SELECT CustomerID, CompanyName, ContactName FROM Customers
Confirm this and the subsequent dialog boxes until the Set Control Properties dialog box appears. Activate the Allow Paging and Allow Sorting options and click the Finish button.
That's all, you're done! Now you can start the page by pressing the F5 key. The content of the customer table is displayed in the browser, and you also have the capability of sorting by different columns, as shown in Figure 3-2. Thanks to paging, everything is clearly arranged. And remember, you didn't write a single line of code!
You probably expect that the assistant in the previous example has generated a large and complex piece of code—but far from it. In Listing 3-1, you'll find the complete page responsible for displaying the customer data.
<%@ page language="VB" %>

<html>
<head runat="server">
   <title>Untitled Page</title>
</head>
<body>
   <form runat="server">
      <asp:gridview id="GridView1" runat="server" allowpaging="True"
                    datasourceid="SqlDataSource1" allowsorting="True"
                    autogeneratecolumns="False">
         <columnfields>
            <asp:boundfield sortexpression="CustomerID" datafield="CustomerID"
                            readonly="True"
                            headertext="CustomerID">
            </asp:boundfield>
            <asp:boundfield sortexpression="CompanyName" datafield="CompanyName"
                             headertext="CompanyName">
            </asp:boundfield>
            <asp:boundfield sortexpression="ContactName"
                             datafield="ContactName" headertext="ContactName">
            </asp:boundfield>
         </columnfields>
      </asp:gridview>
      <asp:sqldatasource id="SqlDataSource1" runat="server" selectcommand="SELECT
            CustomerID, CompanyName, ContactName FROM Customers"
            providername="System.Data.OleDb"
            connectionstring="Provider=SQLOLEDB.1;Initial Catalog=Northwind;
            Data Source=.;Integrated Security=SSPI">
      </asp:sqldatasource>
   </form>
</body>
</html>
Two things are important to know about this page. First, it contains a GridView control. The single columns and fields are noted as separate subelements, similar to the DataGrid. Alternatively, it's still possible to have automatic generation at run time (AutoGenerateColumns property). In the example, the DataSourceID property is set to SqlDataSource1, thereby establishing a connection to the Data Source control with that particular ID.
Second, a SqlDataSource control is also placed on this page. It takes care of the connection to the database. By using the properties that I've been explained, you can specify the ADO.NET Data Provider, the connection string, and the select query. Everything else is handled automatically.