Now that you have been introduced to the concept of Terminal Services for Microsoft Windows Server 2003, you will learn how to install and configure the system. Related topics include:
The basic installation of Windows Server 2003 and Terminal Services, the requirements, and the different installation options (CD-ROM or network).
Details on licensing terminal servers and their system tools.
The tool for setting up Terminal Services—Terminal Services Configuration.
This chapter describes the requirements for installing Windows Server 2003 and activating Terminal Services. Before you install the software from CD-ROM or via the network, you need to make several basic decisions. You can manually install the software, but there are also several options to automate the process. You will find the necessary information in this section.
To successfully install Windows Server 2003, the target platform must meet the requirements of the operating system. This will help prevent installation problems and correct errors after installation. To set up the optimal system based on the requirements, it is very helpful to have a basic grasp of the most important configuration options.
To install Windows Server 2003, a suitable hardware platform is essential. The following list includes the recommended features for different hardware components. It is assumed that the Standard Server and Enterprise Server are the most widely used options of terminal servers. The Datacenter Server is mentioned only for the sake of completeness.
Processor For the Standard Server, Enterprise Server, and Datacenter Server, x86-based processors (32-bit) are supported. The Enterprise Server and the Datacenter Server also supports Itanium-based processors (64-bit). The minimum recommended clock rate for the Standard Server is 550 megahertz (MHz) and 733 MHz for the Enterprise Server and the Datacenter Server.
Main memory The minimum is 128 megabytes (MB); however, 256 MB is recommended. The maximum for Standard Servers is 4 gigabytes (GB), 32 GB for Enterprise Servers with 32-bit systems, and 64 GB for 64-bit systems. Datacenter Server requirements are significantly higher: the minimum is 512 MB; the maximum is 64 GB for Datacenter Servers with 32-bit systems, and 128 GB for 64-bit systems.
Hard drive The hard drive should provide 1.5 GB of available space for a 32-bit system. 64-bit systems require 2 GB. These figures represent the hard drive space for the operating system only and do not include memory for swap space, applications, potential local user profiles, and local user data.
CD-ROM drive The recommended minimum speed for the CD-ROM or DVD drive is 12x. If the installation is performed via the network, no CD-ROM drive is necessary.
Network At least one available network adapter is required to install Windows Server 2003.
Input devices A keyboard and a mouse are usually required to install the operating system.
Output device A monitor with a minimum resolution of 640x480 pixels should be connected to the server. The recommended minimum resolution is 800x600 pixels.
If you use hardware components only from the hardware compatibility list (HCL), your chances of obtaining a fully functional system improve markedly. The updated list is available on the Internet at http://www.microsoft.com/hcl.
During the installation of Windows Servers 2003, you will be prompted to select the desired file system. We strongly recommend the NTFS file system. It includes the following important options that set it apart from other file systems, such as FAT or FAT32:
File-level and folder-level securityAccess to files and folders can be strictly controlled via NTFS.
Compression NTFS allows compression of hard drive partitions and files, thus reducing space requirements for data on the hard drive. However, compression does require additional system capacity and should not be used on terminal servers.
Quotas Allocates a maximum amount of space per user on selected hard- drive partitions.
Remote storage and mounting partitions to folders These features are supported only under Windows Server 2003, although Microsoft Windows 2000 did support them to a very limited extent.
| Note |
A local hard drive formatted with NTFS can be accessed only by systems running Microsoft Windows NT, Windows 2000, Windows XP Professional, or Windows Server 2003. Due to the new NTFS properties for Windows Server 2003, there could be incompatibilities in handling the file system using older tools, for example, imaging and cloning programs. |
In addition to selecting the file system, during installation you also need to decide whether to join a Windows domain or a workgroup. If you decide to join an existing domain, you need a domain name and an account for the server you want to install. The former can be obtained from the administrator of the domain name system (DNS), the latter from the domain administrator. You need both before you can install your new system. You can generate a domain name and a server account during installation only if you have domain administrator rights. (See also Chapter 4.)
| Note |
To join a domain, you need to make sure that a domain controller is available and that a server with DNS service is activated on your network. In principle, a terminal server running Windows Server 2003 works just as well in an NT4 domain. |
If you are on a small network that has no domain or if you prefer to join the domain later, you can join a workgroup. You can select the name of an existing workgroup or create a new workgroup.
Before you install the server, you should also decide on a password for the local administrator account. The password should conform to general security guidelines to protect your server from potential attacks right from the start. If you enter a noncompliant password, a corresponding message will appear. If you leave the password blank, you will not be able to access the server later using Terminal Services from a remote client.
Windows Server 2003 can be installed from CD-ROM or via the network.
The Windows Server 2003 operating system is delivered with all necessary components on one CD-ROM. There are four different installation methods, depending on the current configuration, Boot from a bootable CD-ROM drive. The computer system must have the corresponding hardware to support this option.
Create installation disks and use them to reboot the system. In addition to a disk drive and a hard drive, you need a CD-ROM drive supported by the drivers on the startup disks.
Manually execute the Winnt.exe or Winnt32.exe installation program on the CD-ROM using an existing operating system.
If the CD-ROM drive is incompatible with Windows Server 2003, copy the installation directory to the hard drive using another operating system. Then manually execute the Winnt.exe or Winnt32.exe installation program from the hard drive.
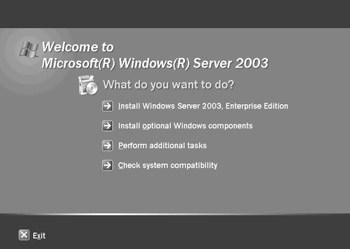
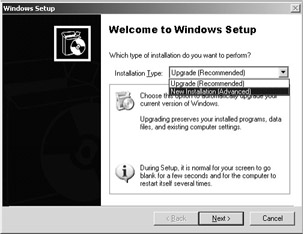
Figure 2-1: The startup screen for installing Windows Server 2003 on an existing 32-bit Windows operating system.
Windows Server 2003 can be directly installed over the network. This option is especially appealing for corporate environments in which software is distributed via central file servers.
Three requirements must be met for a network installation to work:
The distribution server uses the same files as the i386 folder on the CD-ROM to install the 32-bit version of the operating system. The 64-bit version requires access to the ia64 folder.
There must be sufficient memory on the local hard drive of the target computer.
The target computer must have network software installed that allows access to the distribution server.
After connecting to the distribution server, you only need to run the Winnt.exe installation program on the target platform. Winnt.exe generates a temporary folder called $Win_nt$.~ls on the target platform. Installation files are copied to this folder. The local computer is then rebooted and the installation executes from the temporary folder.
| Tip |
The Microsoft Windows Pre-installation Environment allows a client to connect to a distribution server. As this book was being written, Microsoft announced the coming release of the Automated Deployment Service tool, which will support the rollout of new servers. Further information is located at http://www.microsoft.com/windowsserver2003/techinfo/overview/ads.mspx. |
Windows Server 2003 has two installation programs. Each is linked to a different type of existing infrastructure:
Winnt Local or network-based new installation executable under MS-DOS, Windows 3.1, or Windows for Workgroups.
Winnt32 Update for Windows 95, Windows 98, Windows Millennium Edition, Windows NT, Windows 2000, Windows XP, or Windows Server 2003.
The behavior of the Winnt.exe installation program can be modified using arguments and parameters. The syntax of the Winnt command is described in Table 2-1.
|
Arguments |
Description |
|---|---|
|
/a |
Activates accessibility options. |
|
/c[:Command] |
Defines a command to be executed after the graphics-mode portion of the installation is finished. |
|
/r[:Folder] |
Creates an additional, optional folder in the Windows installation folder. The /r argument can be used several times to create multiple folders. They will not be deleted after the installation is complete. |
|
/rx[:Folder] |
Creates an additional, optional folder in the Windows installation folder. The folder is deleted after the installation is complete. |
|
/s:Source |
Specifies the location of the system files for installation. The full path in the form of x:[\Folder] or \\Server\Share[\Folder] must be specified. The current folder is the default path. |
|
/t[:Tempdrive] |
Instructs Setup to save the temporary files on the specified drive and to install Windows Server 2003 there. If no drive is given, Setup will try to find one. |
|
/u[:Answerfile] |
Performs an unattended installation using an answer file (requires /s). The answer file contains the answers to some or all of the prompts that the user normally responds to during installation. |
|
/udf:Identifier[,UDF file] |
Indicates an identifier that Setup uses to specify how a UDB file (uniqueness database file) modifies the answer file. (See /u.) The /udf parameter overwrites values in the answer file, and the identifier determines which values in the UDB file are used. If no UDB file exists, Setup prompts the user to insert a disk containing a file called $Unique$.udb. |
The behavior of the Winnt32.exe installation program can also be modified using arguments and parameters. However, the Winnt32 command syntax is much more complex than that in Winnt, as you can see from Table 2-2.
|
Arguments |
Description |
|---|---|
|
/checkupgradeonly |
Checks if the computer is compatible for upgrade to Windows Server 2003. For Windows 95 or Windows 98 upgrades, Setup generates a report file called Upgrade.txt in the Windows installation folder. For Windows NT 4.0 or Windows 2000 upgrades, Setup saves this report in Winnt32.log in the installation directory. |
|
/cmd:Commandline |
Instructs Setup to execute a certain command before its final phase, that is, after the second reboot of the computer and after Setup has collected the necessary configuration data, but before Setup is complete. |
|
/cmdcons |
Installs additional files and adds the recovery console option for repairing a damaged system to the OS selection screen. Used only after Setup is complete. |
|
/copydir:{i386\ia64]\ Folder |
Creates an additional folder in the folder that contains the Windows Server 2003 system files. The folder can include site or company-specific data or drivers. For example, to create the folder Private_Drivers on a 32-bit system, you would type: /copydir:i386\Private_Drivers. The argument /copydir can be used several times to generate multiple new folders in the system root. |
|
/copysource:Folder |
Creates an additional folder in the folder that contains the Windows Server 2003 system files. Setup can use this folder and its files for configuration. In contrast to the folders /copydir creates, /copysource folders are deleted after Setup is complete. |
|
/debug [Level]:[Filename] |
Generates a debug log on the level specified, for example, /debug4:C:\Win2000.log. The standard log file is C:\%Systemroot%\Winnt32.log and the debug level is 2. The log levels are defined as follows: 0: Severe errors 1: Errors 2: Warnings 3: Information 4: Detailed information about debugging Each level includes the levels below it. |
|
/dudisable |
Prevents execution of Dynamic Update. Only original installation files are used, even if an answer file specifies Dynamic Update. |
|
/duprepare:Foldername |
Prepares an installation folder on a network share for Dynamic Update files from the Windows Update site. The share can then be used for multiple clients. |
|
/dushare:Foldername |
Specifies a common resource (for example, folder share in the network) where the files for Dynamic Update are located. They were previously created using the /duprepare argument. |
|
/emsport:{com1\com2 \ usebiossettings\off} |
Activates or deactivates Emergency Management Service (EMS) during and after the installation. This service allows remote server access in critical situations via the port specified. EMS is typically needed when a local keyboard, mouse, or monitor is required but not available. EMS requires special hardware and is available only under Windows Server 2003. |
|
/emsbaudrate:Baudrate |
Specifies the data transmission rate for EMS communication (9600, 19200, 57600, or 115200). This argument can be used only in combination with /emsport:com1 or /emsport:com2. |
|
/m:Folder |
Specifies Setup to copy replacement files from an alternate location. Instructs Setup to look in the alternate location first, and if files are present, to use them instead of the files from the default location. |
|
/makelocalsource |
Instructs Setup to copy all source files onto the local hard drive for installation. This ensures access to installation files even if the CD-ROM is not available for the rest of the installation. |
|
/noreboot |
Instructs Setup not to reboot the computer after Winnt32 has completed the file copy phase so that another command can be executed. |
|
/s:Source |
Specifies the source of system files for the installation. Several /s sources can be specified to simultaneously copy files from several servers. If multiple /s arguments are used, the first server listed must be available. Otherwise, Setup cannot run. |
|
/syspart:Drive |
Specifies that the Setup startup files can be copied to a hard drive, the hard drive marked active, and files ready to install on another computer. That computer starts with the next phase of Setup. The /syspart parameter must always be used in combination with the /tempdrive parameter. The /syspart argument for Winnt32.exe can be executed only on a computer that is already running Windows NT 4.0, Windows 2000, or Windows Server 2003. It cannot be executed under Windows 9x. |
|
/tempdrive:Drive |
Instructs Setup to store temporary files on the partition specified and to install Windows Server 2003 on this partition. |
|
/udf:id[,UDB file] |
Identifies an ID that Setup uses to specify how a UDB (uniqueness database) file modifies an answer file. (See /unattend.) The UDB overwrites information in the answer file. The ID determines which values are used in the UDB. For instance, /udf:RAS_User,Company.udb overwrites settings specified for the RAS_UserID located in the Unsere_Firma.udb folder. If no UDB file is specified, Setup prompts the user to insert a disk containing the $Unique$.udb file. |
|
/unattend |
Updates earlier versions of Windows Server 2003, Windows 2000, or Windows 4.0 from Service Pack 5 in unattended Setup mode. All user settings are taken from the previous installation so that Setup can be executed without user interaction. |
|
/unattend [Number]:[Answerfile] |
Performs a reinstallation in unattended Setup mode. This works with computers running Windows 98, Windows Millennium Edition, Windows NT, Windows 2000, Windows XP, or Windows Server 2003. Setup imports the user-specific information from the answer file. Number is the number of seconds between the end of the file copy process and reboot by Setup. Answerfile is the file name of the answer file. The default answer file is Unattend.txt. |
One of the most striking improvements to Windows Server 2003 is automated installation via scripts. The setup manager wizard simplifies script generation for customer-specific installations. It is no longer necessary to learn complex script syntax to automatically set up the operating system according to set requirements.
Unattended installation of a basic system is based on Remote Installation Services (RIS). The target platform for the server installation connects with an RIS server during the initial startup phase. The RIS server has all the source files and automation data. In contrast to a network installation using Winnt.exe, you do not need any knowledge of source files’ physical memory, and you might not even have to complete any dialog boxes. A RIS server can provide several operating systems in different sizes. For example, you can save both the minimum configuration of Windows Server 2003 on the RIS server and, in parallel, a special Windows Server 2003 configuration in application server mode.
Both Windows Server 2003 installation images can be made available for all users of a network for new installs. It is, however, more reasonable to limit access to administrators through adjusting the corresponding NTFS security settings for the answer file on the RIS server.
An operating system can take many forms on an RIS server. For instance, it is possible to install the Windows Server 2003 minimum configuration and, in parallel, a special Windows Server 2003 configuration in application mode. The images of both Windows Server 2003 installations can then be provided to all network users. However, it would make more sense to limit this option to administrators by selecting certain NTFS security settings concerning the answer file on the RIS server.
What are the necessary steps to set up an environment for an unattended installation?
Install remote installation services on a network server.
Configure the optional components and applications to be installed on the target platforms. An answer file for the automatic installation is also generated.
The images of the different configurations are stored on the RIS server.
The target platform connects to the RIS server via a PXE-capable network adapter or a startup disk created using RIS.
The operating system is installed on the target platform with little or no interaction from an authorized user.
With the help of scripts and answer files, you can control the amount of interaction needed during installation. The setup manager wizard plays a key role in this task. It allows you to generate or modify answer files for Windows Server 2003.
You can, of course, continue to use answer files that you created or adapted with a standard text editor. For this purpose, a template file called Unattend.txt is located in the i386 folder of the installation CD-ROM. To install Terminal Services in application server mode, you need to add the following lines to the answer file:
[Components]
TerminalServer = On
You can also configure Terminal Services by entering the following lines in the [TerminalServices] section of the Unattend.txt answer file. Table 2-3 lists the corresponding options.
|
[TerminalServices] Settings |
Description |
|---|---|
|
AllowConnections |
Specifies whether clients on the network can access the terminal server. 0: Remote desktop deactivated (default setting) |
|
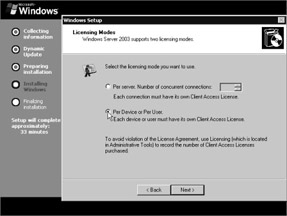
LicensingMode |
Specifies how Terminal Services handles client access licenses (CAL). PerDevice: Configures the terminal server so that each connected device requires a valid CAL for the terminal server (default setting). PerUser: Configures Terminal Services so that it supplies a valid CAL for each active user. |
|
PermissionsSetting |
Allows the selection of security settings for users of terminal server sessions. 0: Sets the permission compatibility in line with the Windows 2000 or Windows Server 2003 security guidelines. Some applications that were originally developed for Windows NT 4.0 or older operating systems might not function properly in this mode (default setting). 1: Sets the permission compatibility in line with Windows NT 4.0 security policies. Users are granted access to critical areas of the registry database. |
The following lines might appear in an answer file:
[Components]
TerminalServer = On
...
[TerminalServices]
AllowConnections = 1
LicensingMode = PerDevice
PermissionsSettings = 0
To further automate the installation, you can use the Sysprep.exe tool. It duplicates the operating system and applications already installed on a reference platform. However, it is important that the target devices have the same hardware configuration as the reference device.
The objective of the Windows Server 2003 installation process is to load the operating system to the target platform so that, by that time the installation is complete, the entire system is completely functional. In particular, that means that all the different motherboards, chip sets, hard drive controllers, USP ports, graphics cards, and network adapters should support the conventional hardware. To further complicate matters, processors are made by a number of manufacturers. There are different system busses. Moreover, you are able to select any number of options for the individual components of the operating system. Therefore, to simplify the overall installation process, it is divided into several easily identifiable phases.
The preparation phase is needed only if you start the installation from another operating system. This is when you can update or newly install Windows Server 2003, perform additional tasks, or verify system compatibility. The licensing agreement and license key query follow, as well as setting further options such as the source directory, accessibility options, language, or dynamic update. The preparation phase is omitted if you boot the target computer directly from boot disks or the installation CD-ROM. At the end of this phase, files are copied to a temporary area and the system reboots.
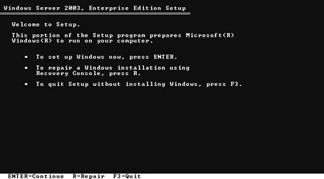
The text-based phase loads the operating system’s kernel, as well as a number of drivers, but it does not launch the graphical user interface. From the welcome screen, you can choose to continue with the installation, repair a damaged installation, or abort.
| Note |
At the beginning of the text-based phase, you can press F6 to load a hard-drive subsystems driver that is not part of the standard scope of installation files. If you want to use an alternate hardware abstraction layer (HAL), press F5. To start Automated System Recovery, press F2 when prompted on the F6 screen. |
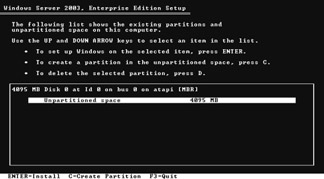
After the welcome screen is displayed, the hard drives are checked and the licensing agreement appears. Next, the system is checked for previous versions of Windows NT, Windows 2000, or Windows Server 2003. Then, all the hard drives are listed with their partitions. You select the partition (existing or new) where you want to install the operating system files and the installation proceeds automatically. One new feature of Windows Server 2003 is quick formatting of empty areas of the hard drive, which really reduces installation time.
| Note |
It is usually a good idea to install Windows Server 2003 on a newly formatted partition. Thus, you will have a clean system with no old versions of executable programs or DLLs. NTFS is recommended for formatting the file system. |
After selecting and preparing the target partition, the installation process creates a list of files that are then copied into an installation directory. Finally, the initial configuration of Windows Server 2003 is created and saved. Now the graphics-based phase of the installation begins.
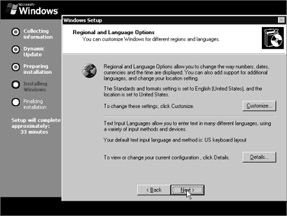
Graphical dialog boxes guide you through the following steps. The dialog boxes help with the intricacies of hardware recognition and setting regional and language options (numbers, currency, time, and keyboard layout, if not already defined).
You then enter the user name, the company, and the license key, if you did not already do so during the preparation phase. Subsequently, you select the licensing mode and computer name, and choose a password for the administrator account.
The following dialog boxes allow you to set the date and time as well as configure the network. This includes optionally configuring the client for Microsoft networks, file and printer release, and the TCP/IP protocol. After you select a domain or workgroup, a few closing tasks remain: set up the start menu, register all components, save all settings, and delete all temporary files. The Windows Server 2003 installation is now complete and it is time to reboot the system.
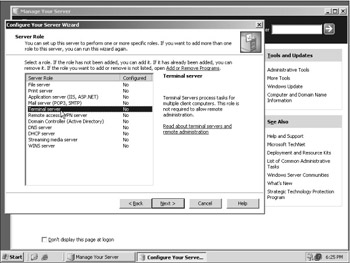
When you first log on as administrator, the server configuration dialog box is displayed. You can add more server functions (listed in Table 2-4) with the help of the server configuration wizard. This is essential to the terminal server function described in this book, which requires the special setup of an application server. The remote administration option is included in the standard functions of Windows Servers 2003 and does not need to be specifically installed.
After all the desired options are selected, the server configuration wizard installs the required files and components. The computer might also reboot. The installation and basic configuration is now complete.
The Windows Servers 2003 Help pages provide further information on Terminal Services, including checklists for setup, recommendations for use, notes on administration, and troubleshooting instructions.
Several critical framework conditions must be met during installation.
The installation partition must be formatted with NTFS. Otherwise, the security settings for the file system cannot be established.
Do not install graphical screensavers on a terminal server. They consume too much CPU even if the graphical elements are minimal.
Avoid intricate wallpaper or desktop designs (themes). They need to be restarted every time you resize the window, and on terminal servers, this leads to an increased net load.
For the most part, it is advisable to install Windows Server 2003 on a clean, suitable hardware platform. It is, however, also possible to upgrade a Windows NT or Windows 2000 installation. The prerequisites for an upgrade follow.
Standard Server
Windows NT 4.0, Terminal Server Edition, with Service Pack 5 or later
Windows 2000 Server on a computer with one or two processors
Enterprise Server